
This guide covers the installation of the EGR Valve Cooler Delete Kit Black Off Plate for 2011-2016 LML 6.6L Duramax GMC Chevy 2500HD 3500HD.
Warning
CAUTION!!! Never work on a hot vehicle. Serious injury in the form of burns can result if the vehicle has been in use. Allow vehicle time to cool prior to installation. Always wear eye protection when working on or under any vehicle.
Note: When working on a used vehicle, we suggest using a penetrating spray lubricant to be applied liberally to all exhaust fasteners. When doing so, allow a significant amount of time for the chemicals to lubricate the threads before attempting to disassemble.
Tools Required
- Sockets and wrenches for the M8 and M10 hex head bolts
- Penetrating spray lubricant
- Coolant drain pan
- Clean rag to plug the intake port
- Eye protection
Installation Procedure
-
Step 1:
Disconnect the negative battery cables from both batteries. -
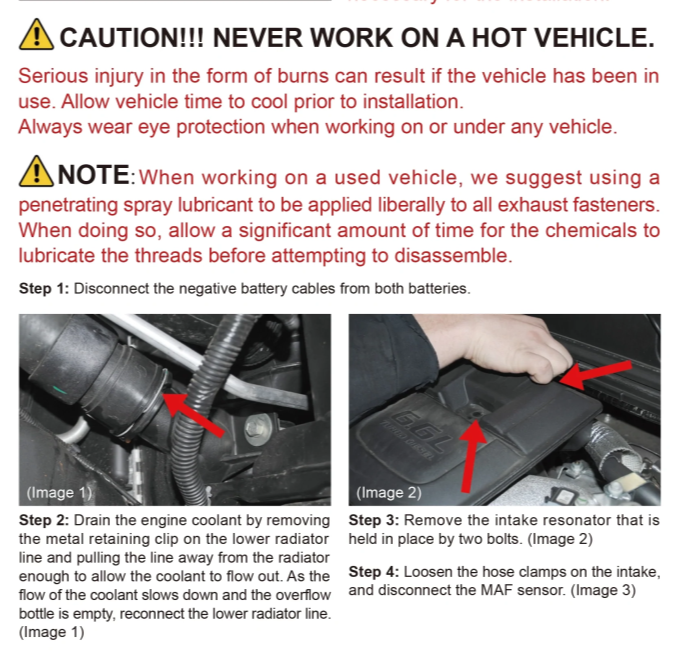
Step 2:
Drain the engine coolant by removing the metal retaining clip on the lower radiator line and pulling the line away from the radiator enough to allow the coolant to flow out. As the flow of the coolant slows down and the overflow bottle is empty, reconnect the lower radiator line. (Image 1) -
Step 3:
Remove the intake resonator that is held in place by two bolts. (Image 2) -
Step 4:
Loosen the hose clamps on the intake, and disconnect the MAF sensor. (Image 3) -
Step 5:
Remove the intake tube, air box, and air filter from the vehicle. -
Step 6:
Remove the electrical connectors on the plastic intercooler tubing and the electrical connector on the throttle valve. -
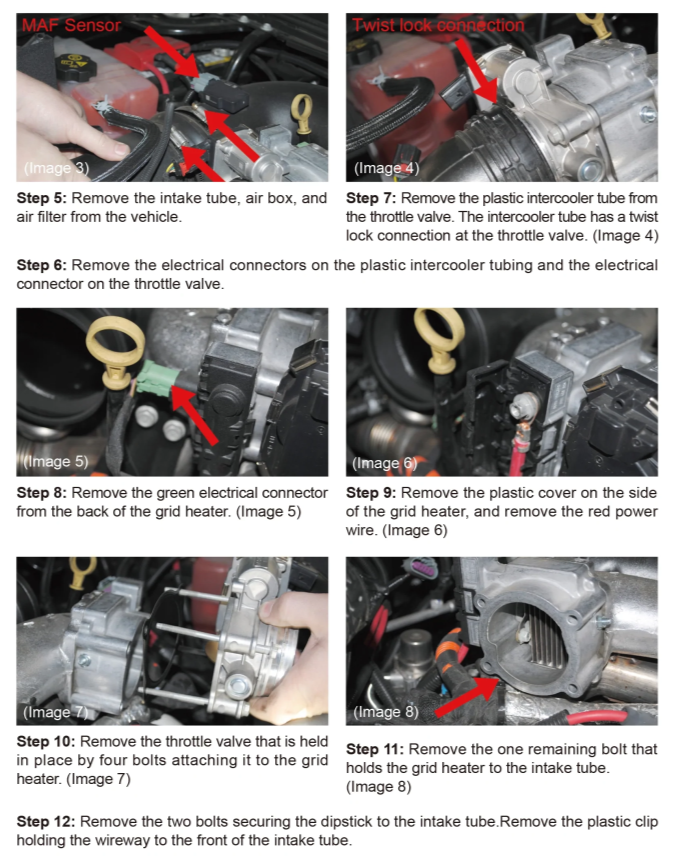
Step 7:
Remove the plastic intercooler tube from the throttle valve. The intercooler tube has a twist lock connection at the throttle valve. (Image 4) -
Step 8:
Remove the green electrical connector from the back of the grid heater. (Image 5) -
Step 9:
Remove the plastic cover on the side of the grid heater, and remove the red power wire. (Image 6) -
Step 10:
Remove the throttle valve that is held in place by four bolts attaching it to the grid heater. (Image 7) -
Step 11:
Remove the one remaining bolt that holds the grid heater to the intake tube. (Image 8) -
Step 12:
Remove the two bolts securing the dipstick to the intake tube. Remove the plastic clip holding the wireway to the front of the intake tube. -
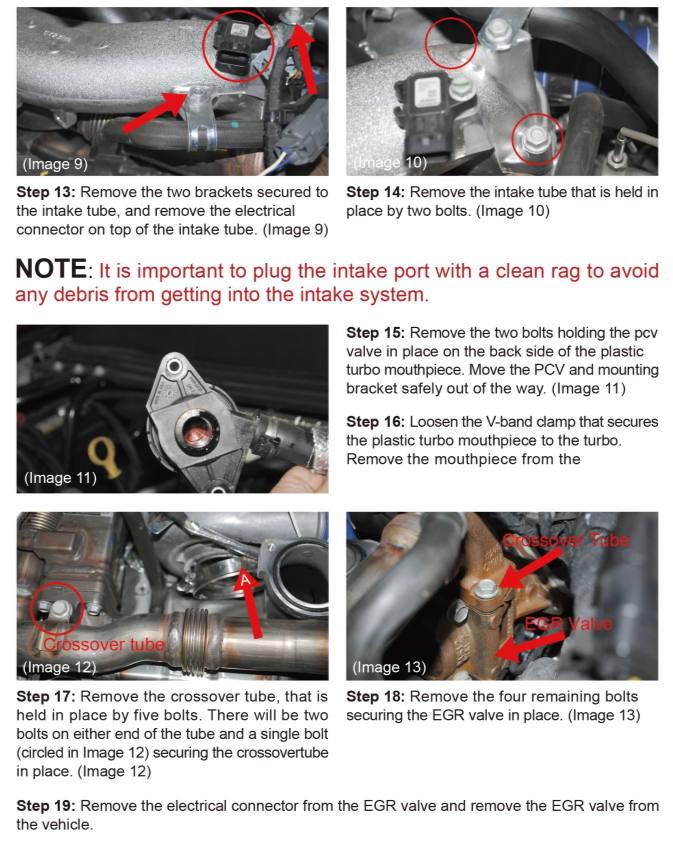
Step 13:
Remove the two brackets secured to the intake tube, and remove the electrical connector on top of the intake tube. (Image 9) -
Step 14:
Remove the intake tube that is held in place by two bolts. (Image 10)
NOTE: It is important to plug the intake port with a clean rag to avoid any debris from getting into the intake system. -
Step 15:
Remove the two bolts holding the PCV valve in place on the back side of the plastic turbo mouthpiece. Move the PCV and mounting bracket safely out of the way. (Image 11) -
Step 16:
Loosen the V-band clamp that secures the plastic turbo mouthpiece to the turbo. Remove the mouthpiece from the -
Step 17:
Remove the crossover tube, that is held in place by five bolts. There will be two bolts on either end of the tube and a single bolt (circled in Image 12) securing the crossover tube in place. (Image 12) -
Step 18:
Remove the four remaining bolts securing the EGR valve in place. (Image 13) -
Step 19:
Remove the electrical connector from the EGR valve and remove the EGR valve from the vehicle. -
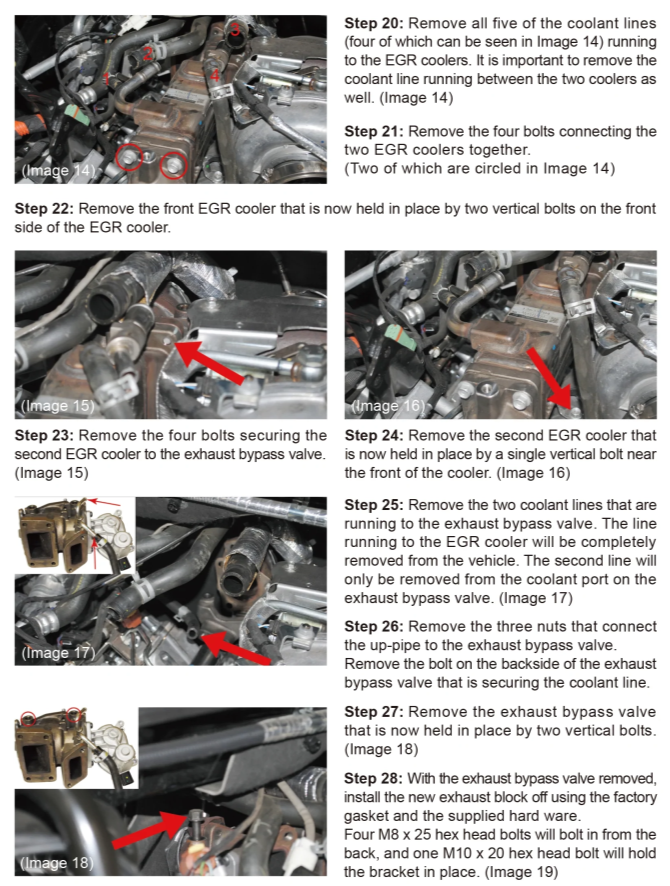
Step 20:
Remove all five of the coolant lines (four of which can be seen in Image 14) running to the EGR coolers. It is important to remove the coolant line running between the two coolers as well. (Image 14) -
Step 21:
Remove the four bolts connecting the two EGR coolers together. (Two of which are circled in Image 14) -
Step 22:
Remove the front EGR cooler that is now held in place by two vertical bolts on the front side of the EGR cooler. -
Step 23:
Remove the four bolts securing the second EGR cooler to the exhaust bypass valve. (Image 15) -
Step 24:
Remove the second EGR cooler that is now held in place by a single vertical bolt near the front of the cooler. (Image 16) -
Step 25:
Remove the two coolant lines that are running to the exhaust bypass valve. The line running to the EGR cooler will be completely removed from the vehicle. The second line will only be removed from the coolant port on the exhaust bypass valve. (Image 17) -
Step 26:
Remove the three nuts that connect the up-pipe to the exhaust bypass valve. Remove the bolt on the backside of the exhaust bypass valve that is securing the coolant line. -
Step 27:
Remove the exhaust bypass valve that is now held in place by two vertical bolts. (Image 18) -
Step 28:
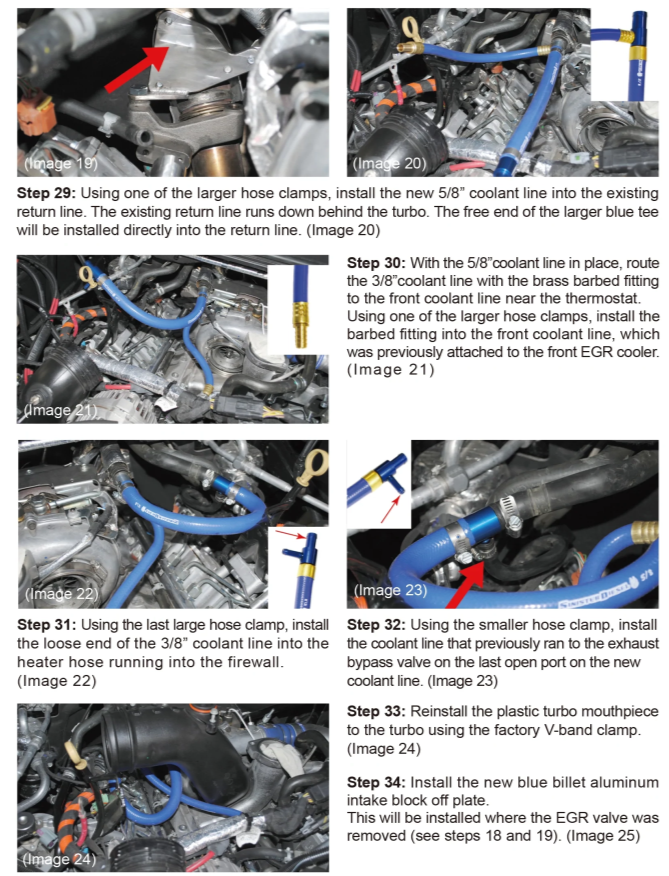
With the exhaust bypass valve removed, install the new exhaust block off using the factory gasket and the supplied hardware. Four M8 x 25 hex head bolts will bolt in from the back, and one M10 x 20 hex head bolt will hold the bracket in place. (Image 19) -
Step 29:
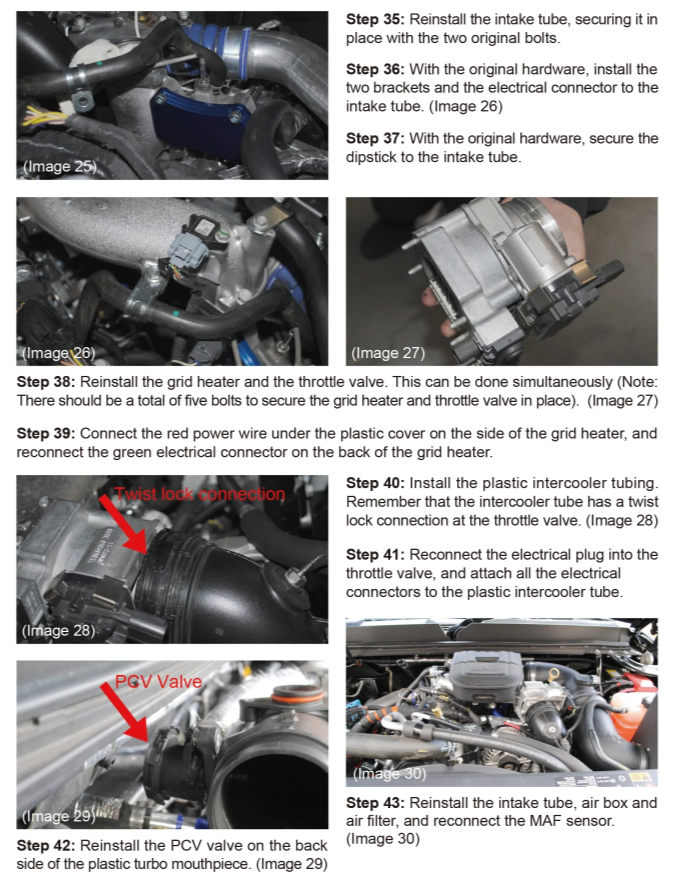
Using one of the larger hose clamps, install the new 5/8" coolant line into the existing return line. The existing return line runs down behind the turbo. The free end of the larger blue tee will be installed directly into the return line. (Image 20) -
Step 30:
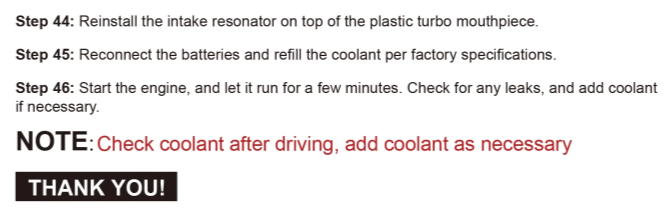
With the 5/8" coolant line in place, route the 3/8" coolant line with the brass barbed fitting to the front coolant line near the thermostat. Using one of the larger hose clamps, install the barbed fitting into the front coolant line, which was previously attached to the front EGR cooler. (Image 21) -
Step 31:
Using the last large hose clamp, install the loose end of the 3/8" coolant line into the heater hose running into the firewall. (Image 22) -
Step 32:
Using the smaller hose clamp, install the coolant line that previously ran to the exhaust bypass valve on the last open port on the new coolant line. (Image 23) -
Step 33:
Reinstall the plastic turbo mouthpiece to the turbo using the factory V-band clamp. (Image 24) -
Step 34:
Install the new blue billet aluminum intake block off plate. This will be installed where the EGR valve was removed (see steps 18 and 19). (Image 25) -
Step 35:
Reinstall the intake tube, securing it in place with the two original bolts. -
Step 36:
With the original hardware, install the two brackets and the electrical connector to the intake tube. (Image 26) -
Step 37:
With the original hardware, secure the dipstick to the intake tube. -
Step 38:
Reinstall the grid heater and the throttle valve. This can be done simultaneously (Note: There should be a total of five bolts to secure the grid heater and throttle valve in place). (Image 27) -
Step 39:
Connect the red power wire under the plastic cover on the side of the grid heater, and reconnect the green electrical connector on the back of the grid heater. -
Step 40:
Install the plastic intercooler tubing. Remember that the intercooler tube has a twist lock connection at the throttle valve. (Image 28) -
Step 41:
Reconnect the electrical plug into the throttle valve, and attach all the electrical connectors to the plastic intercooler tube. -
Step 42:
Reinstall the PCV valve on the back side of the plastic turbo mouthpiece. (Image 29) -
Step 43:
Reinstall the intake tube, air box and air filter, and reconnect the MAF sensor. (Image 30) -
Step 44:
Reinstall the intake resonator on top of the plastic turbo mouthpiece. -
Step 45:
Reconnect the batteries and refill the coolant per factory specifications. -
Step 46:
Start the engine, and let it run for a few minutes. Check for any leaks, and add coolant if necessary.
NOTE: Check coolant after driving, add coolant as necessary.
THANK YOU!
FAQs
- Q1: What are the benefits of installing a diesel delete kit?
- A1: Installing a diesel delete kit can improve engine performance, increase fuel efficiency, and reduce the risk of engine contamination by eliminating the EGR system.
- Q2: Is an EGR delete 6.6L Duramax legal?
- A2: EGR delete kits are not legal in all regions as they can affect emissions. It’s important to check local regulations before installing an EGR delete 6.6L Duramax kit.
- Q3: How long does it take to install a 6.6L Duramax EGR delete kit?
- A3: Installing a 6.6L Duramax EGR delete kit typically takes 4 to 6 hours, depending on your mechanical experience and the specific vehicle model.