
2008-2010 6.4L Powerstroke EGR Delete Kit Installation Guide
This guide covers the installation of the EGR Delete Kit For 2008-2010 Ford 6.4L Powerstroke Turbo Diesel.
Spelab Racing
YouTube-SPELAB
support@spelabautoparts.com
www.spelabautoparts.com
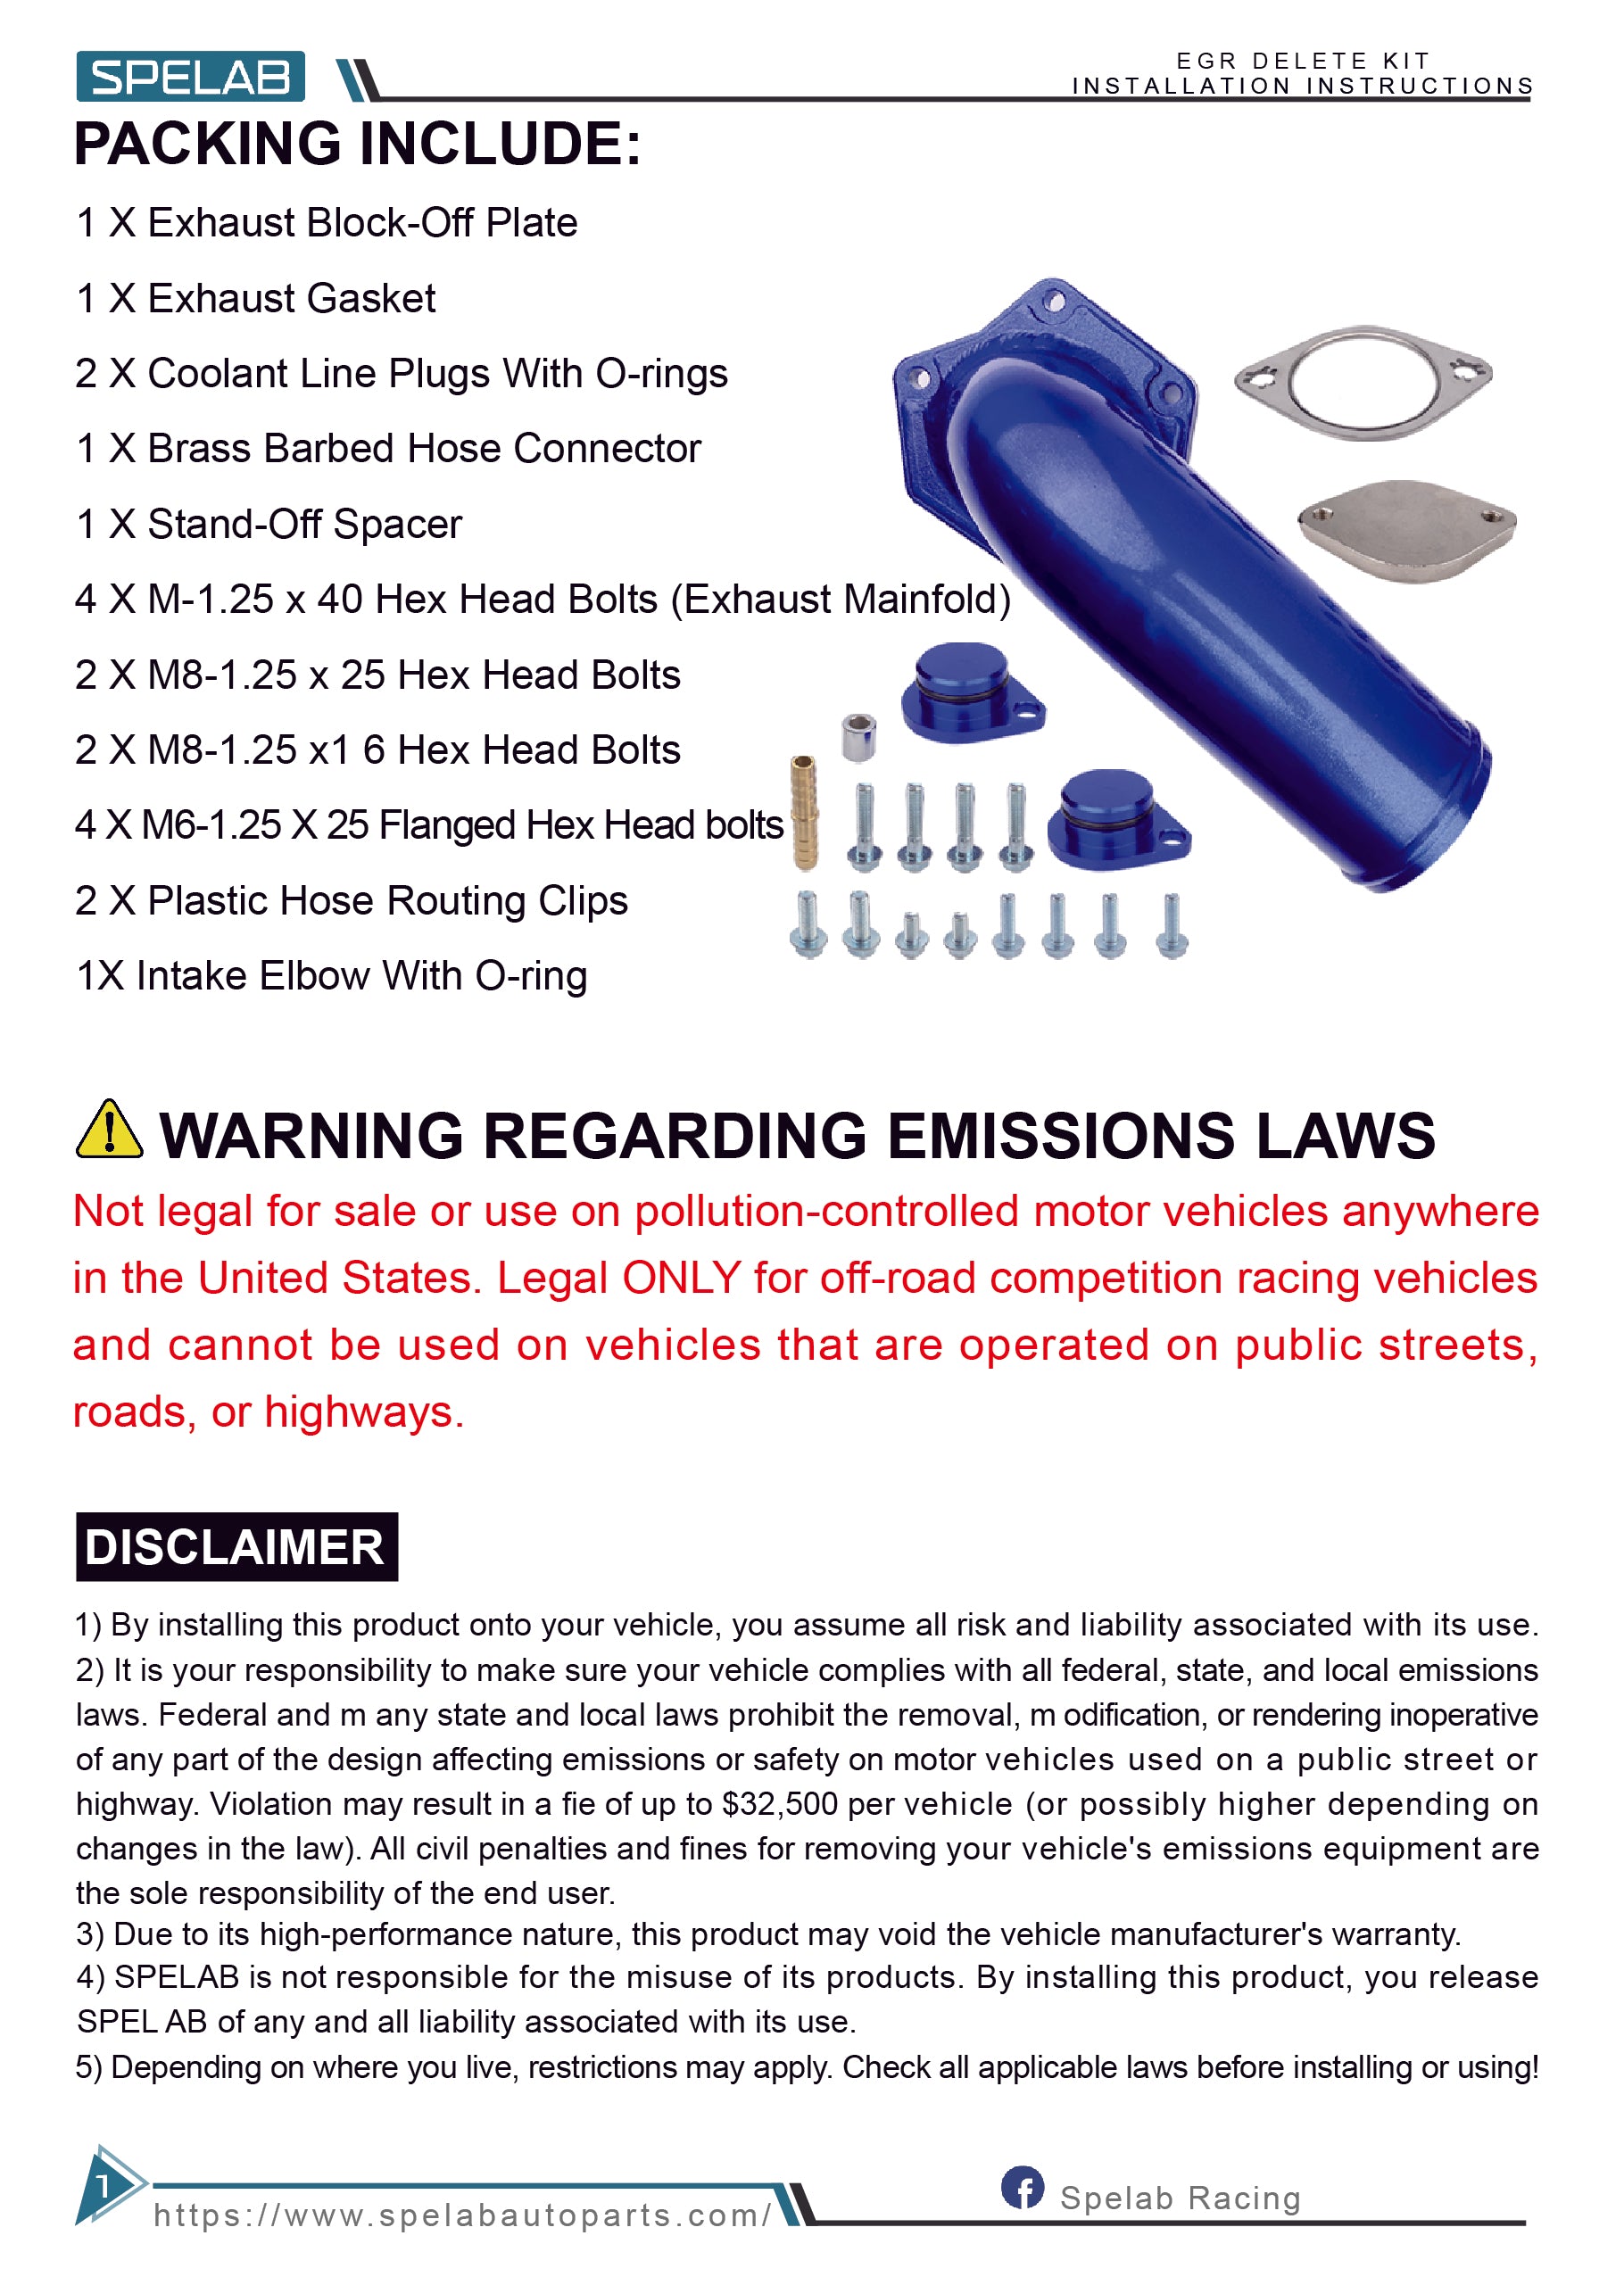
Packing Include
- 1 X Exhaust Block-Off Plate
- 1 X Exhaust Gasket
- 2 X Coolant Line Plugs With O-rings
- 1 X Brass Barbed Hose Connector
- 1 X Stand-Off Spacer
- 4 X M10-1.25 x 40 Hex Head Bolts (Exhaust Manifold)
- 2 X M8-1.25 x 25 Hex Head Bolts
- 2 X M8-1.25 x 16 Hex Head Bolts
- 4 X M6-1.25 x 25 Flanged Hex Head Bolts
- 2 X Plastic Hose Routing Clips
- 1 X Intake Elbow With O-ring
Warning Regarding Emissions Laws
Not legal for sale or use on pollution-controlled motor vehicles anywhere in the United States. Legal ONLY for off-road competition racing vehicles and cannot be used on vehicles that are operated on public streets, roads, or highways.
Disclaimer
- By installing this product onto your vehicle, you assume all risk and liability associated with its use.
- It is your responsibility to make sure your vehicle complies with all federal, state, and local emissions laws. Federal and many state and local laws prohibit the removal, modification, or rendering inoperative of any part of the design affecting emissions or safety on motor vehicles used on a public street or highway. Violation may result in a fine of up to $32,500 per vehicle (or possibly higher depending on changes in the law). All civil penalties and fines for removing your vehicle's emissions equipment are the sole responsibility of the end user.
- Due to its high-performance nature, this product may void the vehicle manufacturer's warranty.
- SPELAB is not responsible for the misuse of its products. By installing this product, you release SPELAB of any and all liability associated with its use.
- Depending on where you live, restrictions may apply. Check all applicable laws before installing or using!
- The purchaser and end-user releases, indemnifies, discharges and holds harmless SPELAB from any and all claims, damages, causes of action, injuries, or expenses resulting from or relating to the use or installation of this product that is in violation of the terms and conditions on this page, the product disclaimer, and/or the product installation instructions. SPELAB will not be liable for any direct, indirect, consequential, exemplary, punitive, statutory, or incidental damages or fines caused by the use.
Tools Required
- 10mm wrench
- 13mm wrench
- Socket set for the M6, M8 and M10 bolts
- Torque wrench, for factory specifications
- Coolant drain pan
- Glass cleaner
Installation Procedure
-
Step 1:
Make sure the front wheels are straight. -
Step 2:
Disconnect both batteries. -
Step 3:
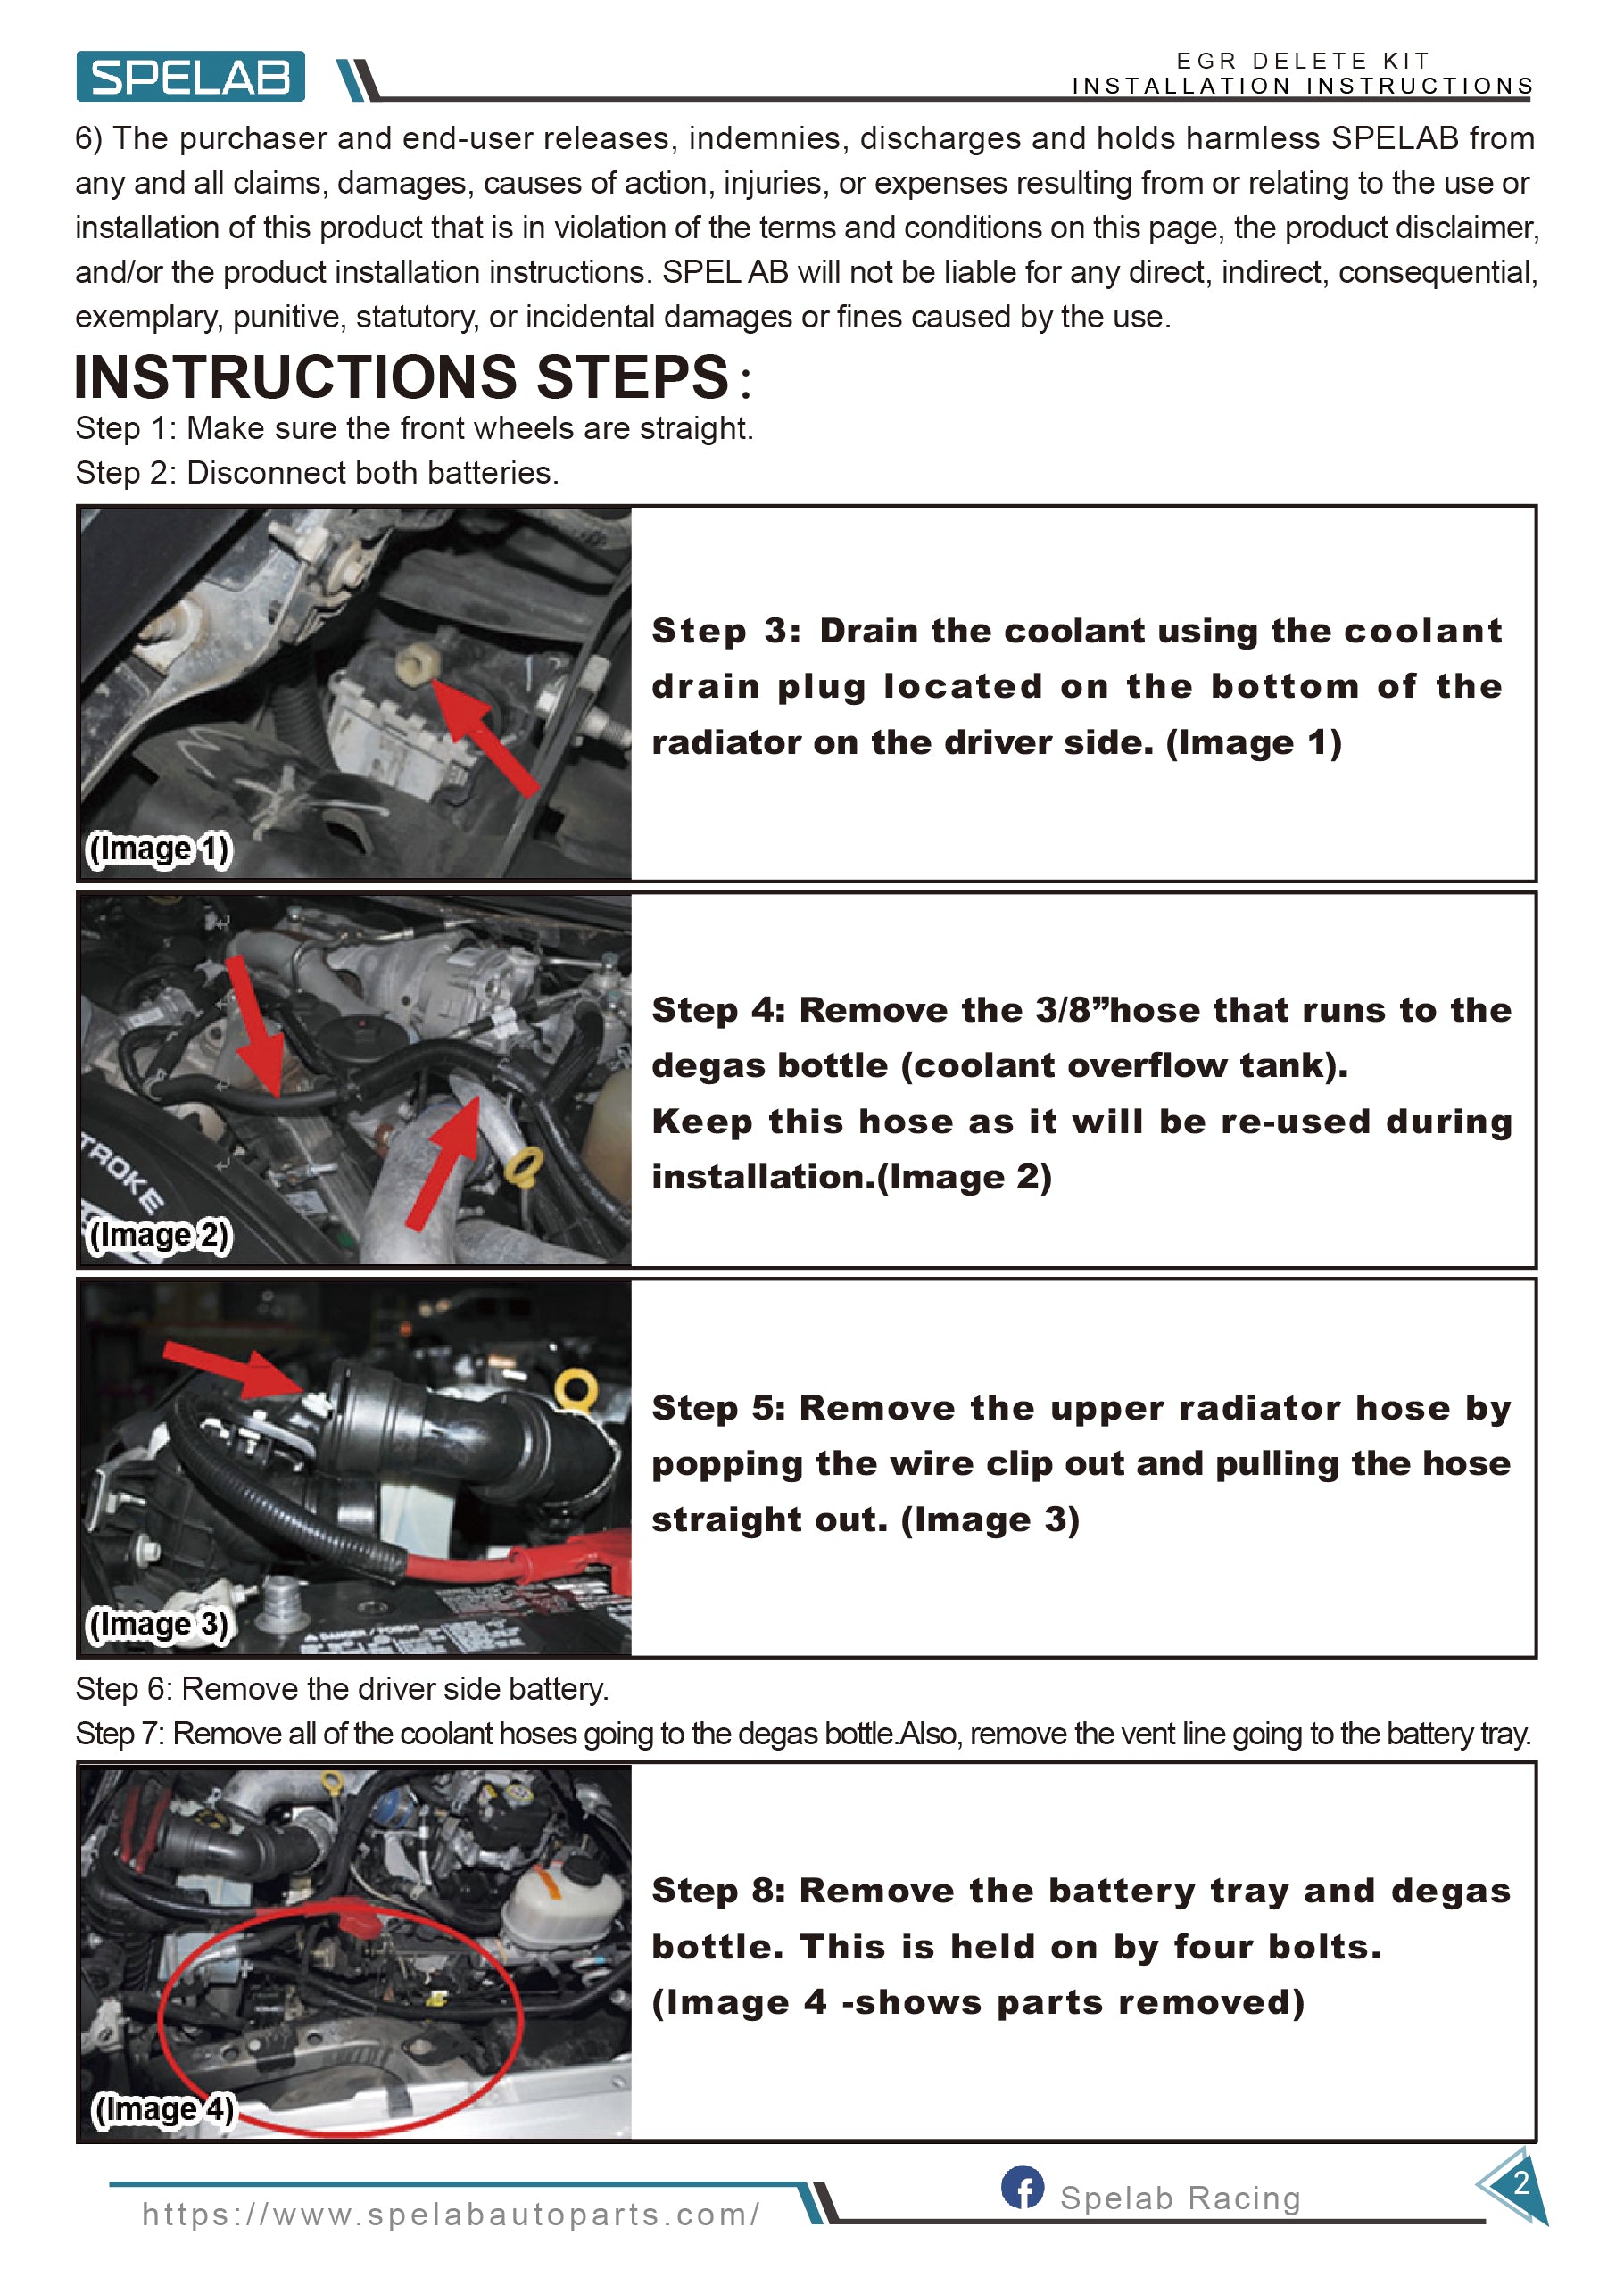
Drain the coolant using the coolant drain plug located on the bottom of the radiator on the driver side. (Image 1) -
Step 4:
Remove the 3/8" hose that runs to the degas bottle (coolant overflow tank). Keep this hose as it will be re-used during installation. (Image 2) -
Step 5:
Remove the upper radiator hose by popping the wire clip out and pulling the hose straight out. (Image 3) -
Step 6:
Remove the driver side battery. -
Step 7:
Remove all of the coolant hoses going to the degas bottle. Also, remove the vent line going to the battery tray. -
Step 8:
Remove the battery tray and degas bottle. This is held on by four bolts. (Image 4 - shows parts removed) -
Step 9:
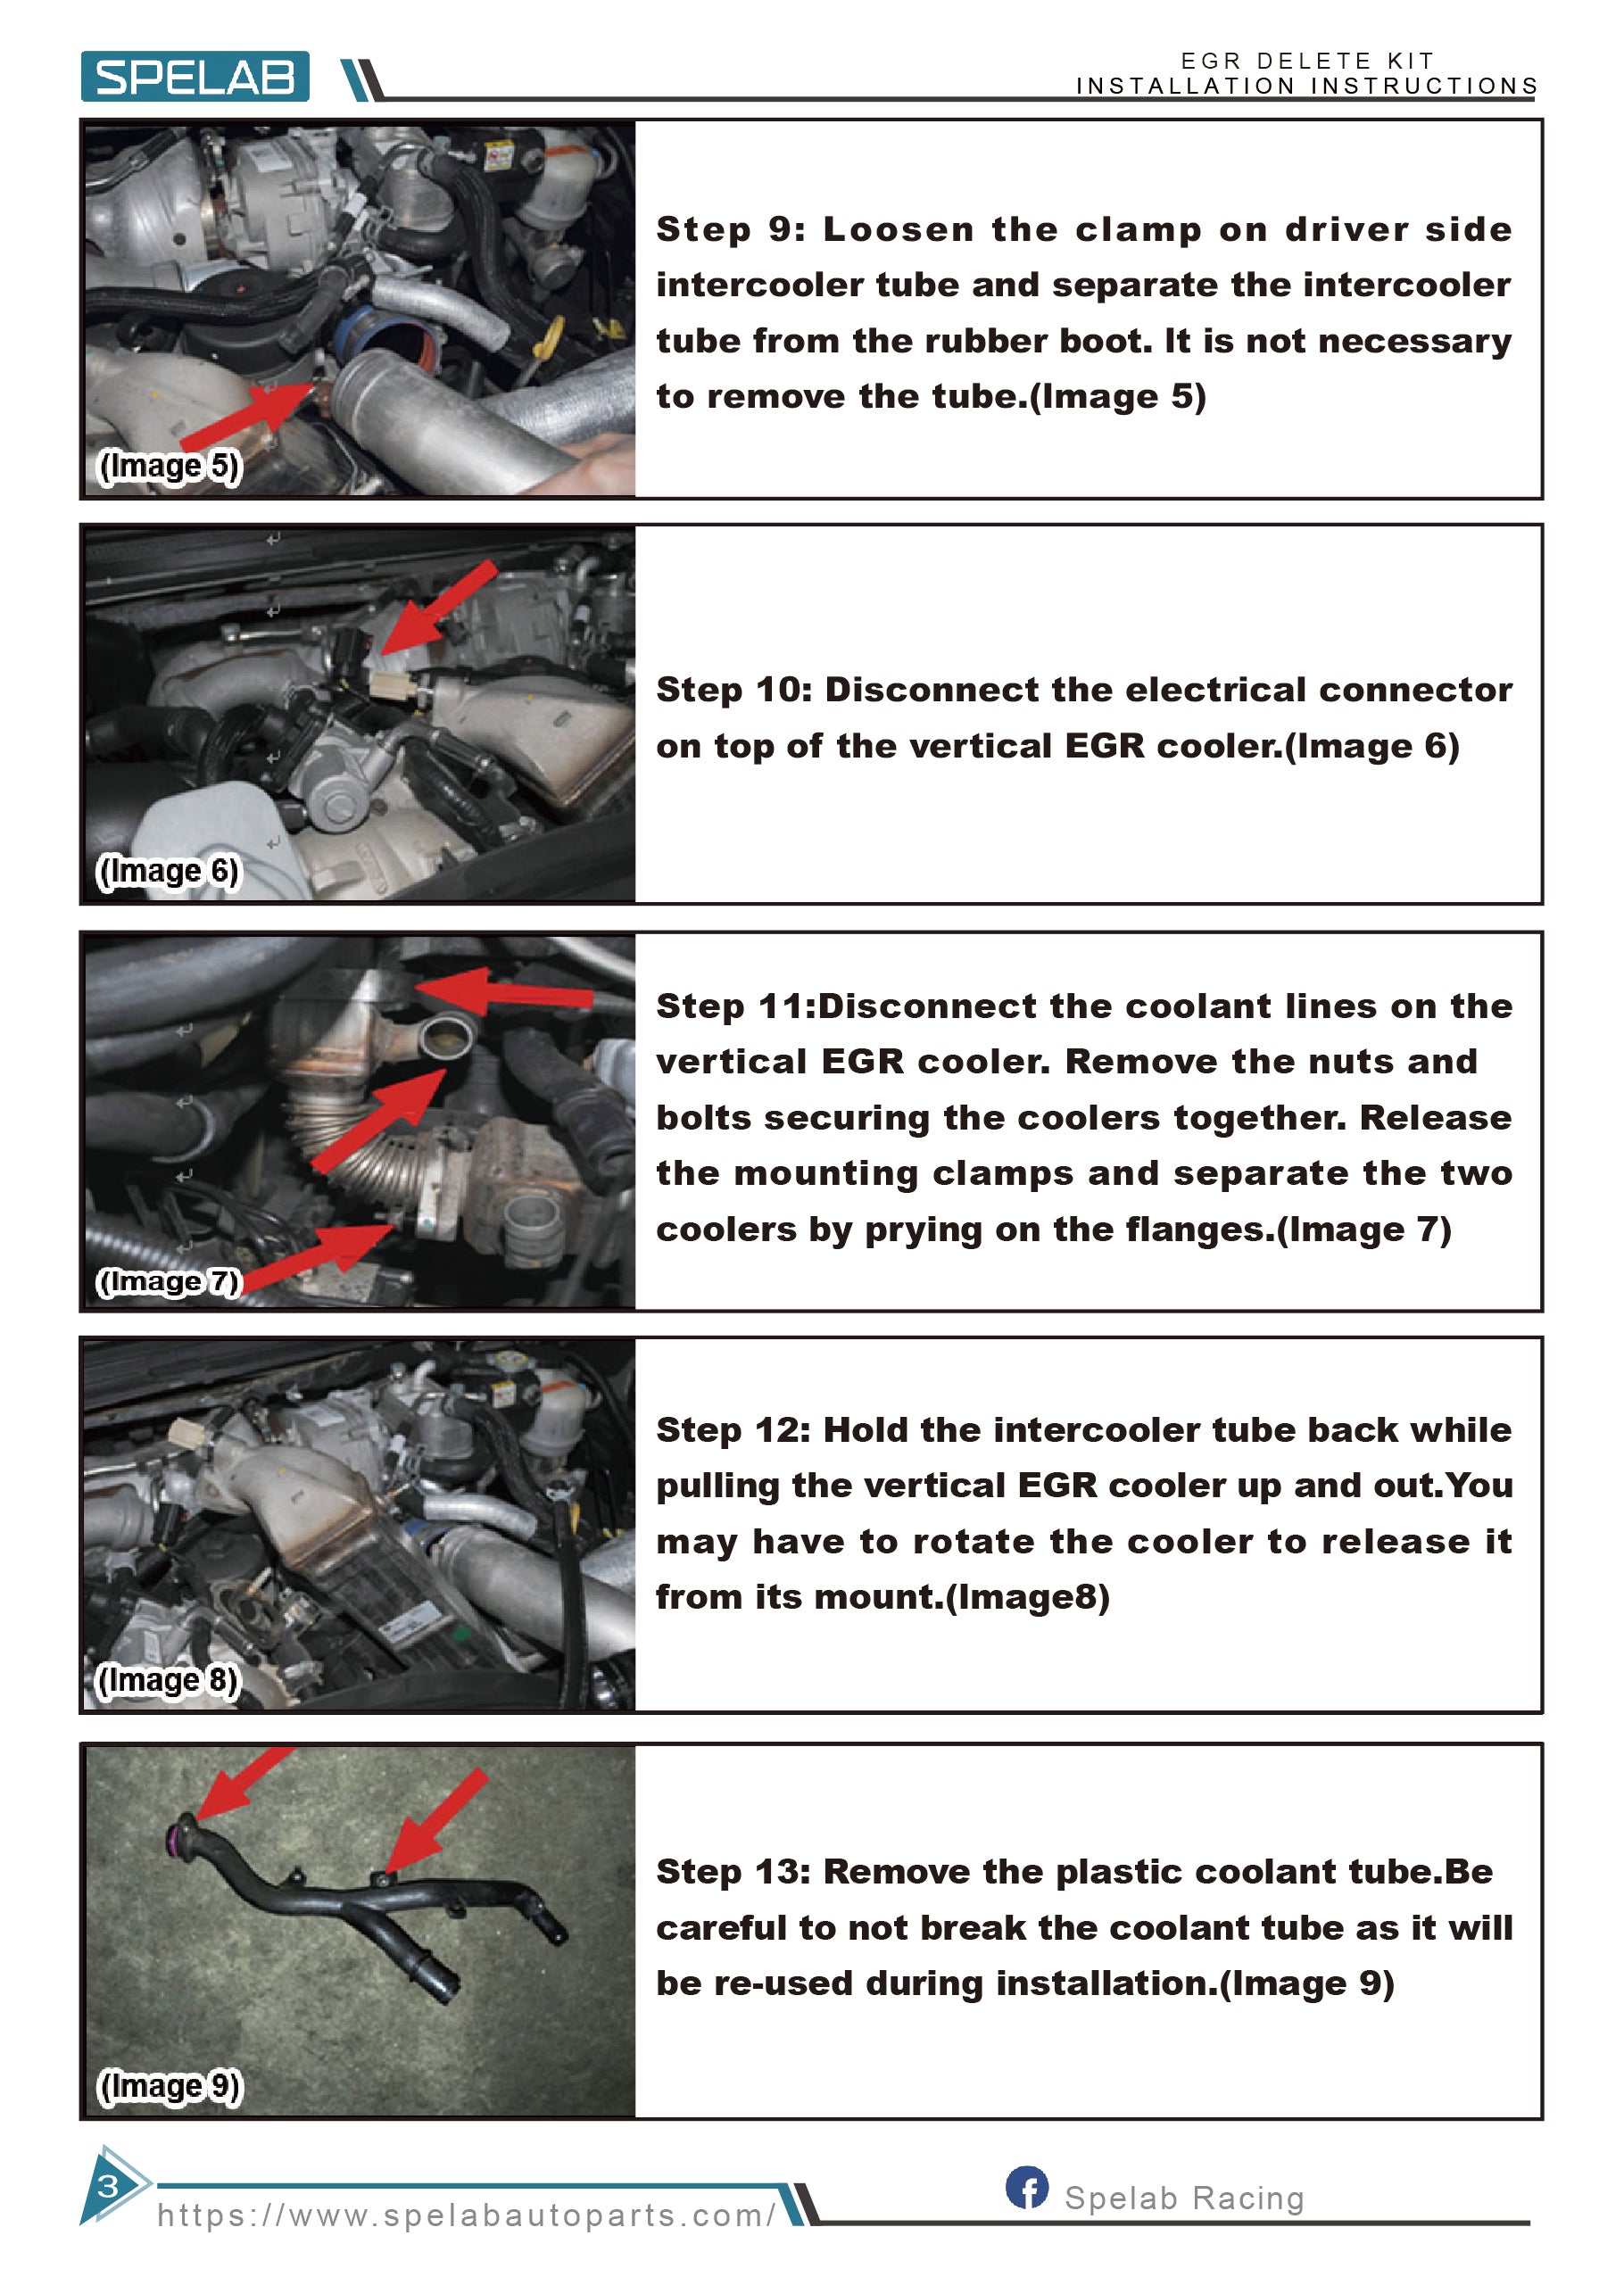
Loosen the clamp on driver side intercooler tube and separate the intercooler tube from the rubber boot. It is not necessary to remove the tube. (Image 5) -
Step 10:
Disconnect the electrical connector on top of the vertical EGR cooler. (Image 6) -
Step 11:
Disconnect the coolant lines on the vertical EGR cooler. Remove the nuts and bolts securing the coolers together. Release the mounting clamps and separate the two coolers by prying on the flanges. (Image 7) -
Step 12:
Hold the intercooler tube back while pulling the vertical EGR cooler up and out. You may have to rotate the cooler to release it from its mount. (Image 8) -
Step 13:
Remove the plastic coolant tube. Be careful to not break the coolant tube as it will be re-used during installation. (Image 9) -
Step 14:
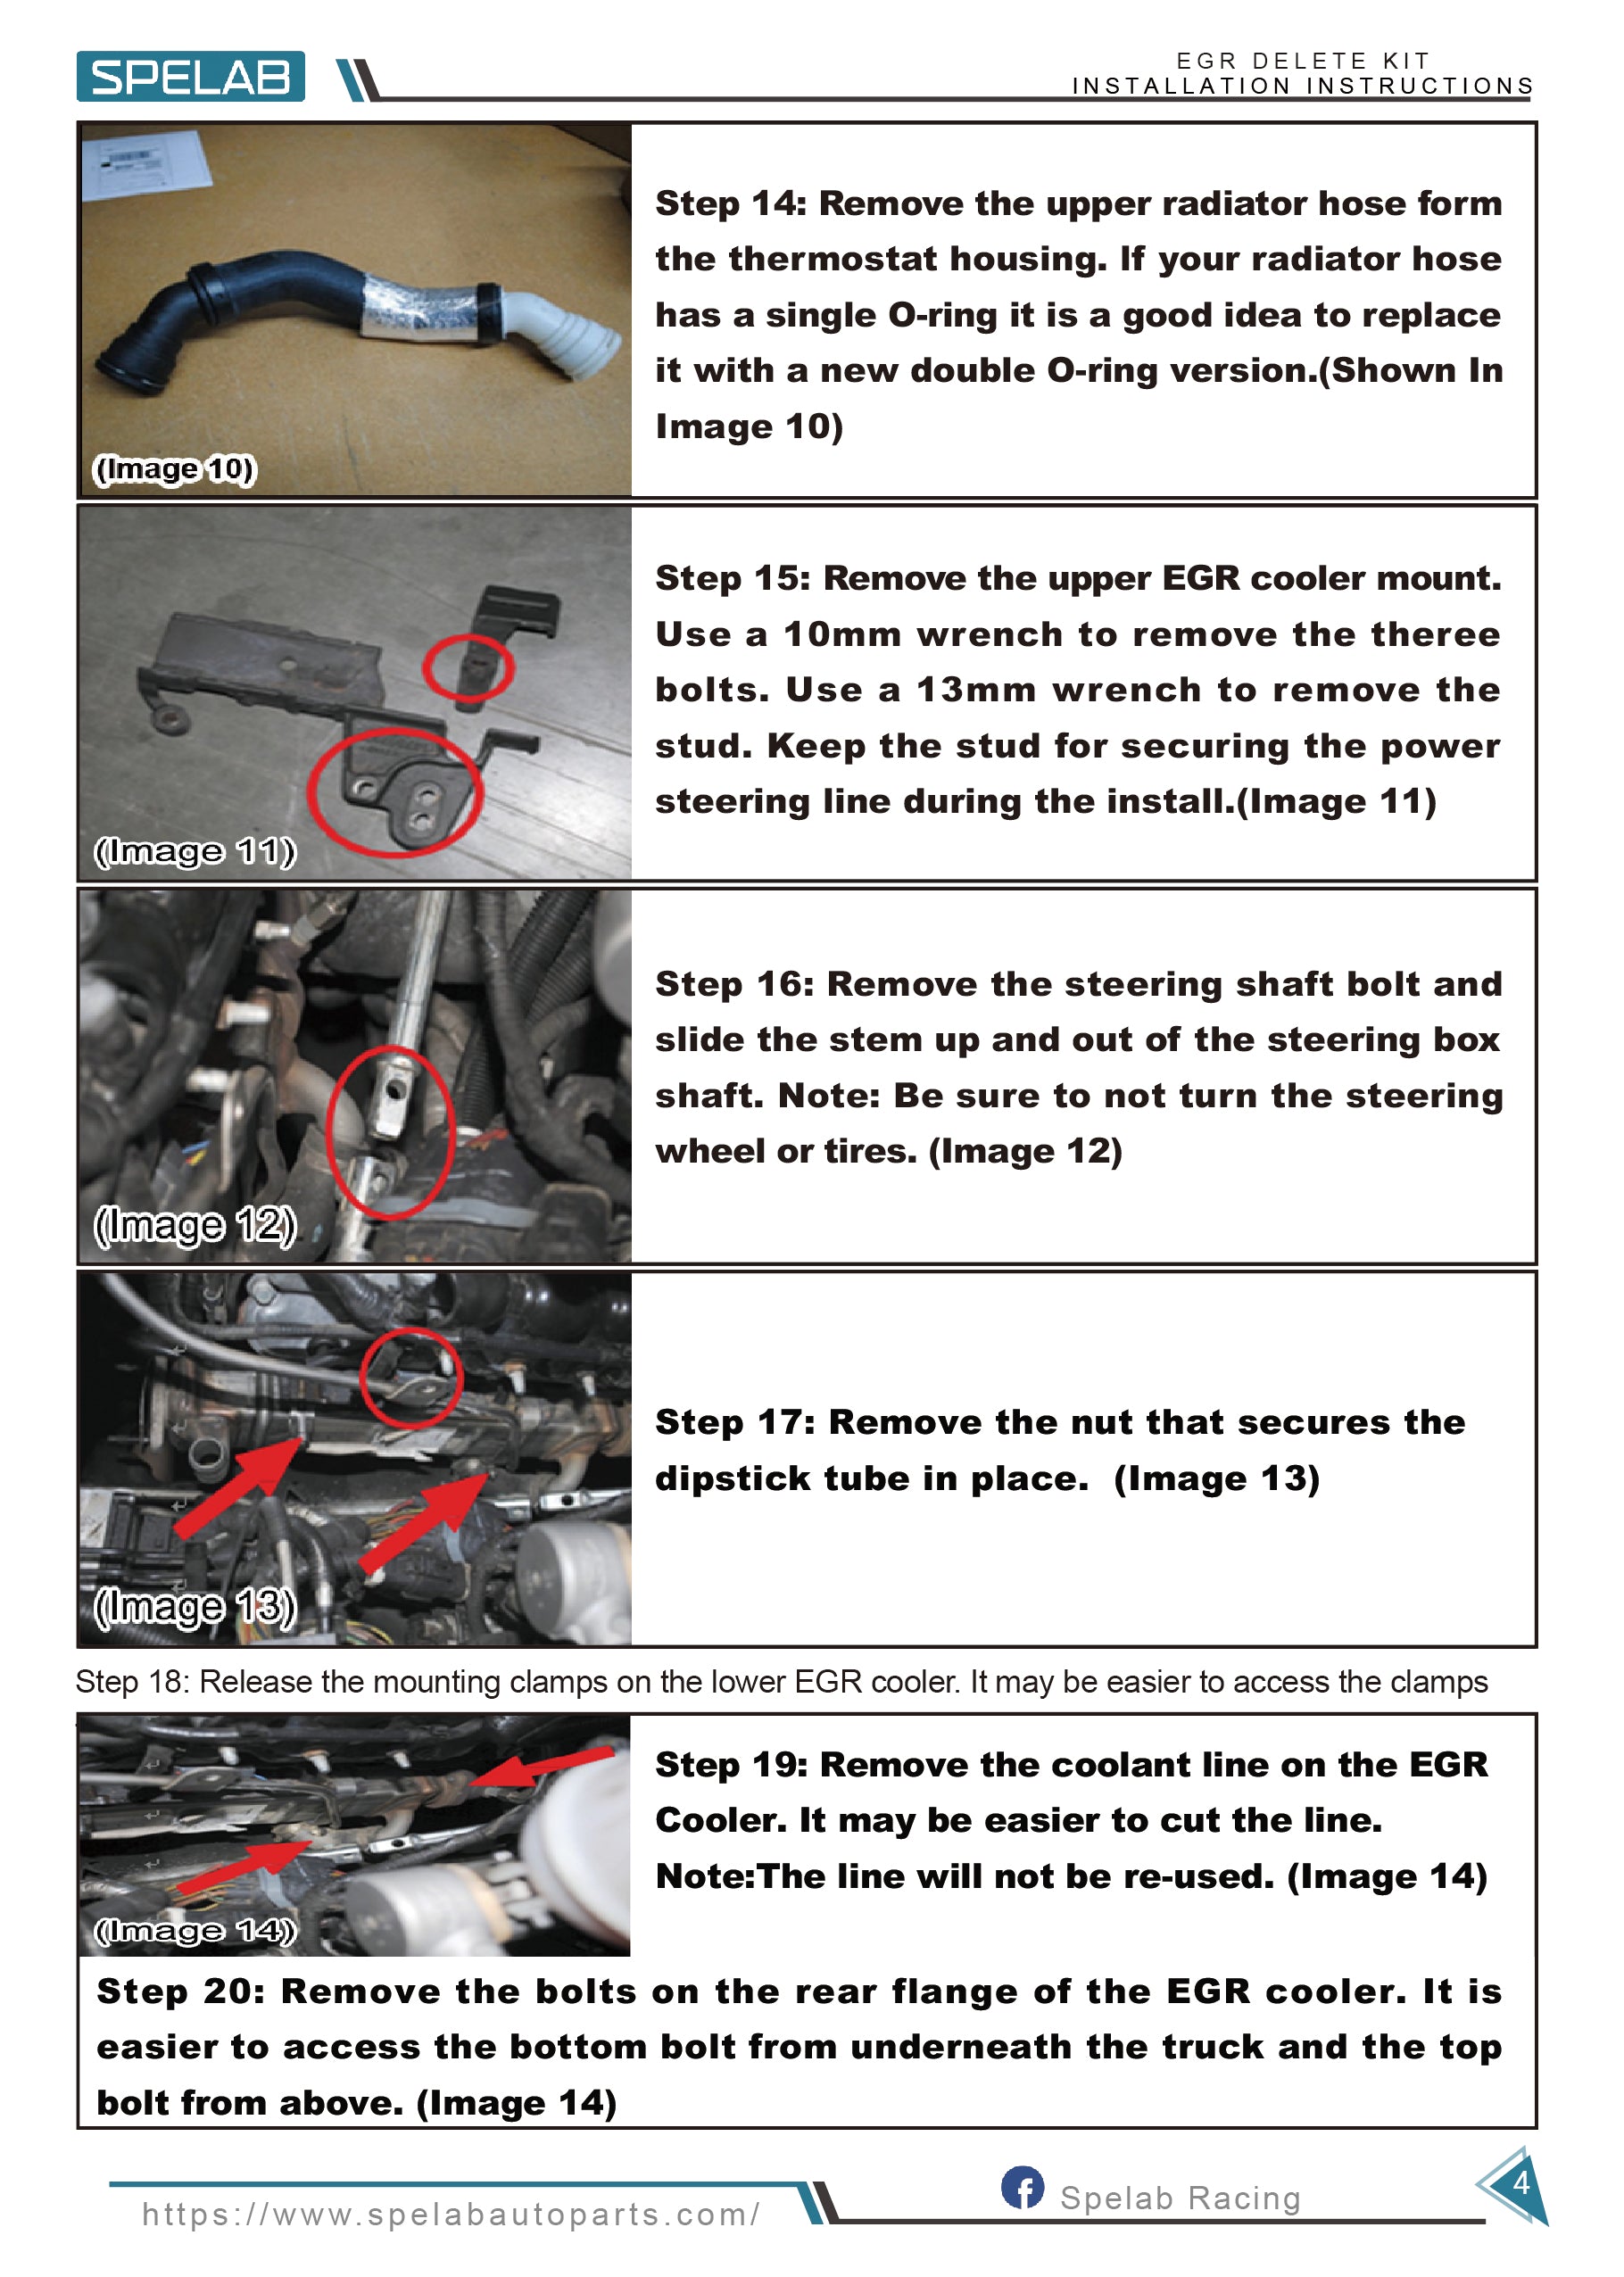
Remove the upper radiator hose from the thermostat housing. If your radiator hose has a single O-ring it is a good idea to replace it with a new double O-ring version. (Shown In Image 10) -
Step 15:
Remove the upper EGR cooler mount. Use a 10mm wrench to remove the three bolts. Use a 13mm wrench to remove the stud. Keep the stud for securing the power steering line during the install. (Image 11) -
Step 16:
Remove the steering shaft bolt and slide the stem up and out of the steering box shaft. Note: Be sure to not turn the steering wheel or tires. (Image 12) -
Step 17:
Remove the nut that secures the dipstick tube in place. (Image 13) -
Step 18:
Release the mounting clamps on the lower EGR cooler. It may be easier to access the clamps -
Step 19:
Remove the coolant line on the EGR Cooler. It may be easier to cut the line. Note: The line will not be re-used. (Image 14) -
Step 20:
Remove the bolts on the rear flange of the EGR cooler. It is easier to access the bottom bolt from underneath the truck and the top bolt from above. (Image 14) -
Step 21:
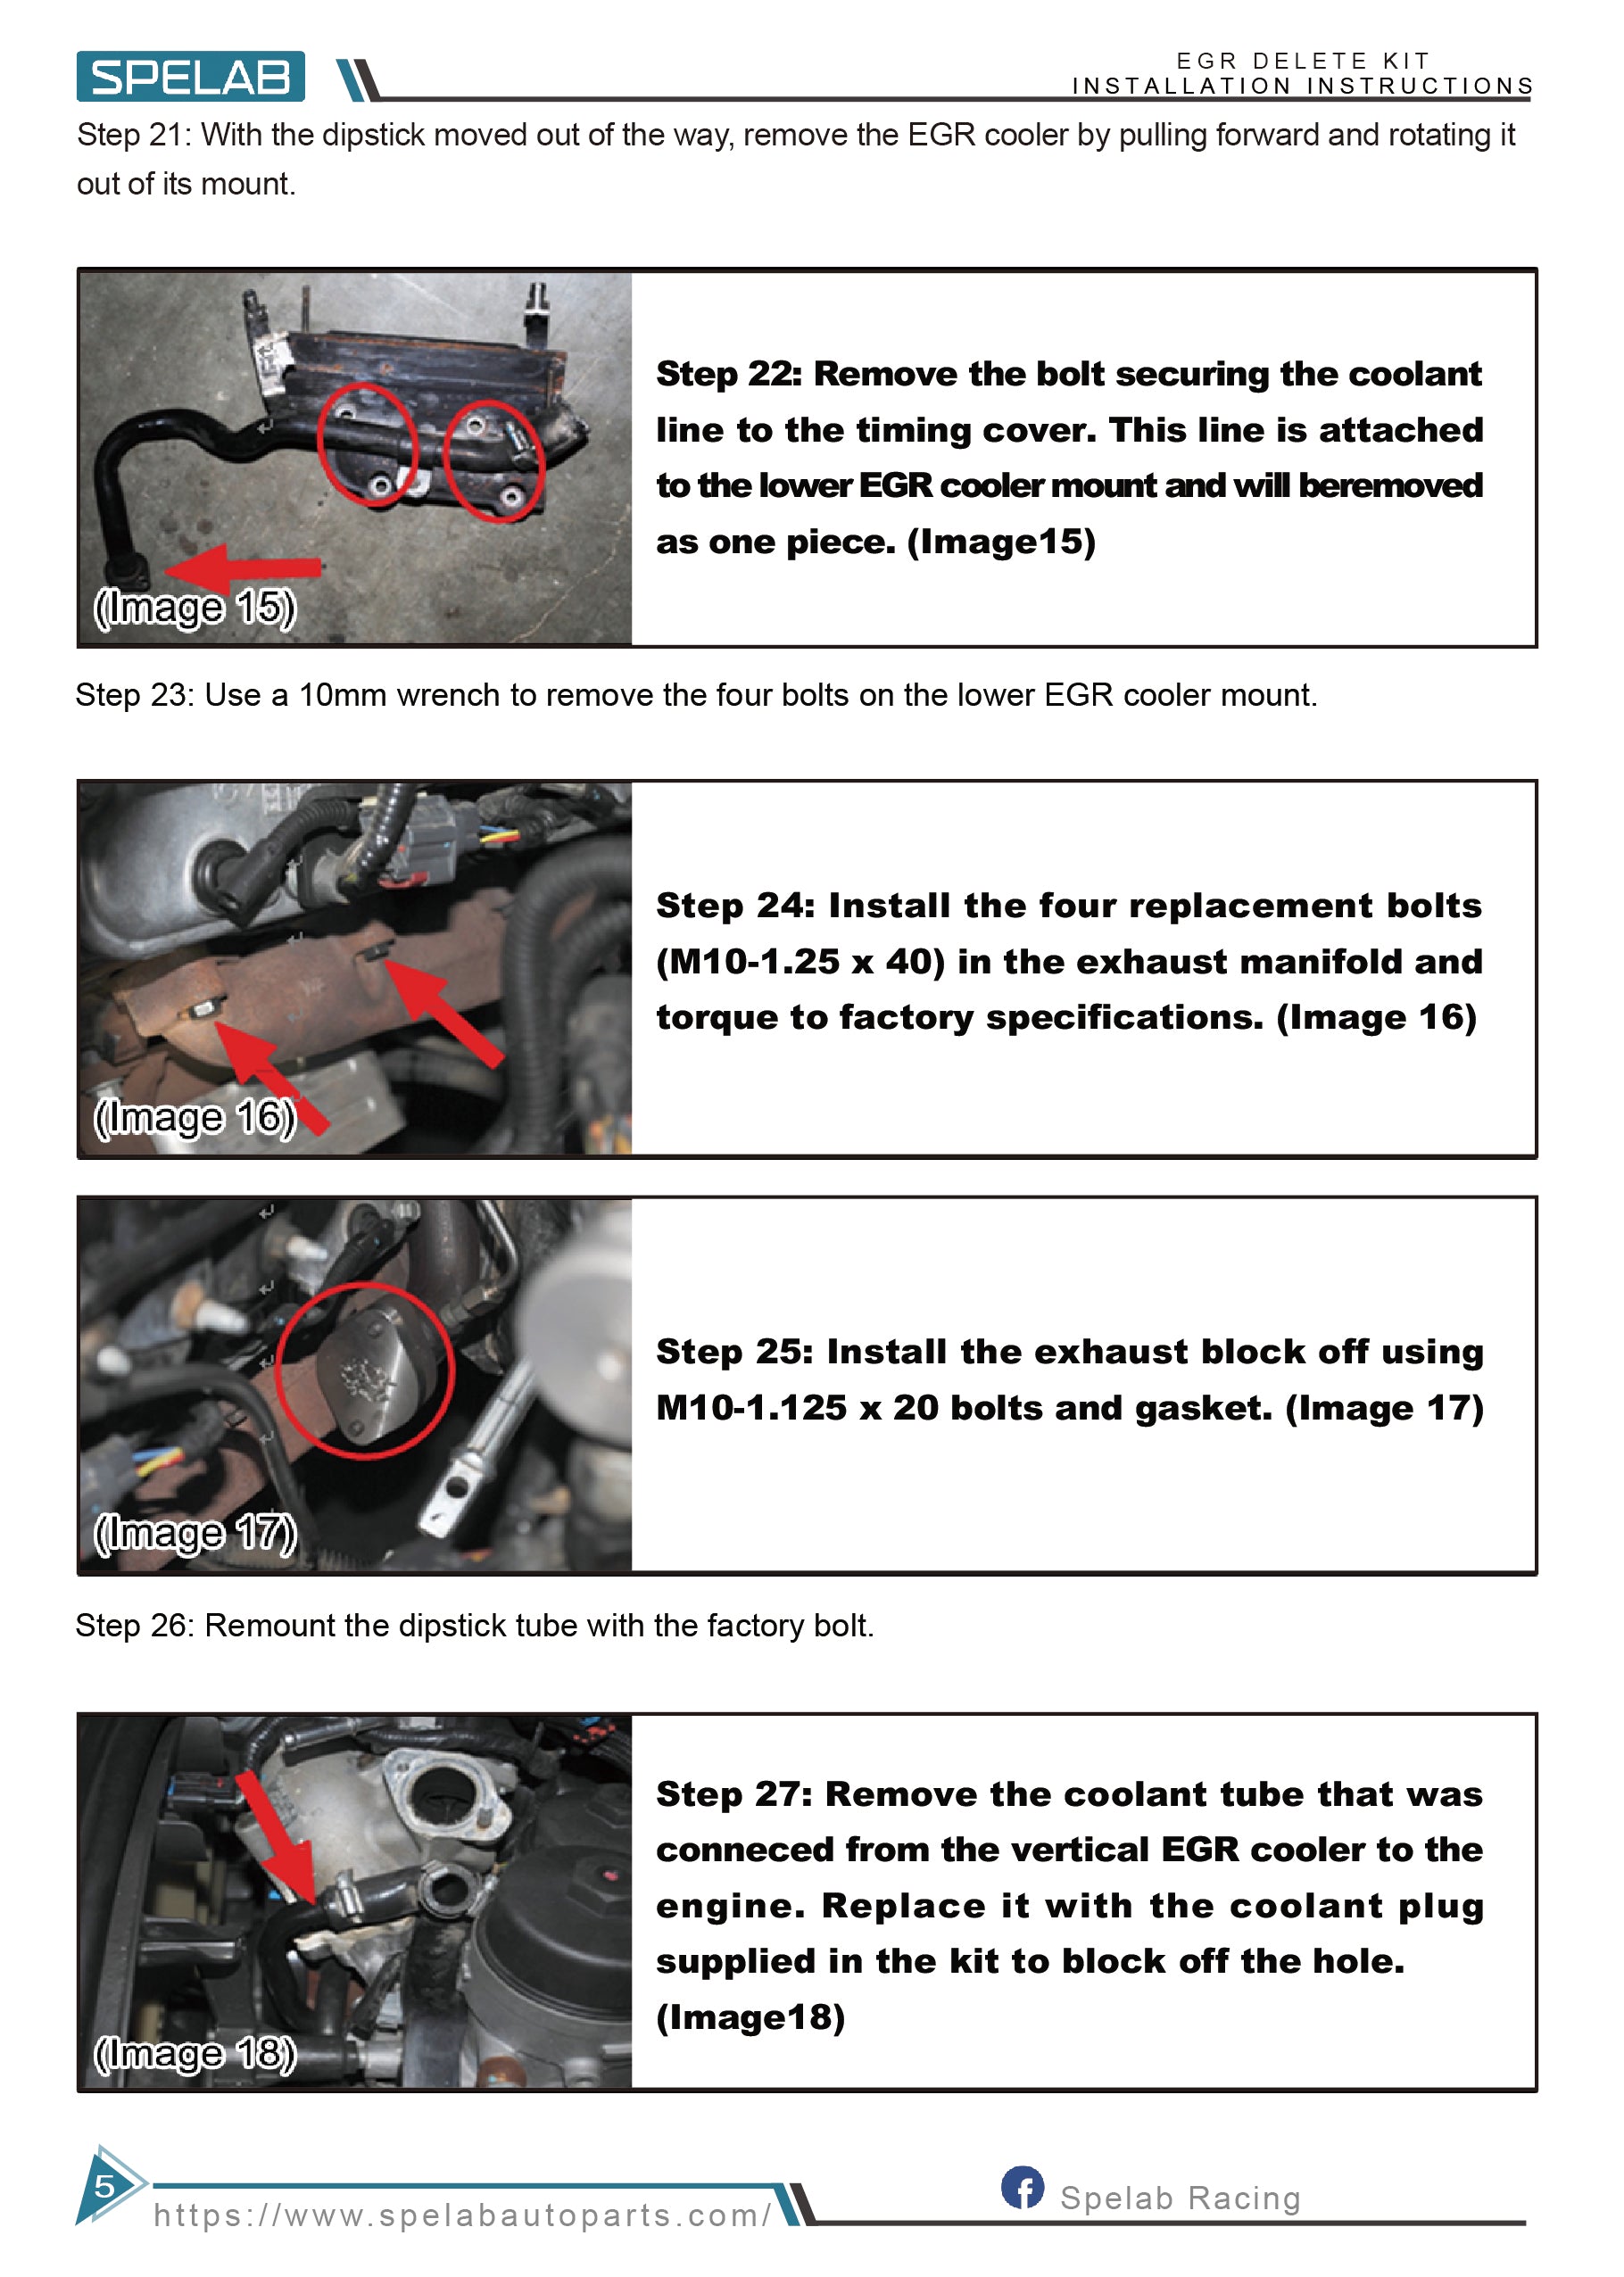
With the dipstick moved out of the way, remove the EGR cooler by pulling forward and rotating it out of its mount. -
Step 22:
Remove the bolt securing the coolant line to the timing cover. This line is attached to the lower EGR cooler mount and will be removed as one piece. (Image 15) -
Step 23:
Use a 10mm wrench to remove the four bolts on the lower EGR cooler mount. -
Step 24:
Install the four replacement bolts (M10-1.25 x 40) in the exhaust manifold and torque to factory specifications. (Image 16) -
Step 25:
Install the exhaust block off using M10-1.25 x 20 bolts and gasket. (Image 17) -
Step 26:
Remount the dipstick tube with the factory bolt. -
Step 27:
Remove the coolant tube that was connected from the vertical EGR cooler to the engine. Replace it with the coolant plug supplied in the kit to block off the hole. (Image 18) -
Step 28:
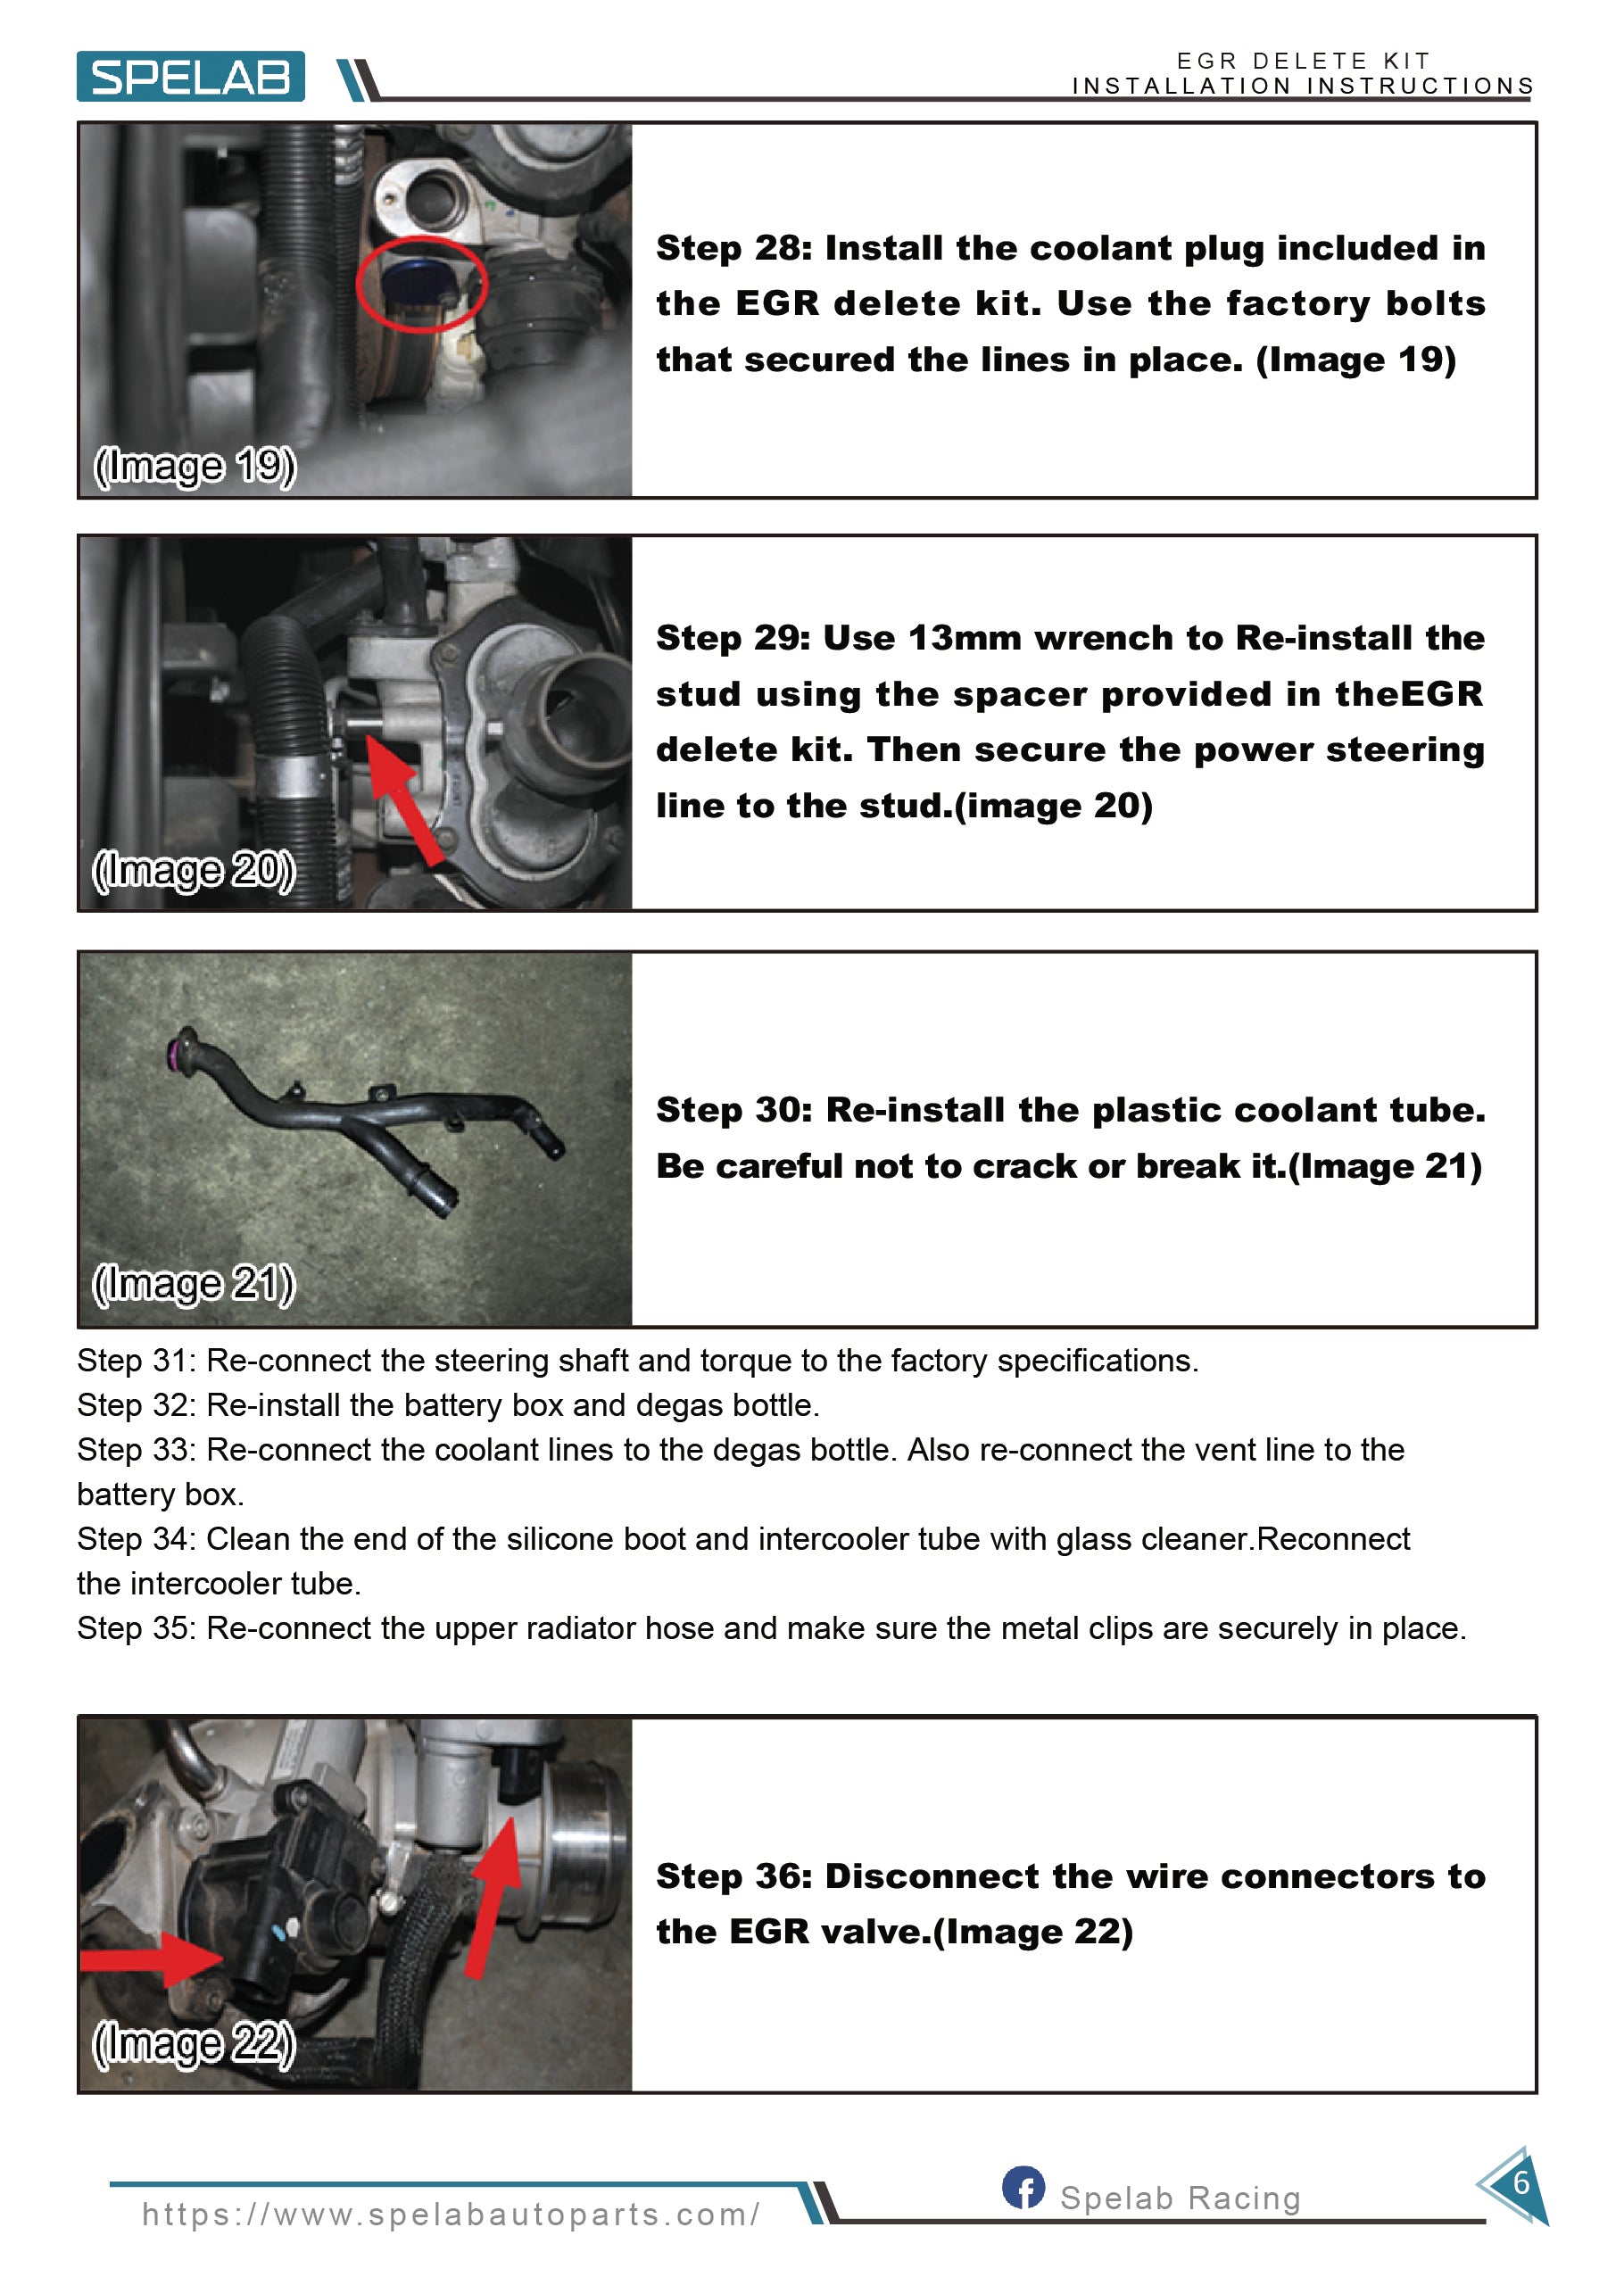
Install the coolant plug included in the EGR delete kit. Use the factory bolts that secured the lines in place. (Image 19) -
Step 29:
Use 13mm wrench to Re-install the stud using the spacer provided in the EGR delete kit. Then secure the power steering line to the stud. (Image 20) -
Step 30:
Re-install the plastic coolant tube. Be careful not to crack or break it. (Image 21) -
Step 31:
Re-connect the steering shaft and torque to the factory specifications. -
Step 32:
Re-install the battery box and degas bottle. -
Step 33:
Re-connect the coolant lines to the degas bottle. Also re-connect the vent line to the battery box. -
Step 34:
Clean the end of the silicone boot and intercooler tube with glass cleaner. Reconnect the intercooler tube. -
Step 35:
Re-connect the upper radiator hose and make sure the metal clips are securely in place. -
Step 36:
Disconnect the wire connectors to the EGR valve. (Image 22) -
Step 37:
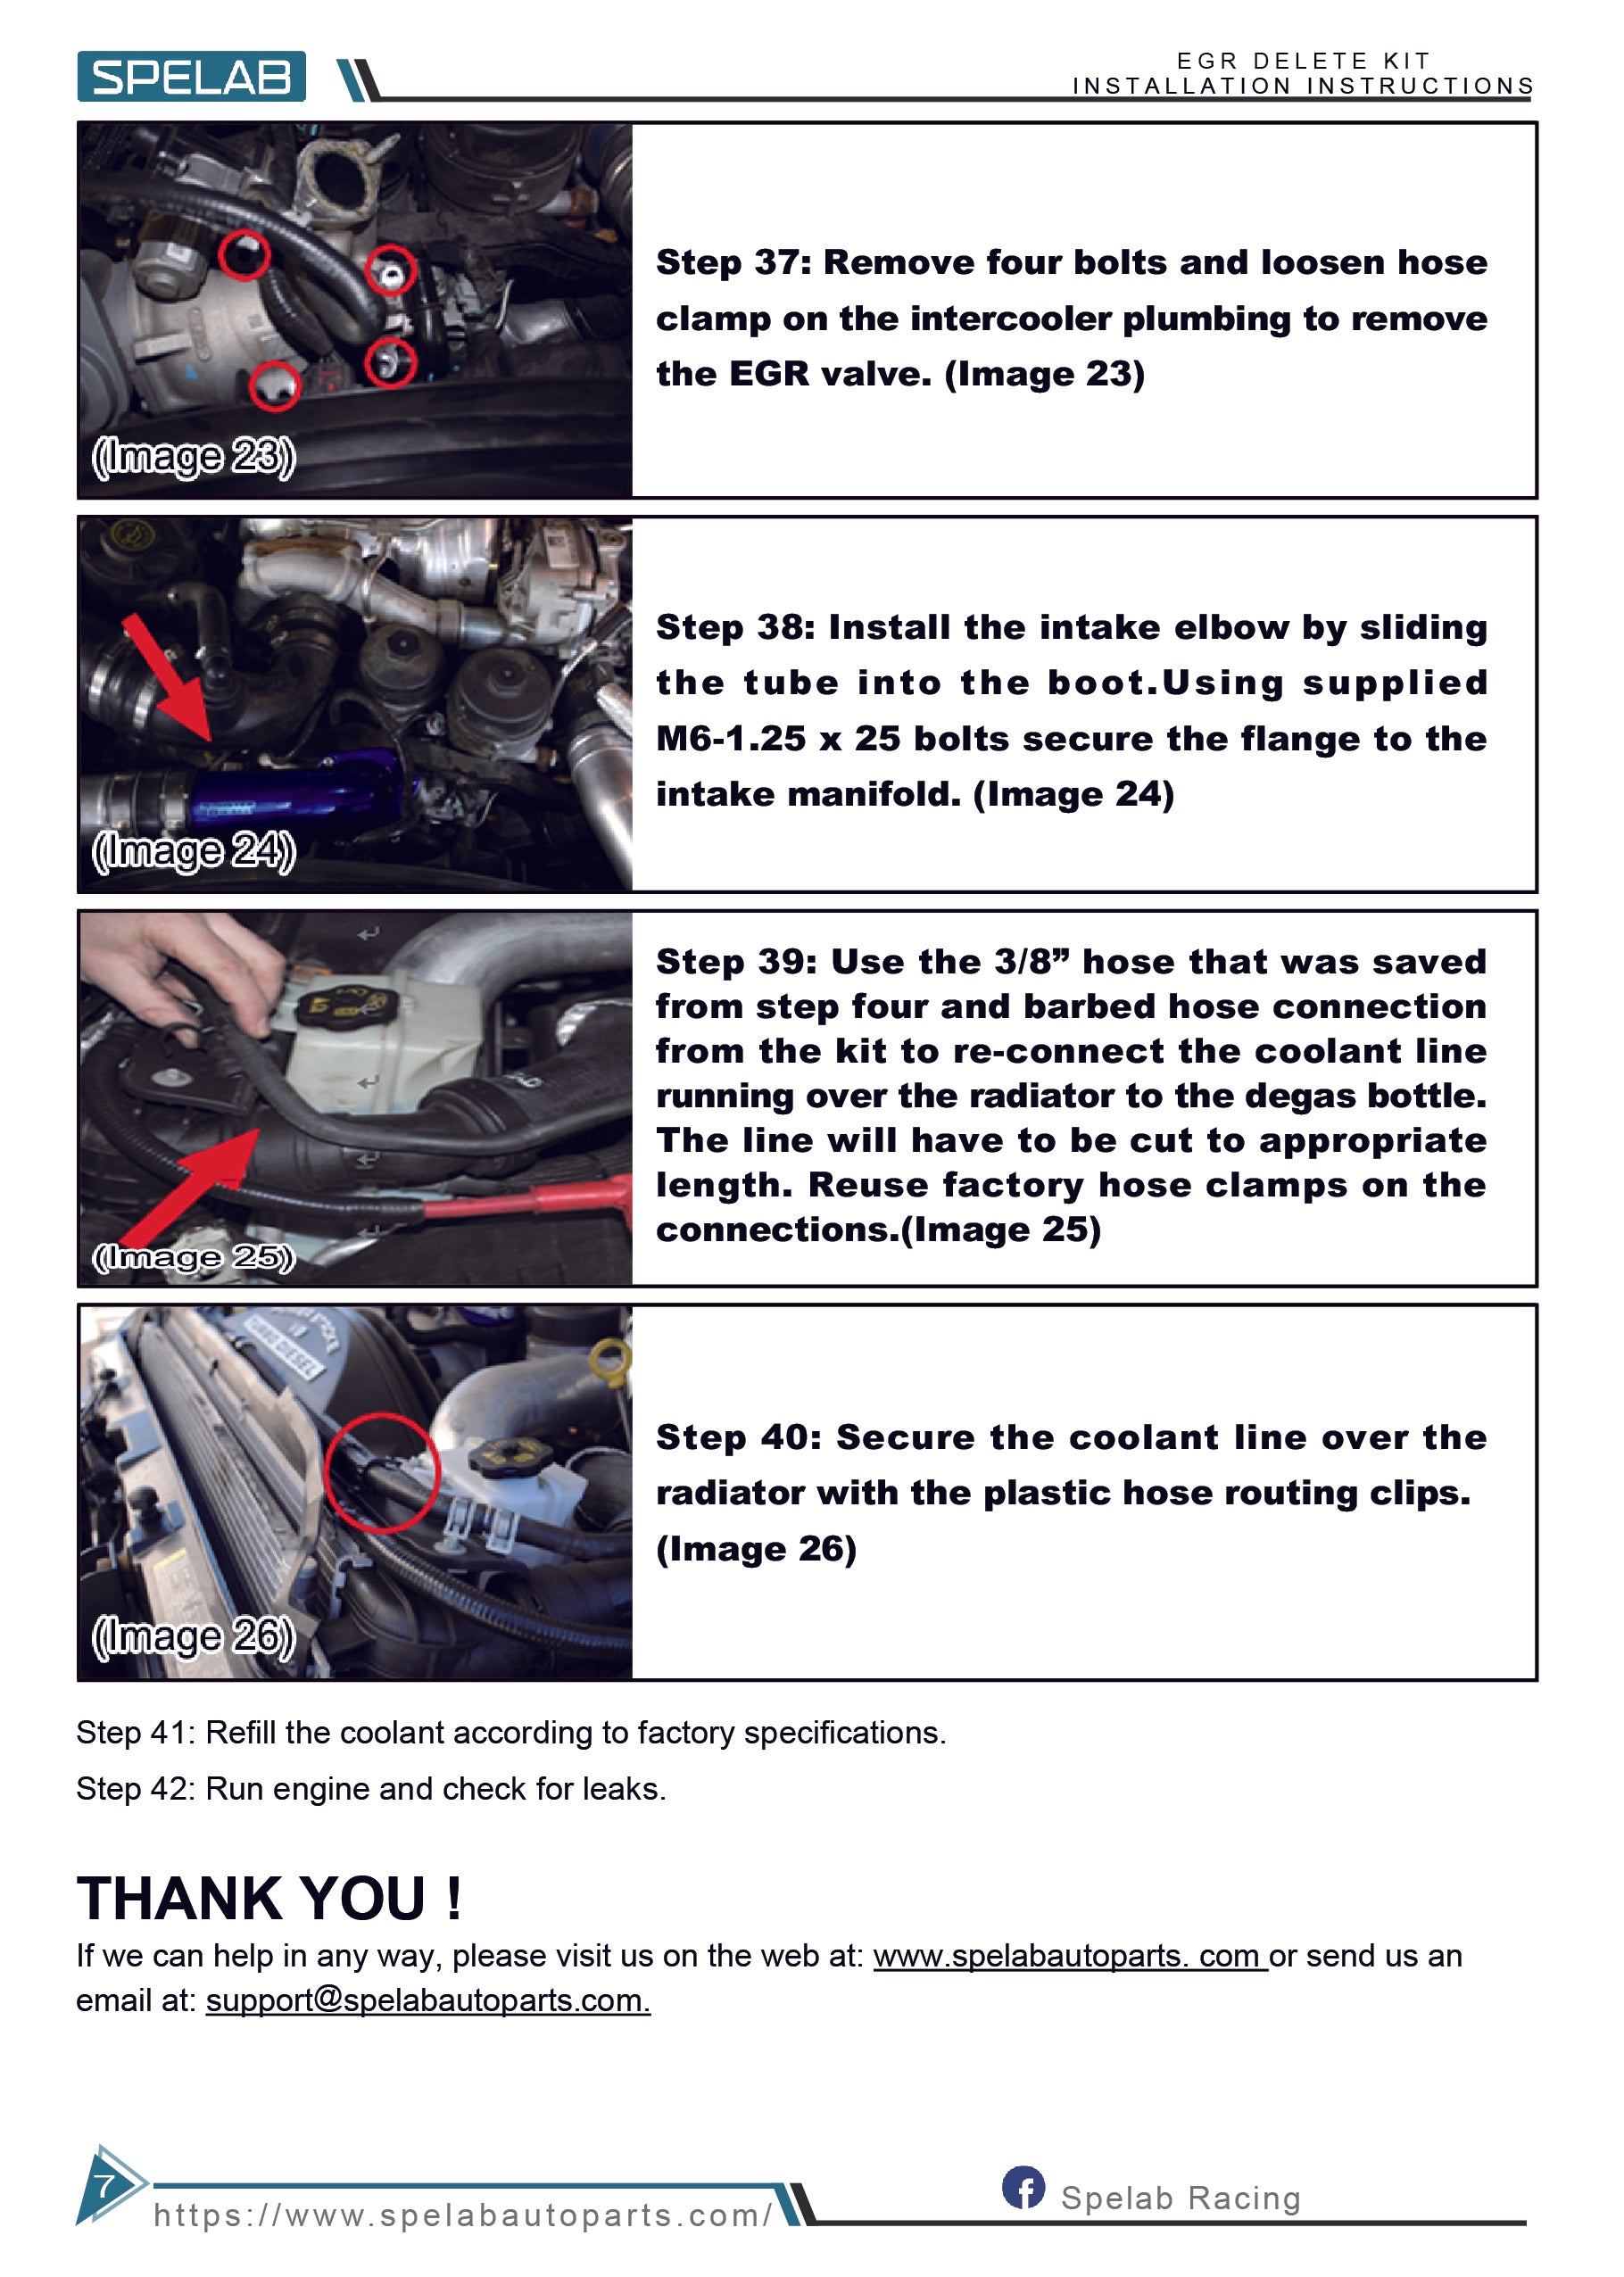
Remove four bolts and loosen hose clamp on the intercooler plumbing to remove the EGR valve. (Image 23) -
Step 38:
Install the intake elbow by sliding the tube into the boot. Using supplied M6-1.25 x 25 bolts secure the flange to the intake manifold. (Image 24) -
Step 39:
Use the 3/8" hose that was saved from step four and barbed hose connection from the kit to re-connect the coolant line running over the radiator to the degas bottle. The line will have to be cut to appropriate length. Reuse factory hose clamps on the connections. (Image 25) -
Step 40:
Secure the coolant line over the radiator with the plastic hose routing clips. (Image 26) -
Step 41:
Refill the coolant according to factory specifications. -
Step 42:
Run engine and check for leaks.
Technical Support
If we can help in any way, please visit us on the web at: www.spelabautoparts.com or send us an email at: support@spelabautoparts.com.