
Author: John Lee, SPELAB Mechanical Engineer. Updated on May 13, 2026.
Quick Answer
Installing a 6.7 Cummins intake manifold or intake horn upgrade usually takes 2–4 hours for an experienced DIY owner. The key steps are disconnecting the batteries, protecting the intake ports from dropped bolts and debris, removing the stock intake horn, cleaning the mating surface, installing new gaskets, torquing the bolts evenly to 18–20 ft-lbs, reconnecting sensors, and checking for boost leaks or warning lights after startup.
A simple intake horn upgrade can improve airflow and throttle response without requiring tuning in many setups. However, if the installation includes EGR removal, grid heater delete, or other emissions-related changes, the truck may require additional tuning and may not be legal for public-road use.
Installation At A Glance
| Estimated Time | 2–4 hours |
| Difficulty | Moderate / Experienced DIY |
| Key Torque Spec | 18–20 ft-lbs, tightened evenly in a crisscross pattern |
| Main Risk | Dropped bolts or debris entering the intake ports |
| Major Benefit | Improved airflow, throttle response, and support for towing or performance builds |
Before You Start: Fitment and Setup Check
Before ordering or installing parts, confirm your truck’s exact year, body style, and engine setup. A 2007–2024 Ram 2500/3500 pickup and a Cab & Chassis truck may require different parts or installation considerations.
- Vehicle: 2007–2024 Dodge Ram / Ram 2500 and 3500
- Engine: 6.7L Cummins diesel
- Body style: Confirm pickup vs Cab & Chassis before ordering
- Grid heater: Confirm whether you are retaining, upgrading, or deleting it
- EGR system: Confirm whether the truck is emissions-equipped or off-road modified
- Tuning: Intake horn upgrades may not need tuning, but EGR or grid heater removal can require extra setup
If you are still comparing intake options, start with SPELAB’s 6.7 Cummins intake manifold collection to confirm year range, heater options, Cab & Chassis notes, and related hardware.
Tools and Materials Needed
- Socket set and wrenches, commonly 6mm, 10mm, and 12mm
- Torque wrench capable of accurately reading 18–20 ft-lbs
- Plastic scraper or non-marring cleaning tool
- Brake cleaner or sensor-safe cleaner where appropriate
- Lint-free rags
- Clean shop towels for covering intake ports
- Vacuum cleaner or shop vac
- Blue threadlocker, if recommended for the supplied hardware
- Thread sealant for NPT plugs or fittings, if required
- New gaskets supplied with the intake manifold kit
- OBD scanner for post-install check-engine-light diagnosis
Recommended Product for This Installation
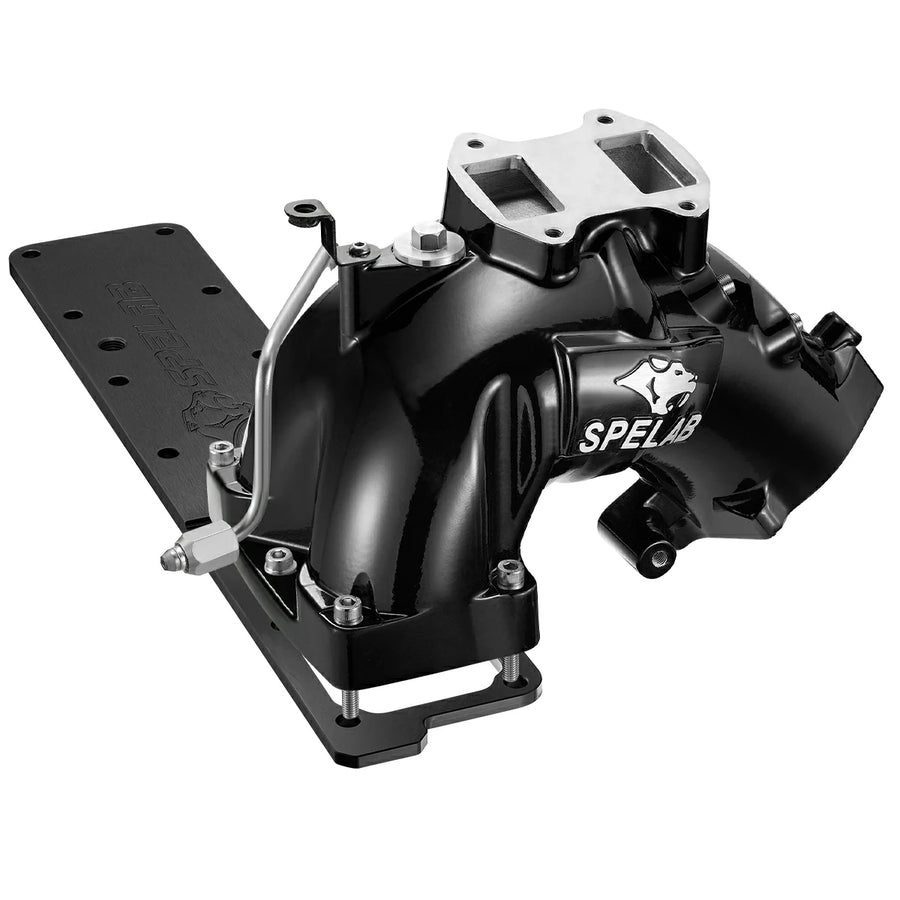
SPELAB Intake Manifold for 6.7L Cummins 2007–2024 Ram 2500/3500
This intake manifold upgrade is designed to improve airflow, throttle response, and engine-bay durability for 6.7L Cummins trucks. Confirm fitment before ordering, especially if your truck is Cab & Chassis or has a non-stock emissions setup.
View ProductStep-by-Step Installation Guide
Step 1: Park Safely and Disconnect the Batteries
Park the truck on a flat surface and let the engine cool completely. Disconnect the negative battery terminals before working around sensors, heater wiring, or intake-side electrical connectors.
Do not skip the battery disconnect. The intake area may involve heater wiring, sensor connectors, and harness routing. Preventing an accidental short is easier than repairing damaged wiring.
Step 2: Clean the Engine Bay Before Disassembly
Clean the top of the engine bay before removing parts. Dirt, grit, and carbon flakes can fall into the intake ports once the factory intake horn is removed.
Use compressed air carefully only before ports are open. Once the intake ports are exposed, use a vacuum instead of blowing debris around the engine.
Step 3: Remove Intake-Side Components
Remove the intake tube, charge-air components, brackets, sensors, hoses, and wiring clips that block access to the factory intake horn or manifold. Label connectors if needed so they return to the correct locations during reassembly.
If your truck has EGR components connected to the intake area, document the routing before removal. For street-driven trucks, emissions equipment should remain compliant with local regulations. EGR-related changes may require additional parts and tuning and may not be legal for public-road use.
Step 4: Remove the Stock Intake Manifold or Intake Horn
Loosen the factory bolts gradually. Once the hardware is removed, lift the factory intake component away from the engine carefully.
Cover the intake ports with clean shop towels as soon as the manifold is removed. A dropped M8 bolt, washer, gasket piece, or carbon chunk can enter the intake port and cause severe engine damage when the truck is started.
Do not leave open intake ports exposed while looking for tools, cleaning parts, or unpacking hardware.
Step 5: Clean the Intake Ports and Mating Surface
Use a plastic scraper or non-marring pad to clean the mating surface. Avoid aggressive metal tools that can gouge the surface and create a boost leak path.
Use a shop vac to remove loose debris. Keep the intake ports protected while cleaning. If a towel becomes dirty or oily, replace it with a clean one before continuing.
Most intake leaks after installation come from poor surface preparation, shifted gaskets, loose sensor ports, or uneven bolt torque. Spend extra time cleaning and aligning the gasket before tightening the manifold.
Step 6: Install the New Gaskets
Install the supplied square and round gaskets in the correct positions. Make sure each gasket sits flat and lines up with the ports. A pinched or shifted gasket can cause a boost leak, idle issue, soot trail, or check engine light.
Do not use excessive RTV unless the kit instructions specifically call for it. Most supplied gaskets are designed to seal by compression.
Step 7: Position the SPELAB Intake Manifold
Set the SPELAB intake manifold in place carefully. Start all bolts by hand before tightening. This prevents cross-threading and helps confirm that the manifold is seated correctly.
Apply blue threadlocker only where recommended. Tighten the bolts gradually in a crisscross pattern so the gasket compresses evenly.
| Fastener Area | Suggested Torque | Installation Note |
|---|---|---|
| Intake manifold bolts | 18–20 ft-lbs | Start all bolts by hand, then tighten gradually in a crisscross pattern |
| Grid heater plate hardware | Follow kit instructions, commonly around 18 ft-lbs where specified | Tighten evenly and verify heater wiring clearance |
| 1/8-inch NPT plugs or fittings | Snug fit, not excessive torque | Use proper sealant if needed; do not crack aluminum ports |
Torque warning: Do not over-tighten. Aluminum threads, NPT ports, and small fasteners can be damaged by excessive torque.
Step 8: Grid Heater Setup, If Applicable
Some setups retain the factory grid heater, while others use a grid heater delete or heater upgrade plate. Follow the specific instructions for your kit.
If installing a grid heater delete or heater plate:
- Confirm whether the truck will still have cold-start heating support
- Route heater wiring away from sharp edges, exhaust heat, belts, and moving parts
- Tighten heater plate hardware evenly
- Understand that grid heater removal may require tuning or may trigger a check engine light
- Consider your climate before deleting the heater function
If you drive in Canada, Alaska, the northern U.S., or any area with freezing winter starts, think carefully before removing the grid heater. Better airflow is useful, but cold-start reliability matters on a work truck.
Optional Cross-Sell: Grid Heater Delete Plate

SPELAB Grid Heater Delete/Upgrade Plate for 6.7L Cummins
This plate is commonly considered by owners who want to reduce intake restriction during an intake horn upgrade. Confirm cold-weather needs, tuning requirements, and off-road-use considerations before installation.
View Grid Heater PlateStep 9: Transfer and Clean Sensors
Clean the MAP sensor and intake air temperature sensor before reinstalling them. Soot-covered sensors can cause inaccurate readings, lazy throttle response, poor drivability, or check engine lights.
Before reinstalling the MAP sensor, inspect the sensor tip for soot buildup. If it is clogged, the truck may still feel sluggish even after the new intake manifold is installed.
Install sensors into the correct ports. If the manifold uses 1/8-inch NPT ports, use proper thread sealant only where required. Avoid wrapping tape or applying sealant where it can contaminate the sensor tip.
NPT warning: 1/8-inch NPT threads are tapered. Over-tightening can crack, distort, or damage aluminum ports. Tighten to a snug seal, then pressure-check for leaks instead of forcing another turn.
Step 10: Reconnect Hoses, Wiring, and Fuel Line Components
Reconnect all wiring harnesses, hoses, brackets, and intake tubing. Keep wiring away from sharp edges and heat sources.
If your specific kit includes a proprietary fuel line or requires fuel line repositioning, double-check routing, clamp position, fitting tightness, and clearance. Fuel leaks are a safety issue and must be corrected before startup.
Step 11: Reconnect the Batteries and Start the Engine
Reconnect the negative battery terminals. Start the engine and let it idle.
If fuel lines were opened during installation, the first start may take slightly longer than normal. If the engine cranks excessively, stop and recheck fuel connections, sensor plugs, and battery condition.
Step 12: Check for Leaks and Warning Lights
While the truck idles, inspect the manifold area carefully. Look and listen for:
- Boost leaks or hissing sounds
- Fuel leaks if any fuel line was moved
- Coolant leaks if related components were disturbed
- Loose clamps or brackets
- Check engine light
- Rough idle or abnormal throttle response
If a check engine light appears, scan the truck instead of guessing. Common causes after intake work include disconnected MAP/IAT sensors, loose connectors, air leaks, or configuration changes related to EGR or grid heater components.
Step 13: Test Drive and Recheck
Take the truck for a short test drive. Start with light throttle and listen for boost leaks, rattles, or unusual intake noise. After the test drive, recheck all bolts, clamps, hoses, sensor ports, and NPT plugs.
Under load, the truck should feel smoother and more responsive if everything is installed correctly. If it feels weak, smoky, or inconsistent, recheck for air leaks and sensor issues first.
Common Issues After Installation
| Symptom | Potential Cause | What to Check |
|---|---|---|
| Check engine light | Unplugged sensor, EGR/grid heater change, or air leak | Scan codes, check MAP/IAT connectors, inspect gasket seal |
| Hissing sound | Shifted gasket, loose clamp, loose NPT plug | Manifold gasket, charge pipe clamps, NPT ports |
| Soot trails | EGR connection leak or loose gasket | EGR crossover area, manifold flange, gasket alignment |
| Hard start | Fuel line was moved, battery disconnected, loose connector | Fuel fittings, battery terminals, sensor plugs |
| Poor throttle response | Sensor reading issue or boost leak | MAP sensor, intake air temperature sensor, boost leak test |
| Rattle after installation | Loose bracket, wiring contact, or pipe contact | Bracket hardware, wire routing, intake tube clearance |
Benefits of a 6.7 Cummins Intake Manifold Upgrade
A properly installed intake manifold can reduce intake restriction and help the engine breathe more efficiently. The biggest benefits are usually felt under load, during towing, or on modified trucks where the factory intake path becomes a bottleneck.
- Improved airflow: A less restrictive design can help the engine move more air.
- Better throttle response: Cleaner airflow can improve response, especially under load.
- Support for tuned builds: Modified trucks often benefit more than stock daily drivers.
- Sensor and port flexibility: Extra NPT ports can support gauges or sensor accessories.
- Stronger construction: Aluminum construction can improve durability compared with some restrictive factory designs.
For more technical context before choosing a part, read SPELAB’s article on whether an intake horn upgrade helps a 6.7 Cummins.
When This Upgrade Makes the Most Sense
A 6.7 Cummins intake manifold upgrade makes the most sense if your truck is used for towing, performance driving, airflow upgrades, or supporting modifications such as intake, exhaust, intercooler piping, or tuning.
If your truck is completely stock and used mostly for light daily driving, gains may be more modest. If the truck is tuned, towing heavy, or running airflow-supporting upgrades, the difference is usually easier to feel.
If you are planning a full off-road airflow package, compare the 6.7 Cummins intake manifold with EGR delete kit. For broader platform upgrades, browse SPELAB’s 6.7 Cummins applicable products by model year and engine setup.
Final Recommendation
Installing a 6.7 Cummins intake manifold is a manageable project for experienced DIY diesel owners, but the details matter. The most important steps are confirming fitment, protecting the intake ports from debris, cleaning the sealing surfaces, installing the gaskets correctly, torquing the bolts evenly, sealing NPT ports properly, and checking sensors and boost leaks after startup.
If your goal is a simple airflow upgrade, choose the correct manifold or intake horn for your truck and retain required emissions equipment where applicable. If your installation includes EGR or grid heater changes, understand the legal, tuning, and cold-start implications before beginning.
FAQs
Q1: Does the SPELAB intake manifold fit all 2007–2024 Ram 2500/3500 6.7 Cummins trucks?
A: It is designed for 2007–2024 Ram 2500/3500 6.7L Cummins pickup applications, but fitment should always be confirmed before ordering. Cab & Chassis trucks may require a different configuration.
Q2: Do I need tuning after installing a 6.7 Cummins intake manifold?
A: For a simple intake manifold or intake horn upgrade, tuning is usually not required. However, if the install includes EGR removal, grid heater delete, or other emissions-related changes, tuning or additional setup may be required and may not be street legal.
Q3: What torque should I use for the intake manifold bolts?
A: The common torque range used in this installation is 18–20 ft-lbs, unless the specific kit instructions state otherwise. Tighten gradually in a crisscross pattern to avoid uneven gasket compression.
Q4: Can I install the intake manifold without removing the grid heater?
A: Depending on the kit and truck configuration, some setups can retain the grid heater while others use a heater delete or upgraded heater plate. Confirm your kit design before starting.
Q5: Should cold-climate owners delete the grid heater?
A: Cold-climate owners should be careful. The grid heater helps with cold starts, especially in freezing temperatures. If your truck works in Canada, Alaska, mountain states, or northern winter conditions, consider a heated intake option or confirm the cold-start plan before deleting the heater.
Q6: Will an intake manifold upgrade trigger a check engine light?
A: It should not trigger a check engine light if sensors, gaskets, wiring, and emissions-related components are installed correctly. If a light appears, scan the codes and check MAP/IAT sensors, boost leaks, and any EGR or grid heater changes.
Q7: What sensors should I clean during installation?
A: The MAP sensor and intake air temperature sensor should be inspected and cleaned carefully. Use sensor-safe methods and avoid damaging the sensor tips.
Q8: Should I use thread tape on the 1/8-inch NPT ports?
A: Use the sealant method recommended by the kit instructions. If using thread sealant or tape, keep it away from the sensor tip and air stream. Do not over-tighten NPT fittings because tapered threads can damage aluminum ports.
Q9: What are signs of a boost leak after installation?
A: Common signs include hissing under throttle, low boost, black smoke, poor throttle response, rough running, or a check engine light. Recheck gaskets, clamps, sensor ports, and NPT plugs.
Q10: Does an intake manifold upgrade help towing?
A: It can help airflow and throttle response under load, especially when paired with other supporting upgrades. Results vary depending on tuning, truck condition, trailer weight, elevation, and driving conditions.
Q11: Is this a good DIY project?
A: It is suitable for experienced DIY owners who are comfortable working around diesel intake systems, sensors, gaskets, and torque specs. If you are not comfortable checking for leaks or diagnosing warning lights, professional installation is safer.
Q12: What should I recheck after the first drive?
A: Recheck manifold bolts, clamps, hoses, wiring, NPT ports, sensor connectors, and any fuel line or heater wiring that was moved during installation.
John Lee
Mechanical Engineer | 10+ Years Experience
John has spent the last decade engineering and testing high-performance automotive components. Specializing in drivetrain durability and thermal management across Powerstroke, Cummins, and Duramax applications, he bridges the gap between OEM limitations and aftermarket performance. His philosophy: "Factory parts are just a starting point."


4 comments
It looks like no one is monitoring this question thread.
I need to make sure the grid heater delete / intake manifold includes the new heating element or if I can buy the element separately for you all.
I don’t find it on your site anywhere.
Please let us know something.
Does the intake come with the heating element
Good day,
I’m looking at your replacement intake for 2018 6.7 Cummins. I’d like to keep the intake heating capability with a screw in intake element. However, I don’t see any element on your site. Is that available through you, or do I need to search elsewhere? Can you tell me what part would fit?
After installing my intake manifold my truck is shifting awfully what do I need to check or possibly did wrong?
Before installation shifted smoothly. And just got it efi live tuned before the intake horn installation.