
Updated September 24, 2026.
A 2011–2019 Ford Super Duty with the 6.7L Power Stroke does not need an intake manifold simply because the factory part is composite. Replacement becomes reasonable after testing confirms a cracked housing, a leaking flange or seal, damaged threads, or a material problem that makes the original manifold unreliable.
P0299, a hiss under load, oily residue, and slow boost response do not identify the intake manifold by themselves. The same symptoms can come from the charge-air cooler outlet tube, boots, clamps, intercooler, MAP sensor passage, exhaust leaks, turbocharger control, or VGT operation.
Key takeaway: Confirm where the boost leak or airflow fault is before ordering parts. When the manifold is damaged—or when a hard-working tow or jobsite truck is already apart for a long-term intake refresh—a cast-aluminum replacement provides a more rigid, serviceable foundation. On 2015–2016 trucks, verify the kit-specific external turbo oil-feed-line arrangement before ordering or disassembly.
Should You Repair, Replace, or Upgrade the Intake Manifold?
The correct decision depends on what failed. A grocery-run F-250 with stable boost and a dry, intact manifold does not need the same repair plan as an F-350 that repeatedly loses boost while pulling a fifth-wheel up a summer grade.
| Confirmed Condition | Reasonable Action | Why |
|---|---|---|
| No crack, no leak, normal boost and believable scan data | Keep and monitor the factory manifold | Replacing a sound housing is unlikely to correct a symptom that originates elsewhere |
| Loose clamp, split coupler, damaged charge-air tube or isolated gasket leak | Repair the confirmed connection or seal | The manifold does not need replacement when its housing and sealing surfaces remain serviceable |
| Visible housing crack, distorted sealing surface or damaged mounting area | Replace the manifold | A structural or sealing defect can reopen under boost and heat even after the area is cleaned |
| Confirmed damage on a high-mileage tow or work truck that will be kept long term | Consider a cast-aluminum replacement | Greater material rigidity and durable threaded areas can be useful where the intake is repeatedly heat-cycled or serviced |
| P0299 with no verified leak at the manifold | Continue system diagnosis | Underboost can result from charge-air leakage, sensor error, exhaust leakage, turbo control or VGT problems |
Which Symptoms Actually Point to an Intake or Charge-Air Leak?
A boost leak often becomes easiest to hear or feel when airflow and pressure rise under load. A truck may idle smoothly in the driveway and still hiss, lose commanded boost, or coat a connection with oily dust while towing.
| Symptom | What It Can Mean | First Useful Check |
|---|---|---|
| P0299 or low delivered boost | Charge-air leak, exhaust-side leak, sensor error, turbo control fault, VGT problem or restriction | Save freeze-frame data and compare desired versus actual boost under the conditions that set the code |
| Hiss or whoosh during acceleration | Split boot, loose clamp, separated pipe joint, gasket leak or cracked housing | Inspect for oil-and-dust tracks, then perform a regulated pressure or smoke test |
| Oily seam or connection | Normal CCV oil mist marking an air leak, or a connection that has started to move | Clean the area and identify the exact point where fresh residue returns |
| Black sludge near the MAP sensor passage | EGR soot mixed with CCV oil mist | Inspect the port and sensor; clean only with a sensor-safe method and verify live data afterward |
| Repeated coupler movement or blow-off | Oil-softened boot, poor clamp position, damaged pipe bead, misalignment or excessive pipe stress | Check the pipe ends, coupler condition, bracket alignment and engine movement |
A thin oil film inside the charge-air path is common because the closed-crankcase ventilation system carries oil vapor into the intake. Oil film alone does not prove that the turbocharger or intake manifold has failed; active dripping, pooling, rapid oil use, blue exhaust smoke, or excessive crankcase pressure requires a broader diagnosis.
For 2011–2016 P0299, Check the CAC Outlet Tube Early
Ford service bulletin TSB 19-2143 states that some 2011–2016 F-Super Duty trucks with the 6.7L diesel can show a lack of power and/or P0299 because the charge-air cooler outlet tube disconnects at the throttle body or separates at its crimped connection. That documented failure mode makes the CAC outlet tube an early inspection point before the intake manifold is condemned.
- Record the diagnostic trouble codes and freeze-frame data before clearing anything.
- Inspect the CAC outlet tube at the throttle-body connection and at the crimped joint, especially on 2011–2016 trucks.
- Inspect hot-side and cold-side pipes, boots, clamps, intercooler end tanks and visible intake seals.
- Compare desired and actual boost while also reviewing applicable MAP, barometric-pressure and turbo-control data.
- Check for exhaust leakage that can reduce the energy available to drive the turbocharger.
- Pressure-test or smoke-test the sealed charge-air path before ordering a manifold.
The Ford TSB 19-2143 diagnostic procedure specifically addresses the outlet-tube condition. It does not establish that every P0299 complaint has the same cause, so the remaining charge-air and turbo systems still need testing when the tube is secure.
How Should the Charge-Air System Be Pressure-Tested Safely?
If the complaint appears only after towing or extended driving, reproduce the symptom under controlled load, park safely, shut the engine down, and allow hot components to reach a safe working temperature before connecting test equipment. Do not pressure-test a running engine or work around hot turbocharger and exhaust components.
Many technicians test at a controlled pressure below the truck's peak operating boost, but there is no single safe pressure for every homemade adapter or modified charge-air system. The correct limit depends on the test-tool rating, installed pipes, couplers, intercooler condition and the service procedure being followed. Use soapy water or smoke to locate leakage, keep people clear of capped openings, and depressurize the system before touching a connection.
What Does a Cast-Aluminum Manifold Actually Change?
Heat soak, vibration, pressure cycles, oily soot and repeated service can age polymer components over time. Internal boost also applies outward load to the manifold walls—often called hoop stress—but whether a housing cracks depends on its geometry, material condition, temperature, pressure history and mounting stress.

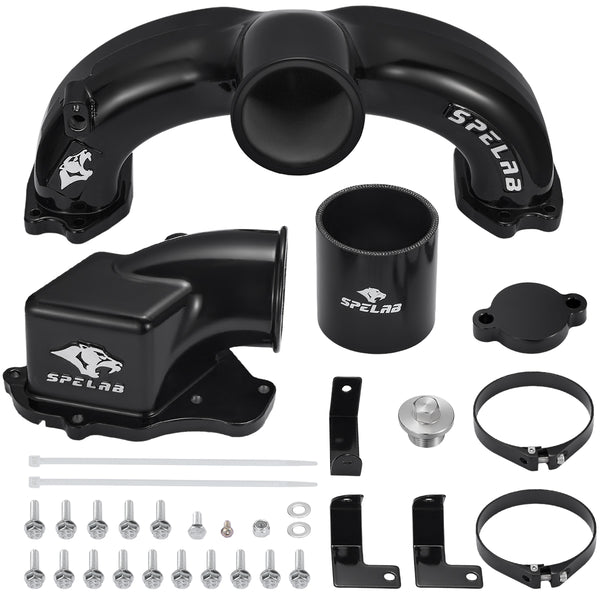
An aluminum manifold is most persuasive as a durability and future-planning upgrade. A truck that repeatedly tows a heavy fifth-wheel, idles on jobsites and accumulates years of heat cycles asks more from the intake hardware than a lightly used commuter. Replacing a damaged or suspect composite housing with cast aluminum removes one aging polymer housing from that environment and provides a rigid part with durable threaded areas for future service.
That future-proofing has limits: aluminum does not make the boots, pipes, intercooler or turbo controls failure-proof. It does reduce one material-related concern, which can be worthwhile when the owner plans to keep the truck and does not want to reopen the same area for another manifold replacement.
| Factor | Factory Composite | Cast-Aluminum Replacement |
|---|---|---|
| Best use | Lower-cost choice when the existing housing remains sound | Confirmed damage, long-term ownership or repeated high-load heat cycling |
| Weight and isolation | Lighter and naturally less conductive | Heavier and more thermally conductive |
| Rigidity | Adequate while the housing, flange and mounting points remain sound | Typically more rigid around the housing, flange and threaded areas, depending on casting and machining quality |
| Performance expectation | Supports the factory airflow path and calibration | A 3.5-inch inlet can support a broader airflow build, but the complete system determines measurable performance |
| Primary buying reason | Lowest immediate cost | Durability, serviceability and greater confidence in a long-term intake refresh |

What Changes Between 2011–2014, 2015–2016, and 2017–2019?
The engine displacement is not enough to select the correct kit. The truck's model year, turbo oil-feed routing, connected pipework, sensors and previous modifications all matter.
| Model Year | Planning Note | Verify Before Ordering |
|---|---|---|
| 2011–2014 | Uses the standard 2011–2014 variant of the referenced manifold kit | VIN/model year, sensor positions, CAC outlet tube condition and previous modifications |
| 2015–2016 | The referenced kit includes an external oil-feed-line arrangement that replaces the factory routing | Correct year variant, included fittings, line routing, heat clearance and installation instructions |
| 2017–2019 | Uses the later 2017–2019 variant of the referenced kit | VIN/model year, connected piping, sensors and any non-stock turbo or charge-air parts |
| 2020 and newer | Outside the stated fitment of this 2011–2019 product | Use only a product specifically confirmed for the later engine layout |
On a 2015–2016 truck, the external oil-feed line is a fitment and engine-protection requirement, not an optional cosmetic detail. Route the supplied line exactly as the kit instructions specify, maintain clearance from hot and moving parts, and verify that no fitting is twisted, loaded sideways or leaking before the truck is driven.
When Should the Intercooler Pipes Be Replaced Too?
Replace related pipes or boots only when inspection shows cracking, separation, oil-softened rubber, damaged beads, persistent movement or poor alignment. A complete bundle can save repeated labor when several parts are already deteriorated, but replacing sound pipework adds cost without proving the original complaint is fixed.

Aftermarket pipe fitment can vary with model year, cab and chassis configuration, turbo hardware and previous modifications. Assemble pipes and couplers loosely first, correct bracket or pipe stress, and tighten the system only after every connection sits squarely. The intake manifold should never be used to pull a misaligned pipe into position.
What Should You Expect for Cost, Labor, HP, MPG, and EGT?
Budget and performance depend more on the truck's condition and the scope of work than on the manifold alone. The following ranges are planning estimates rather than Ford labor times, official specifications or guaranteed results.
| Item | Reasonable Planning Range | Main Variables |
|---|---|---|
| Cast-aluminum manifold or manifold/pipe package | Roughly $500–$900 for currently listed hardware in this category | Model year, included external oil line, pipe package, finish and current pricing |
| Professional labor | Often about 3–7 shop hours | Model year, corrosion, access, broken fasteners, oil-line work, pipe alignment and regional labor rate |
| Wheel horsepower | Often no repeatable gain on an otherwise healthy stock or lightly modified truck; a matched higher-airflow setup may show a small change | Baseline restriction, turbo, tuning, fuel, exhaust, test method and ambient conditions |
| Fuel economy | No dependable MPG gain should be promised from the manifold alone | Load, speed, tires, gearing, regeneration, idle time, weather and driving style |
| Exhaust-gas temperature | Often little or no measurable change from the manifold alone; results can vary under sustained load | Fueling, boost, timing, trailer weight, grade, ambient temperature, probe position and calibration |
| Boost response after repair | Can improve noticeably when the job eliminates a verified leak | Leak size, turbo condition, sensor accuracy and whether other leaks remain |
An intake manifold that repairs a real boost leak can restore lost performance. Replacing a healthy manifold should be judged mainly as a durability and system-planning decision, not as a stand-alone horsepower, MPG or EGT modification.
Installation Checkpoints That Prevent Rework
The awkward part of this job is access, not simply lifting off one plastic housing. The current SPELAB procedure requires moving the upper fuel-filter assembly and connected lines, removing the hot-side charge pipe, releasing manifold-mounted wiring, moving the oil and transmission dipstick support brackets, and transferring the MAP sensor. Photograph routing and connector locations before disassembly so a hidden clip or unsupported line does not become the next fault.
- Disconnect and secure the batteries as required by the service procedure before working around engine wiring and starter-current circuits.
- Protect the open runners: Cover both exposed intake openings immediately. A washer, socket, fastener or abrasive particle entering a runner can turn an intake job into cylinder-head removal or severe internal engine damage.
- Handle the fuel-line clips like aged plastic: The upper fuel-filter lines and return-line quick connects can become brittle after years of engine heat. Release each tab with a suitable pick or trim tool, support the connector body and never pull on the line itself.
- Label the wiring: Release the MAP connector and every harness retainer attached to the manifold without levering against a brittle clip. Photograph the routing first; a broken retainer can leave the harness rubbing on hot or vibrating hardware after reassembly.
- Clean sealing surfaces without gouging the metal or pushing debris into an open passage.
- Use the gaskets, O-rings, sealants and replacement fasteners specified by the exact kit or Ford service information.
- Use an inch-pound torque wrench: The current SPELAB installation guide lists the manifold fasteners at typically about 89 lb-in (approximately 10 N·m). Confirm the value and sequence in the instructions supplied with the exact kit before tightening; 89 lb-in is only about 7.4 lb-ft, and applying 89 lb-ft can destroy the threads or sealing surface.
- Do not tighten by feel after using a torque value: A specified torque is the stopping point. Do not add a “quarter turn,” and do not assume every MAP screw, noise-plate fastener, bracket bolt or oil-line fitting uses the manifold-fastener value.
- Keep oil off the silicone coupler: The current kit guide recommends glass cleaner as temporary assembly lubrication because it evaporates. Petroleum oil or grease can leave the boot slippery and make it more likely to move under boost.
- On 2015–2016 trucks, complete and inspect the external oil-feed-line routing before final assembly.
- Prime before starting: After reconnecting the fuel system and batteries, the current SPELAB guide calls for roughly 6–10 OFF-to-RUN key cycles without cranking. Follow the exact kit procedure, then inspect for fuel, oil and air leaks before applying load.
- After startup, check for abnormal noise and sensor faults, then verify boost under a controlled version of the original operating condition.
If a bracket or hard pipe pushed sideways on the old manifold, correct that alignment before tightening the replacement. A rigid new housing can still leak or suffer damaged threads when it is forced to carry pipe stress it was not designed to absorb.
The complete sequence and current kit-specific notes are available in the 2011–2019 6.7L Power Stroke intake-manifold installation guide.
Frequently Asked Questions
When is a cast-aluminum 6.7 Power Stroke intake manifold worth buying?
A cast-aluminum manifold is easiest to justify when the original housing is cracked, its sealing surface or threaded area is damaged, or a high-mileage tow or work truck is already apart for a long-term intake refresh. The upgrade replaces one heat-cycled composite housing with a more rigid and serviceable part, while the condition of the pipes, boots, intercooler and turbo system still determines overall reliability.
What performance gains can an aluminum intake manifold realistically provide?
Repairing a verified boost leak can restore lost response and delivered boost, but a manifold alone often produces no repeatable wheel-horsepower, MPG or EGT change on a healthy stock or lightly modified truck. Any measurable result depends on the original restriction, turbocharger, tuning, fueling, exhaust, load, ambient conditions and test method; the most consistent benefit is the durability and serviceability of the cast-aluminum housing.
Why does the 2015–2016 kit need a different oil-feed-line arrangement?
The referenced 2015–2016 manifold configuration uses an external turbo oil-feed-line arrangement in place of the factory routing so the larger aftermarket hardware can fit correctly. The supplied line and fittings must be routed according to the exact kit instructions with adequate heat and movement clearance.
Can a new intake manifold still leak after installation?
Yes. A new manifold can leak when a gasket or O-ring is pinched, a sealing surface is dirty, fasteners are tightened in the wrong sequence, a clamp remains loose or connected pipework loads the housing sideways. A regulated post-installation leak test is more reliable than assuming a new part is sealed.
What torque should be used on the SPELAB manifold fasteners?
The current SPELAB installation guide lists the manifold fasteners at typically about 89 lb-in, or approximately 10 N·m. Confirm the value and sequence supplied with the exact kit, use an inch-pound torque wrench, and do not apply that value to unrelated MAP, bracket, noise-plate or oil-line fasteners.
Should the intercooler pipes be upgraded at the same time?
Replace the intercooler pipes or boots at the same time when inspection finds cracking, separation, damaged beads, oil-softened couplers or alignment problems. Sound factory pipework can remain in service, and a pipe bundle should not be used as a substitute for locating the original leak.
Does this 2011–2019 intake manifold fit a 2020 or newer truck?
No interchange should be assumed. The product discussed here is listed only for 2011–2019 Ford Super Duty 6.7L Power Stroke applications, so a 2020 or newer truck requires a manifold specifically confirmed for its later engine layout and vehicle configuration.
About the Author

John Lee
John contributes repair-focused technical content for SPELAB. This article was reviewed against current product fitment records, Ford service information and system-level diagnostic practices for the 6.7L Power Stroke platform.


