
Updated on August 02, 2026.
An electric exhaust cutout is a sound-control mod first. Open the butterfly valve and exhaust takes a shorter path around the muffler; close it and flow returns through the normal exhaust. That can be useful on a track, dyno, or controlled off-road build, but it does not guarantee horsepower or a clean install on every truck with the same pipe diameter.
The real job is choosing the correct pipe size and valve count, keeping every emissions device functional, aiming hot exhaust away from the cab and chassis hardware, and protecting a 12-volt motor from heat, water, road debris, and vibration. A universal kit is a fabricator-fit part, not a vehicle-specific Bolt-on.
Key Takeaways
- Measure the exhaust pipe outside diameter where the cutout will be installed. Do not order from engine size or tailpipe-tip diameter.
- A single exhaust normally uses one valve. A true dual exhaust usually needs two matched valves and synchronized controls.
- Install the bypass downstream of all required catalysts, DPF, SCR, and emissions sensors. Public-road use is governed separately by muffler, noise, inspection, and emissions rules.
- Expect a large sound change. Treat any power change as unproven until backpressure and dyno data show it on the specific vehicle.
- Check dump direction, ground clearance, suspension travel, payload squat, wiring, fuse protection, and weather exposure before cutting pipe.

How Does an Electric Exhaust Cutout Work?
Most kits add a Y-pipe or side branch to the existing exhaust. An electric gear motor rotates a butterfly plate in that branch. With the valve closed, exhaust follows the muffled path. With the valve open, some or most flow exits through the shorter dump path, depending on valve angle, branch geometry, and restriction in the rest of the system.
| Valve position | Exhaust path | What the driver usually notices |
|---|---|---|
| Closed | Through the normal muffler and tailpipe | Lower sound level; a worn gasket or misaligned plate may still hiss or rattle |
| Partly open | Split between the dump and muffled path | Variable sound, but the plate can sit in a high-heat, high-vibration position |
| Fully open | Prefers the shorter, lower-restriction branch | Much louder exhaust, more cabin drone, and possible high-rpm flow change |
The engine does not need backpressure as a goal. It needs an exhaust system with suitable diameter, gas velocity, pulse behavior, turbine outlet pressure where applicable, and enough flow for the actual horsepower and rpm. Opening a cutout may reduce a restrictive muffler's pressure drop at high load, but an oversized or poorly placed branch can also change low-rpm response, sound quality, and sensor behavior.
Does an Exhaust Cutout Add Horsepower?
Sometimes, but a catalog number cannot answer that question. A nearly stock truck with a healthy, low-restriction muffler may show little measurable gain. A high-output engine with a restrictive exhaust may gain at the top of the pull. The valve angle, branch entry, pipe diameter, muffler restriction, camshaft, turbocharger, tuning, and test rpm all matter.
A useful test keeps coolant temperature, intake-air temperature, fuel, tire pressure, gear, and dyno procedure consistent. Record:
- Wheel horsepower and torque with the valve fully closed and fully open
- Air-fuel ratio on gasoline combinations and smoke/airflow data on instrumented diesels
- Exhaust pressure ahead of the restrictive section using a proper pressure tap
- Boost, turbine outlet pressure, and exhaust gas temperature on a turbo build when those sensors are available
- Sound level and cabin drone at cruise, not just a wide-open-throttle video
Do not use an open-valve street pull as a test method. A controlled chassis dyno or closed course gives repeatable data without mixing traffic, noise, and safety risks into the result.
Choose Pipe Diameter and Valve Count
Measure the pipe at the planned installation point with a caliper or exhaust sizing tape. Nominal 2.5-inch exhaust needs a 2.5-inch cutout at that location; a 4-inch diesel tailpipe does not prove the pipe near the muffler or aftertreatment is also 4 inches. Check roundness, wall condition, nearby bends, and enough straight length for the Y-pipe or clamp sleeves.
| Vehicle layout | Typical hardware choice | Fitment check |
|---|---|---|
| Single exhaust | One valve and one Y-pipe | Match the measured outside diameter and verify one safe dump location |
| True dual exhaust | Two same-size valves with a one-to-two controller | Confirm both banks have equal clearance and both valves reach full travel together |
| Dual tips after one muffler | Usually one upstream cutout | Do not mistake two tips for true dual pipes |
| Large diesel exhaust | Often a 4-inch valve if the measured pipe is 4 inches | Keep DPF, DOC, SCR, DEF dosing, EGT, NOx, and pressure-sensor strategy untouched |
Read the Product Limits, Not Just the Size
Specifications are not identical across every electric cutout. The current SPELAB listings show why the exact product page must stay with the kit during planning.
| Kit example | Published physical data | Mechanic's interpretation |
|---|---|---|
| One-piece single Y-pipe kit | 2.0, 2.5, or 3.0 inches; 12V; listed 32-302 degrees F working range | The product listing warns that motor lubricant can stiffen below 23 degrees F and says the motor is not waterproof. That matters on a winter truck or wet trail. |
| Dual remote kit | 2.0, 2.25, 2.5, or 3.0 inches; 304 stainless pipe; 2 mm wall; two 12-foot harnesses; 12V; 10A fused power plug | Useful planning dimensions, but the installer still has to verify circuit capacity, routing, ground, and room for two motors. |
| 4-inch single Y-pipe kit | 4-inch 304 stainless pipe, aluminum-alloy valve body, gear-driven motor, wiring harness, 45-degree dump | A large diesel-size option, not permission to bypass any aftertreatment component or sensor. |
Shipping weight is not a ground-clearance specification. Mock up the complete valve, flange, fasteners, dump tube, motor, connector, and harness. Cycle the suspension, turn the steering where relevant, load the truck to its normal Payload, and check driveshaft movement before welding.
Where Should the Cutout Be Installed?
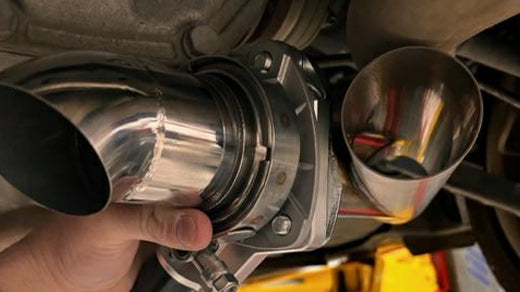
The cleanest controlled-use layout is downstream of every required emissions component and sensor, upstream of the muffler being bypassed, and in a straight section with enough room to service the motor and gasket. The open outlet must discharge away from the cab floor, fuel and brake lines, wiring, hoses, tires, driveshaft, fuel tank, spare tire, and anything that can burn or melt.
There is no universal distance from a catalytic converter, turbocharger, floor, or fuel line that fits every chassis. Use the vehicle service information, kit instructions, measured surface temperatures, heat shielding, and a fabricator's inspection. Do not mount the motor at the lowest point of the truck or point the dump forward where it can scoop water and road debris.
Diesel heat warning: A pre-turbo pyrometer reading is not the temperature at a cutout mounted near the tailpipe. Temperature falls through the turbine, aftertreatment, and pipe, while an active regeneration can deliberately raise temperature inside the aftertreatment. Cummins explains that diesel aftertreatment uses active thermal management, so one borrowed EGT number cannot establish motor clearance.
On a towing truck, place the valve downstream of every aftertreatment component and sensor and as far rearward as the chassis safely allows. Reproduce a full loaded heat cycle and, where applicable, regeneration, then measure the pipe, valve body, motor side, floor, and nearby lines with suitable instruments. If radiant protection is required, use a rigid shield with an air gap and verify temperatures after installation. Do not wrap the electric motor or controller in exhaust wrap; trapped heat can be as damaging as direct radiation.
Installation Sequence That Avoids Comebacks
- Baseline the truck. Scan for codes, inspect exhaust hangers and leaks, verify emissions readiness, and record how it runs before the Mod.
- Measure the complete system. Confirm pipe outside diameter, available straight length, motor envelope, connector access, dump direction, ground clearance, and full suspension/driveshaft travel.
- Choose single or dual control. A dual kit needs two matched valves and synchronized wiring. Do not combine unmatched motors on one circuit.
- Isolate the vehicle before welding. Follow the exact OEM electric-welding procedure for the vehicle. Turn the ignition off, disconnect and isolate every battery in the specified sequence, and disconnect or relocate nearby modules and harnesses when the manual requires it. Put the welder ground clamp as close to the weld as practical. Ford service guidance, for example, calls for both battery cables to be disconnected before electric welding and the ground cable to be placed close to the part being welded. Cool the exhaust and support the vehicle on rated stands at approved lift points; never work under a truck held only by a jack.
- Mock up before cutting. Mark the Y-pipe length and clocking. Hold the motor, flange, and dump tube in their final positions, not just the bare pipe.
- Cut and deburr. Protect nearby fuel, brake, and electrical parts from sparks. Remove metal chips and make the pipe ends square.
- Weld or clamp without preload. Align the exhaust on its hangers before final tightening. A forced joint will crack, leak, or twist the valve after heat cycles.
- Wire a fused 12V supply. Follow the kit diagram. Protect the harness with suitable loom and heat sleeve, secure it away from the exhaust and moving parts, and use a proper firewall grommet.
- Test cold. Confirm full open and full closed travel without holding the switch against the motor stop. Verify both valves move together on a dual kit.
- Test hot. Start the engine outdoors, inspect every joint for leaks, then recheck clearance and wiring after a full heat cycle and complete cooldown.
Clamp-on does not mean no fabrication. The host pipe must be sound, round, clean, and long enough for the joint. Welded stainless requires correct filler, shielding gas, fit-up, and heat control. If those are not already part of your garage skill set, pay an exhaust shop.
Common Failures and Diagnostic Steps
| Symptom | Likely cause | Diagnostic move |
|---|---|---|
| No motor sound or movement | Blown fuse, lost power/ground, failed remote or controller, damaged harness | Check the fuse and voltage under load, then verify ground voltage drop before condemning the motor |
| Motor clicks but plate does not move | Carbon-bound shaft, damaged gear, bent plate, frozen or water-damaged motor | Disconnect power, let the exhaust cool, remove the valve for inspection, and never keep driving the motor against a jam |
| Loud hiss with valve closed | Flange gasket leak, loose fasteners, warped flange, plate not reaching the seat | Use a smoke machine or soapy-water check on a cold low-pressure test setup; inspect soot tracks |
| Rattle at one rpm | Loose plate, motor gear lash, dump contacting the chassis, exhaust hanger preload | Reproduce on a lift only with proper ventilation and inspect with the system hot and cold |
| Intermittent operation in rain or winter | Wet connector/controller, non-waterproof motor exposure, stiff lubricant, low battery voltage | Dry and inspect connectors, load-test the circuit, and compare temperature with the product's operating limits |
| Repeated blown fuse | Shorted harness, seized valve, undersized wiring, wrong circuit, failed motor | Do not install a larger fuse; isolate the branch and measure current against the kit specification |
| Exhaust smell in cab | Dump outlet under a pressure zone, body opening, leaking joint, damaged floor seal | Close the valve, ventilate, stop driving if fumes persist, and correct routing before further use |
Diesel soot note: An older diesel without a particulate filter can load a butterfly shaft with soot and oily condensate faster than a clean gasoline exhaust. That should not be normalized on a modern emissions-intact truck. Cummins states that its DPF collects and oxidizes more than 90% of particulate matter; heavy black deposits downstream of an intact DPF call for diagnosis of the aftertreatment, engine, or an incorrect cutout location.
Do not spray carburetor cleaner into an assembled hot valve or apply copper anti-seize, graphite, ceramic spray, or another lubricant to the shaft unless the valve manufacturer specifically approves that chemical and location. Solvent can attack seals or ignite, and residue can collect grit. Remove the cold valve, clean it by the current service instructions, inspect the plate and shaft, and replace damaged parts rather than forcing them.
Real Truck Use Changes the Decision
- Towing: An open cutout does not increase the truck's tow rating. Under a long grade it can add cabin noise, heat, and fatigue; monitor the same EGT, coolant, transmission, and boost limits the truck required before the Mod.
- Payload: Rear suspension squat reduces underbody clearance. Check the loaded truck, not an empty driveway stance.
- Jobsite: A loud cold start near crews, customers, or posted noise limits is usually the wrong use case. A durable muffled exhaust is simpler.
- Off-roading: Mud, water crossings, rocks, and full articulation punish low-mounted motors and dumps. A product listing that says the motor is not waterproof should be taken literally.
- Extreme cold: One SPELAB listing warns against operation below 23 degrees F. Do not cycle a slow or frozen valve until the assembly is within its stated range.
- Extreme rain and road salt: Weather-resistant is not the same as waterproof. Mount connectors high, use proper seals, and inspect corrosion without assuming a plastic box is submersible.
Which Exhaust Option Fits the Goal?
| Goal | Better path | Tradeoff |
|---|---|---|
| Street-friendly deeper tone | Vehicle-specific muffler or cat-back | Less instant sound change, but easier noise, inspection, and durability management |
| Single-pipe track or dyno build | one-piece single-pipe cutout | Simple one-valve control; available size, weather limit, and installation space must match |
| True dual track exhaust | matched dual-valve system | More hardware, wiring, current draw, cost, and two leak points to maintain |
| Measured 4-inch single exhaust | 4-inch remote Y-pipe kit | Large package needs substantial clearance and cannot bypass diesel aftertreatment |
For a verified closed-course, dyno, show, or controlled off-road project, compare size and control layouts in the electric exhaust cutout kit range. Confirm current product instructions and availability before building the pipe around one part number.
What Does a Proper Installation Cost?
Hardware commonly starts around $130-$200 for the examples reviewed here, before tax and shipping. At a U.S. labor rate of roughly $150-$220 per hour, a straightforward single-valve fabrication and wiring job may require 3-6 hours, or about $450-$1,320 in labor. A dual system, tight chassis, stainless fabrication, heat shielding, or electrical diagnosis can take longer.
| Project level | Planning range | Usually includes |
|---|---|---|
| Single clamp-fit project | $450-$1,100 total | Kit, sound host pipe, clamps, basic protected wiring, leak test |
| Single welded fabrication | $650-$1,800 total | Mock-up, stainless or mild-steel fabrication, hangers, wiring, heat and clearance check |
| Dual custom system | $900-$2,500 or more | Two valves, synchronized controls, two branches, added wiring and fabrication time |
These are planning ranges, not quotes. Broken fasteners, rusty pipe, missing straight length, a weak charging system, custom shields, or reworking a previous exhaust Mod can move the bill quickly.
Noise, Emissions, and Safety Rules
Installing a cutout after the catalytic converter does not automatically make it road legal. California Vehicle Code Section 27150, for example, requires an adequate muffler in constant operation and says an exhaust system shall not be equipped with a cutout, bypass, or similar device. Read the official California exhaust-system rule and check the rules where the vehicle is registered and operated.
Do not route a cutout around a catalytic converter, diesel oxidation catalyst, DPF, SCR system, or related emissions sensor. The EPA vehicle and engine tampering policy explains the federal treatment of parts that bypass, defeat, or render emissions controls inoperative.
Open exhaust can also create a hearing hazard. NIOSH uses 85 dBA over eight hours as its recommended occupational exposure limit and explains that allowable exposure time drops as sound increases. Use a real sound-level meter, follow the venue's limit, and protect everyone standing near the vehicle; the NIOSH noise guidance provides the exposure context.
Electric Exhaust Cutout FAQ
Q: Does an electric exhaust cutout make more horsepower?
A: Not automatically. It may reduce restriction on a combination where the muffler is limiting high-rpm flow, but many vehicles mainly get more sound. Use controlled backpressure and dyno testing to prove a gain.
Q: What size exhaust cutout do I need?
A: Measure the exhaust pipe outside diameter at the exact installation point. Match the valve or Y-pipe to that diameter and verify straight length, roundness, motor space, and dump clearance.
Q: Where should an electric cutout be installed?
A: On a controlled-use build, place it downstream of all required emissions hardware and sensors, before the muffler being bypassed, and where the dump cannot heat the cab, fuel system, brakes, wiring, tires, or driveline.
Q: Can an exhaust cutout be installed without welding?
A: Some kits support clamp installation, but the host pipe must be clean, round, sound, and correctly sized. The joint still needs support, alignment, clearance, and a leak test.
Q: Why will my electric exhaust cutout not close?
A: Check fused power, ground voltage drop, controller output, connectors, motor current, carbon around the shaft, plate alignment, damaged gears, water exposure, and ambient temperature. Do not keep powering a jammed valve.
Q: Can I use an electric exhaust cutout in rain or snow?
A: Only within the exact product's environmental limits. The one-piece SPELAB listing reviewed here says its motor is not waterproof and warns against heavy rain and operation below 23 degrees F. Mounting and connector protection cannot turn a non-waterproof motor into a submersible part.
Q: Is an exhaust cutout legal when it is closed?
A: Do not assume so. Some jurisdictions regulate excessive noise, while others specifically restrict installed cutouts or bypass devices even if the valve can close. State code, local ordinances, inspection rules, and emissions placement all matter.
About the Author
John Lee writes practical truck and automotive upgrade guides for SPELAB. He evaluates parts through fitment measurements, system diagnosis, installation risk, and the way a vehicle is actually used, with performance claims treated as test results rather than catalog promises.


1 comment
hi looking to have a electric cutout installed on my 06 STS-V.
give me a call back whenever.