
2008-2010 6.4L Powerstroke EGR Delete Kit Installation Guide
This guide is organized from the original SPELAB installation images for the 2008-2010 6.4L Powerstroke EGR Delete Kit. Follow the steps in order and confirm all factory torque specifications before final assembly.
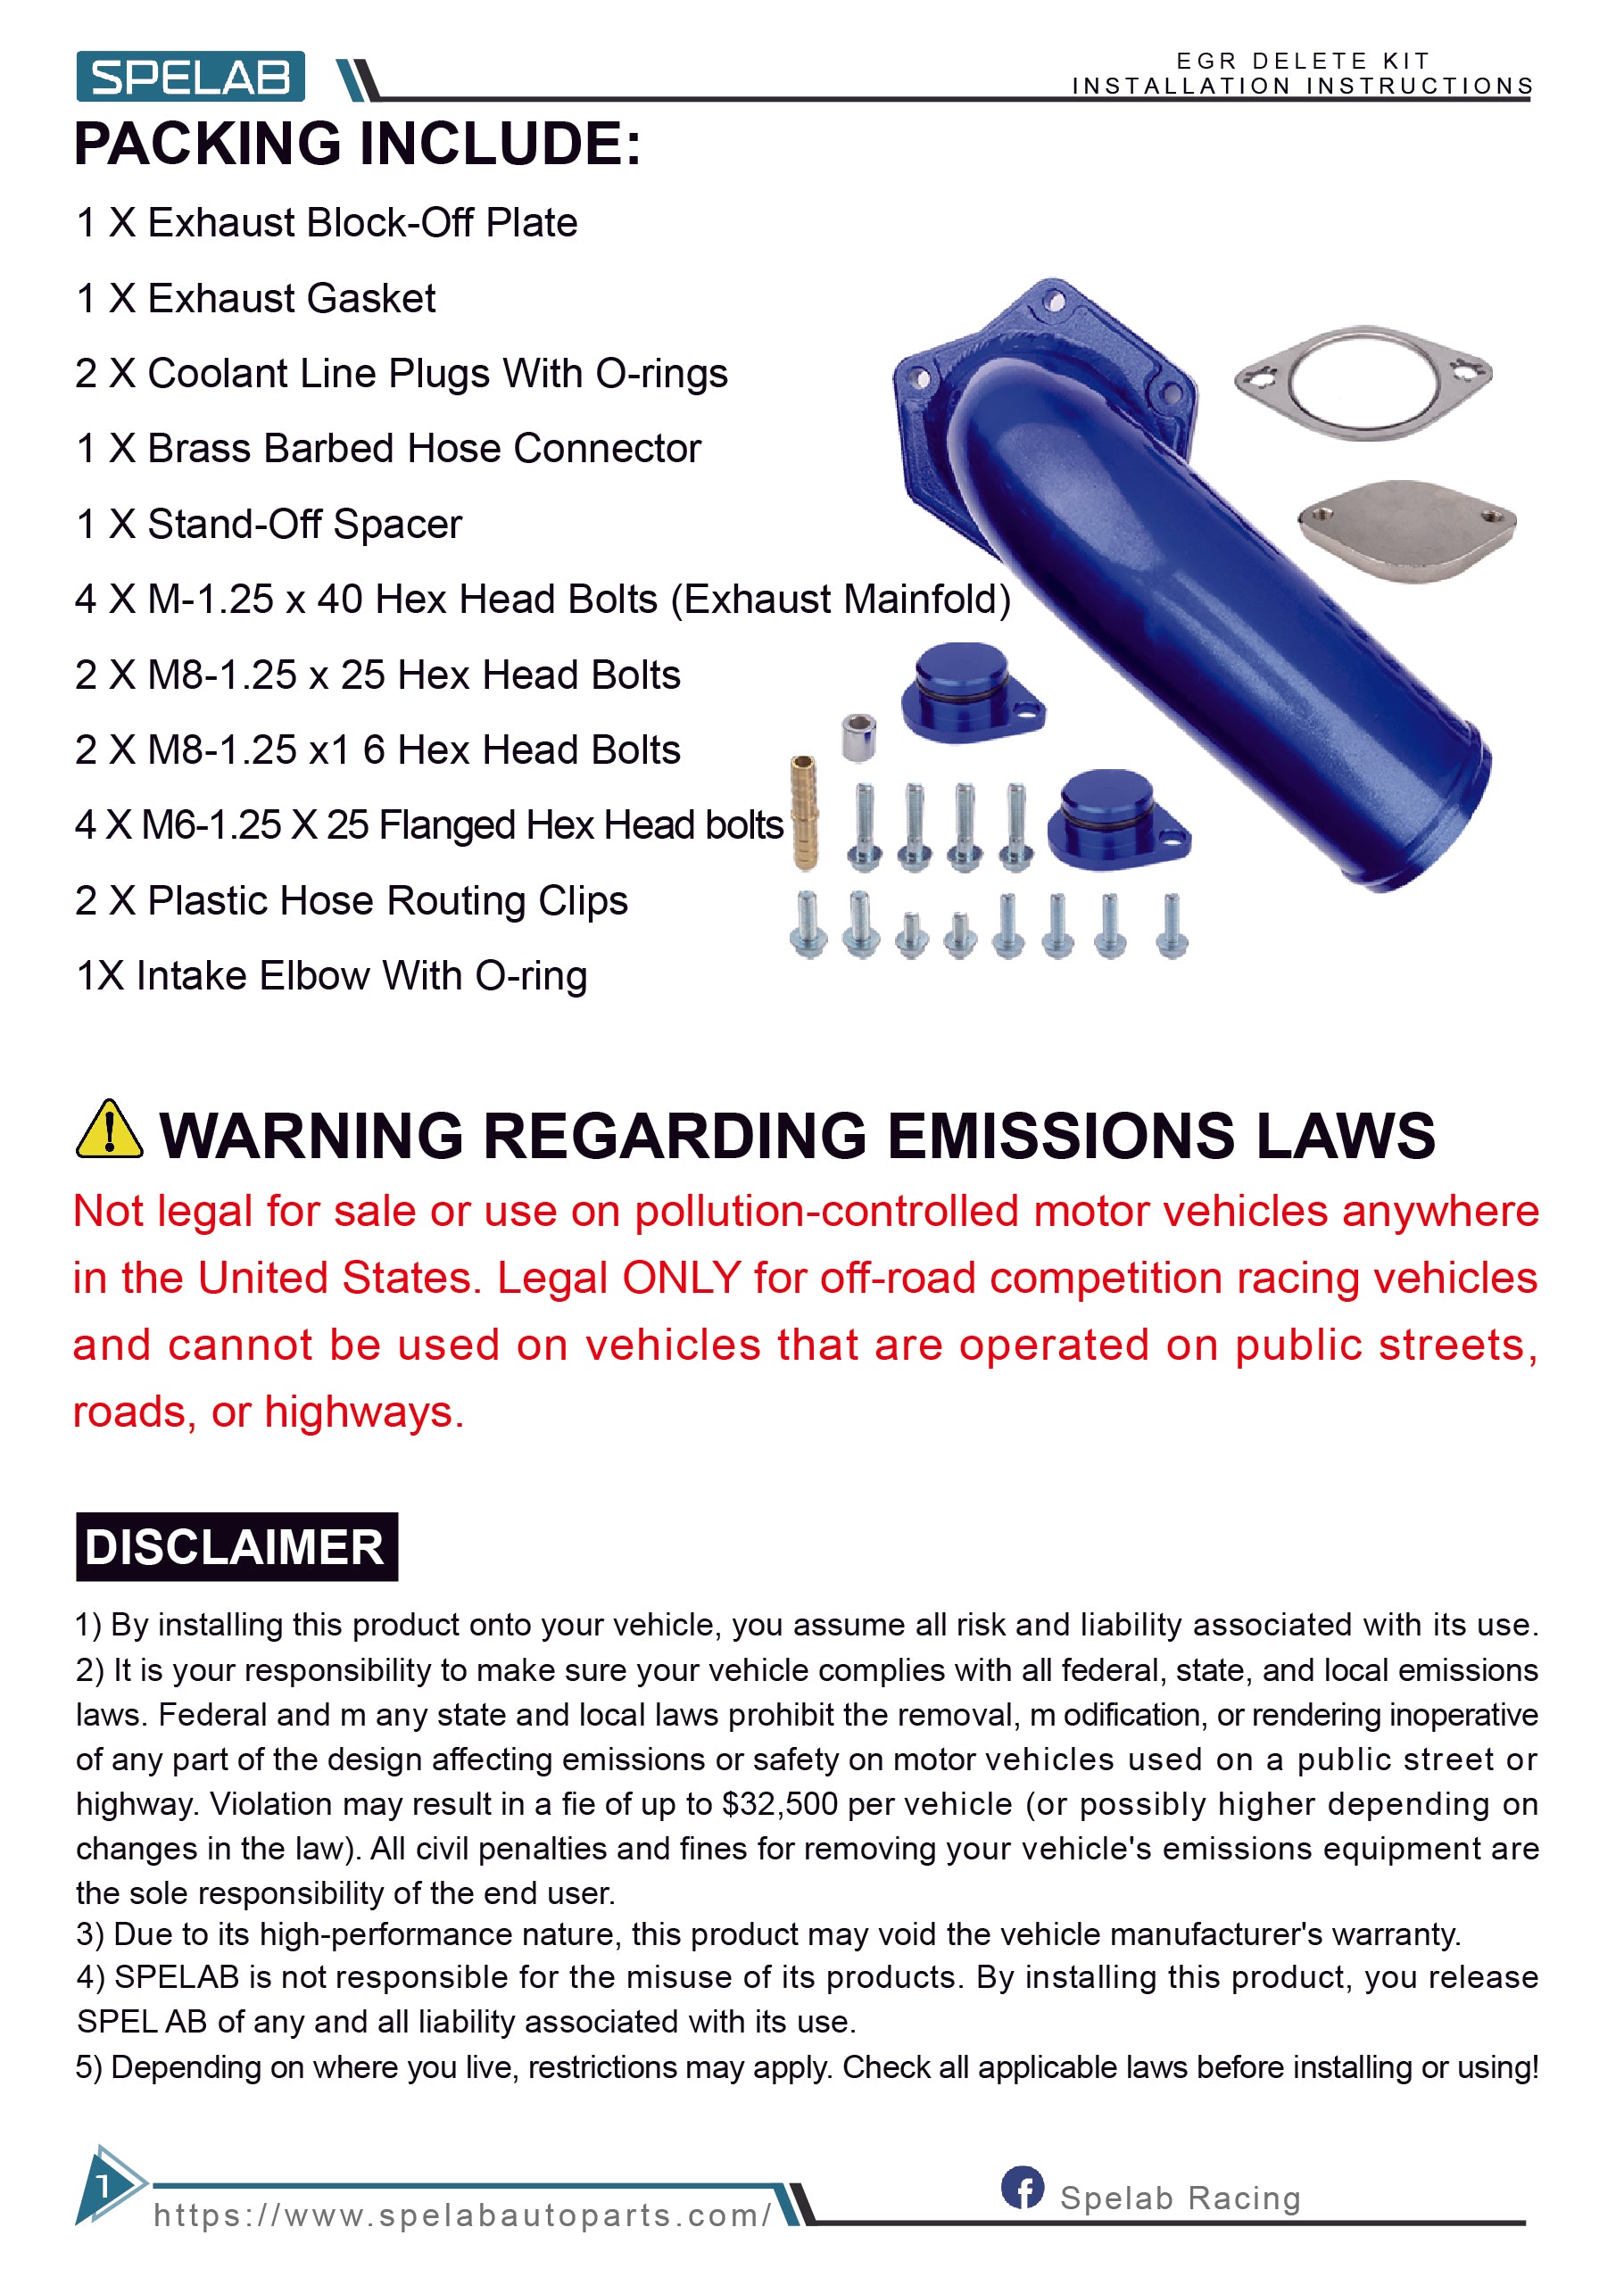
Packing Include
- 1 x Exhaust Block-Off Plate
- 1 x Exhaust Gasket
- 2 x Coolant Line Plugs with O-rings
- 1 x Brass Barbed Hose Connector
- 1 x Stand-Off Spacer
- 4 x M-1.25 x 40 Hex Head Bolts, Exhaust Manifold
- 2 x M8-1.25 x 25 Hex Head Bolts
- 2 x M8-1.25 x 16 Hex Head Bolts
- 4 x M6-1.25 x 25 Flanged Hex Head Bolts
- 2 x Plastic Hose Routing Clips
- 1 x Intake Elbow with O-ring
Warning Regarding Emissions Laws
Not legal for sale or use on pollution-controlled motor vehicles anywhere in the United States. Legal ONLY for off-road competition racing vehicles and cannot be used on vehicles that are operated on public streets, roads, or highways.
By installing this product onto your vehicle, you assume all risk and liability associated with its use. It is your responsibility to make sure your vehicle complies with all federal, state, and local emissions laws. This product may void the vehicle manufacturer's warranty. Depending on where you live, restrictions may apply. Check all applicable laws before installing or using.
Preparation
- Make sure the front wheels are straight.
- Disconnect both batteries.
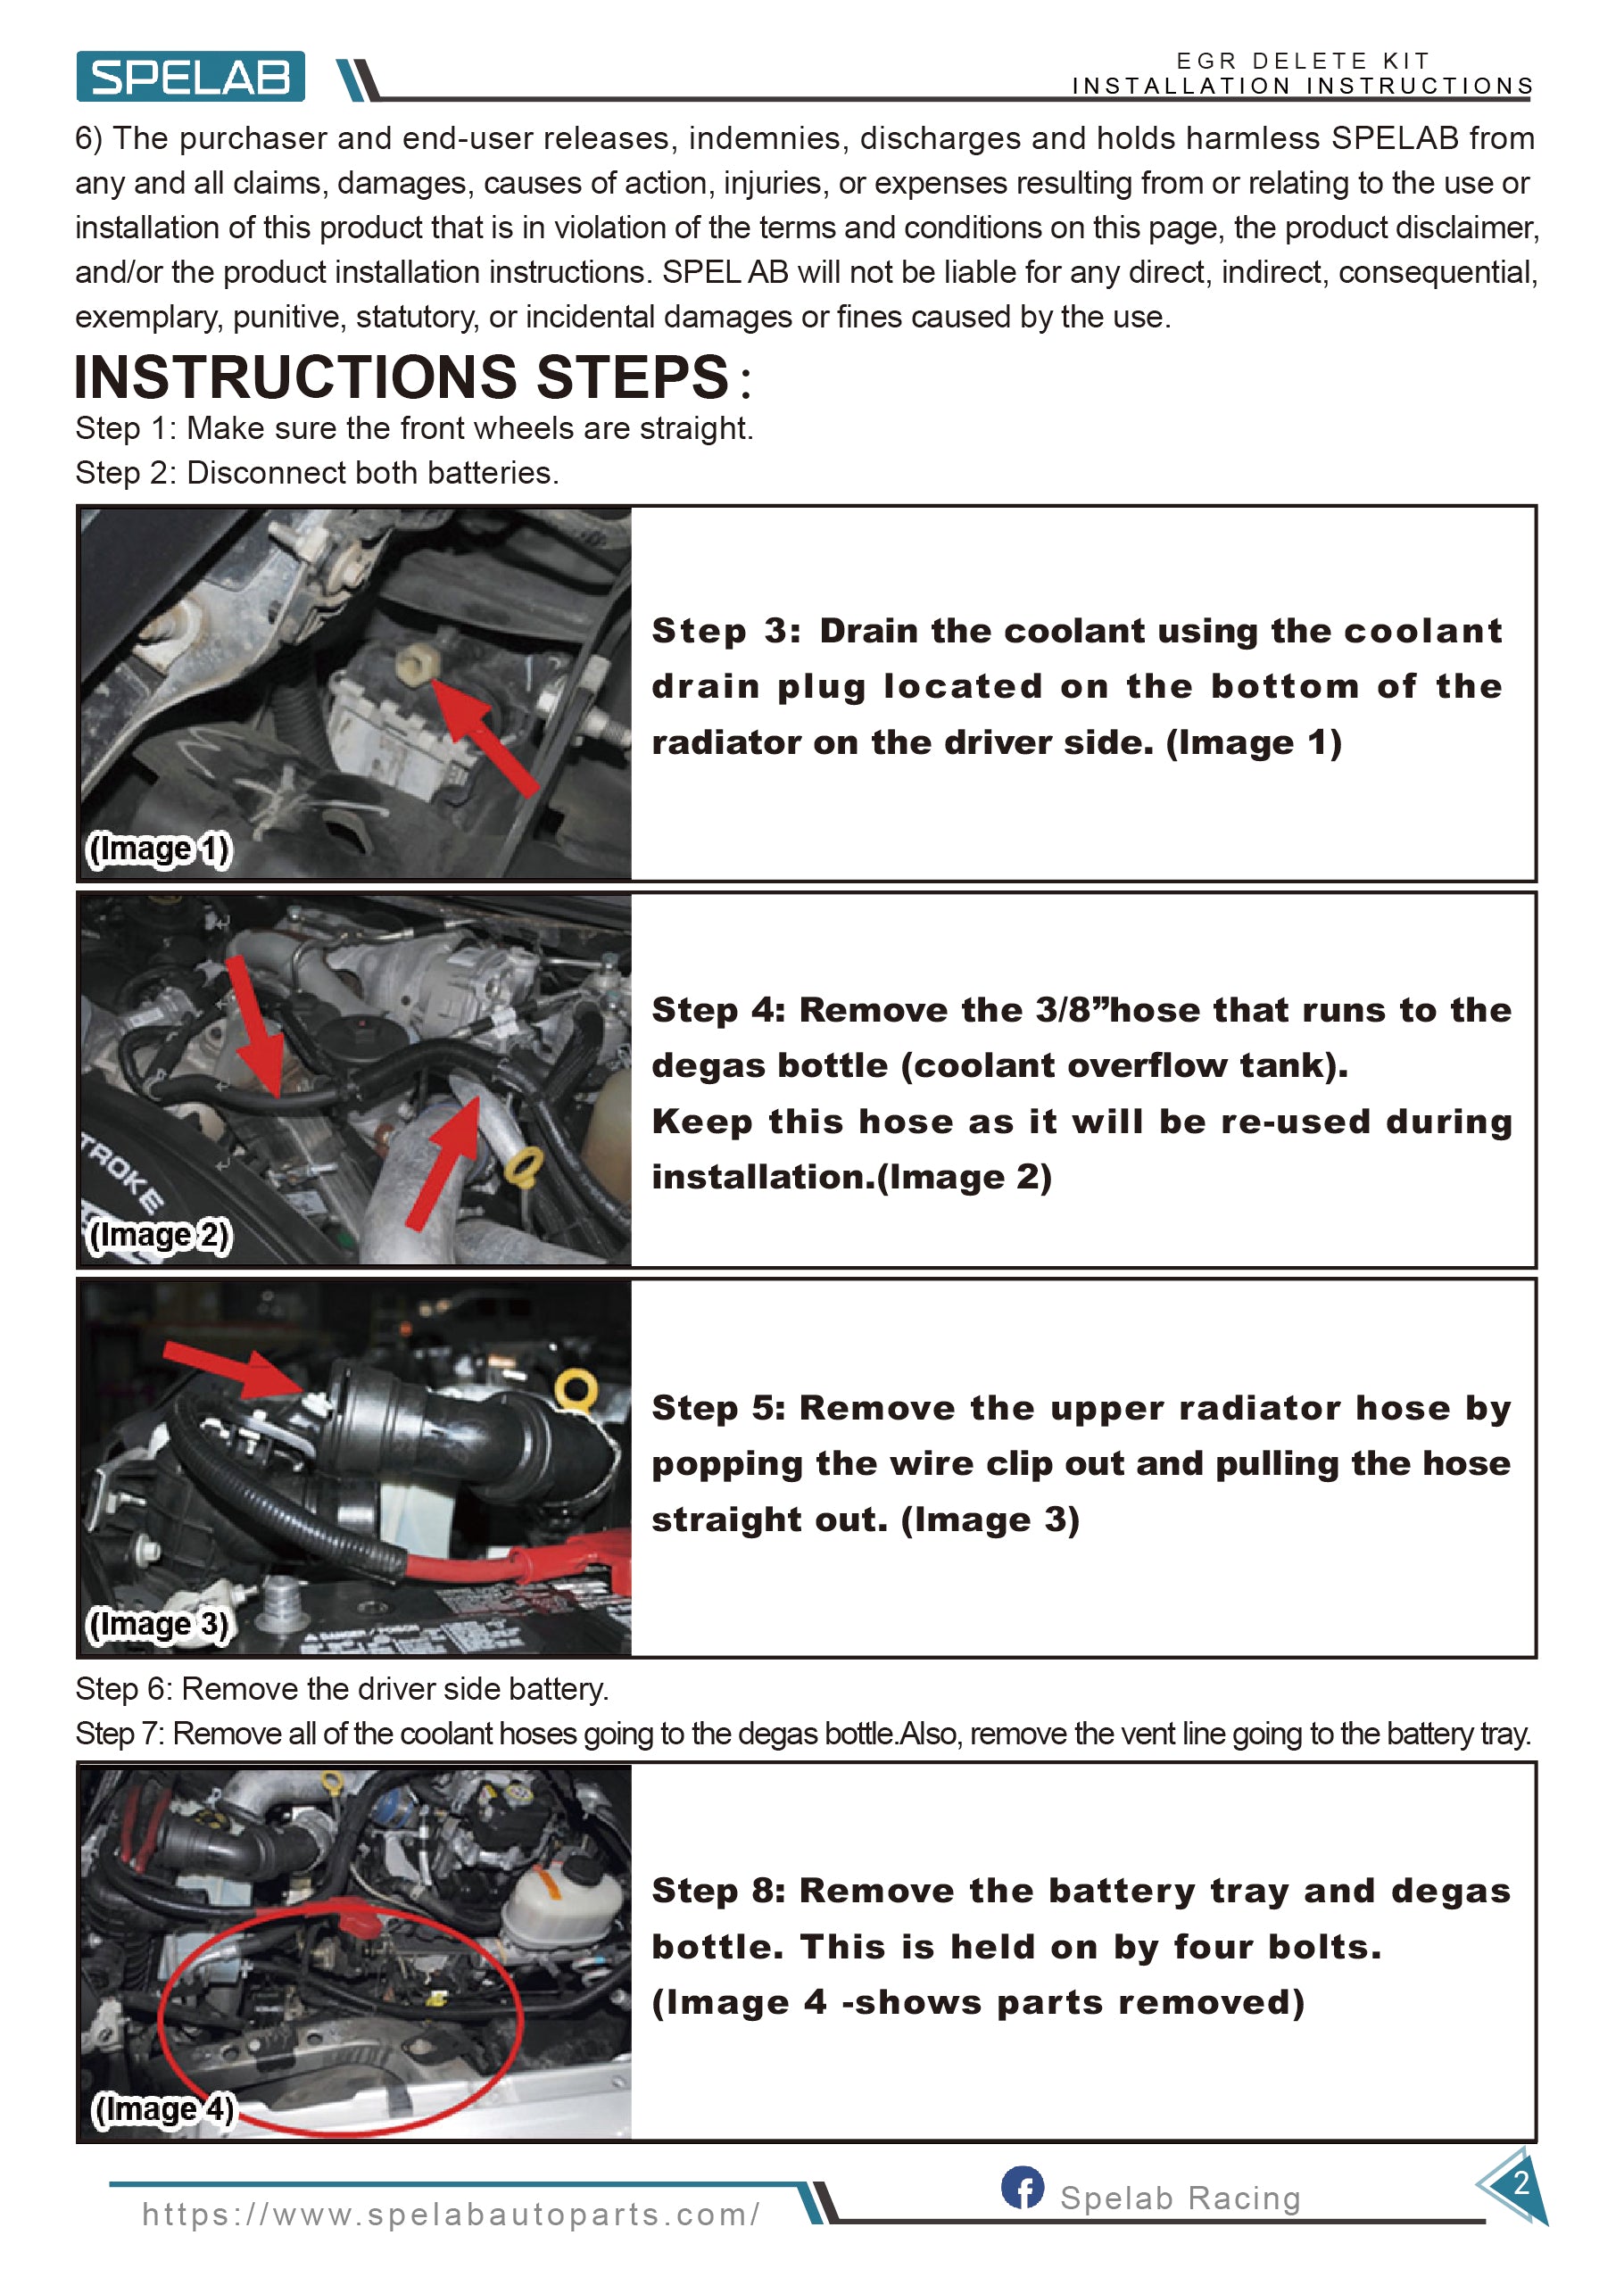
- Drain the coolant using the coolant drain plug located on the bottom of the radiator on the driver side.
Remove Coolant Lines, Battery Tray, and Access Parts
- Remove the 3/8 inch hose that runs to the degas bottle, also called the coolant overflow tank. Keep this hose, as it will be reused during installation.
- Remove the upper radiator hose by popping the wire clip out and pulling the hose straight out.
- Remove the driver side battery.
- Remove all of the coolant hoses going to the degas bottle. Also remove the vent line going to the battery tray.
- Remove the battery tray and degas bottle. This is held on by four bolts.
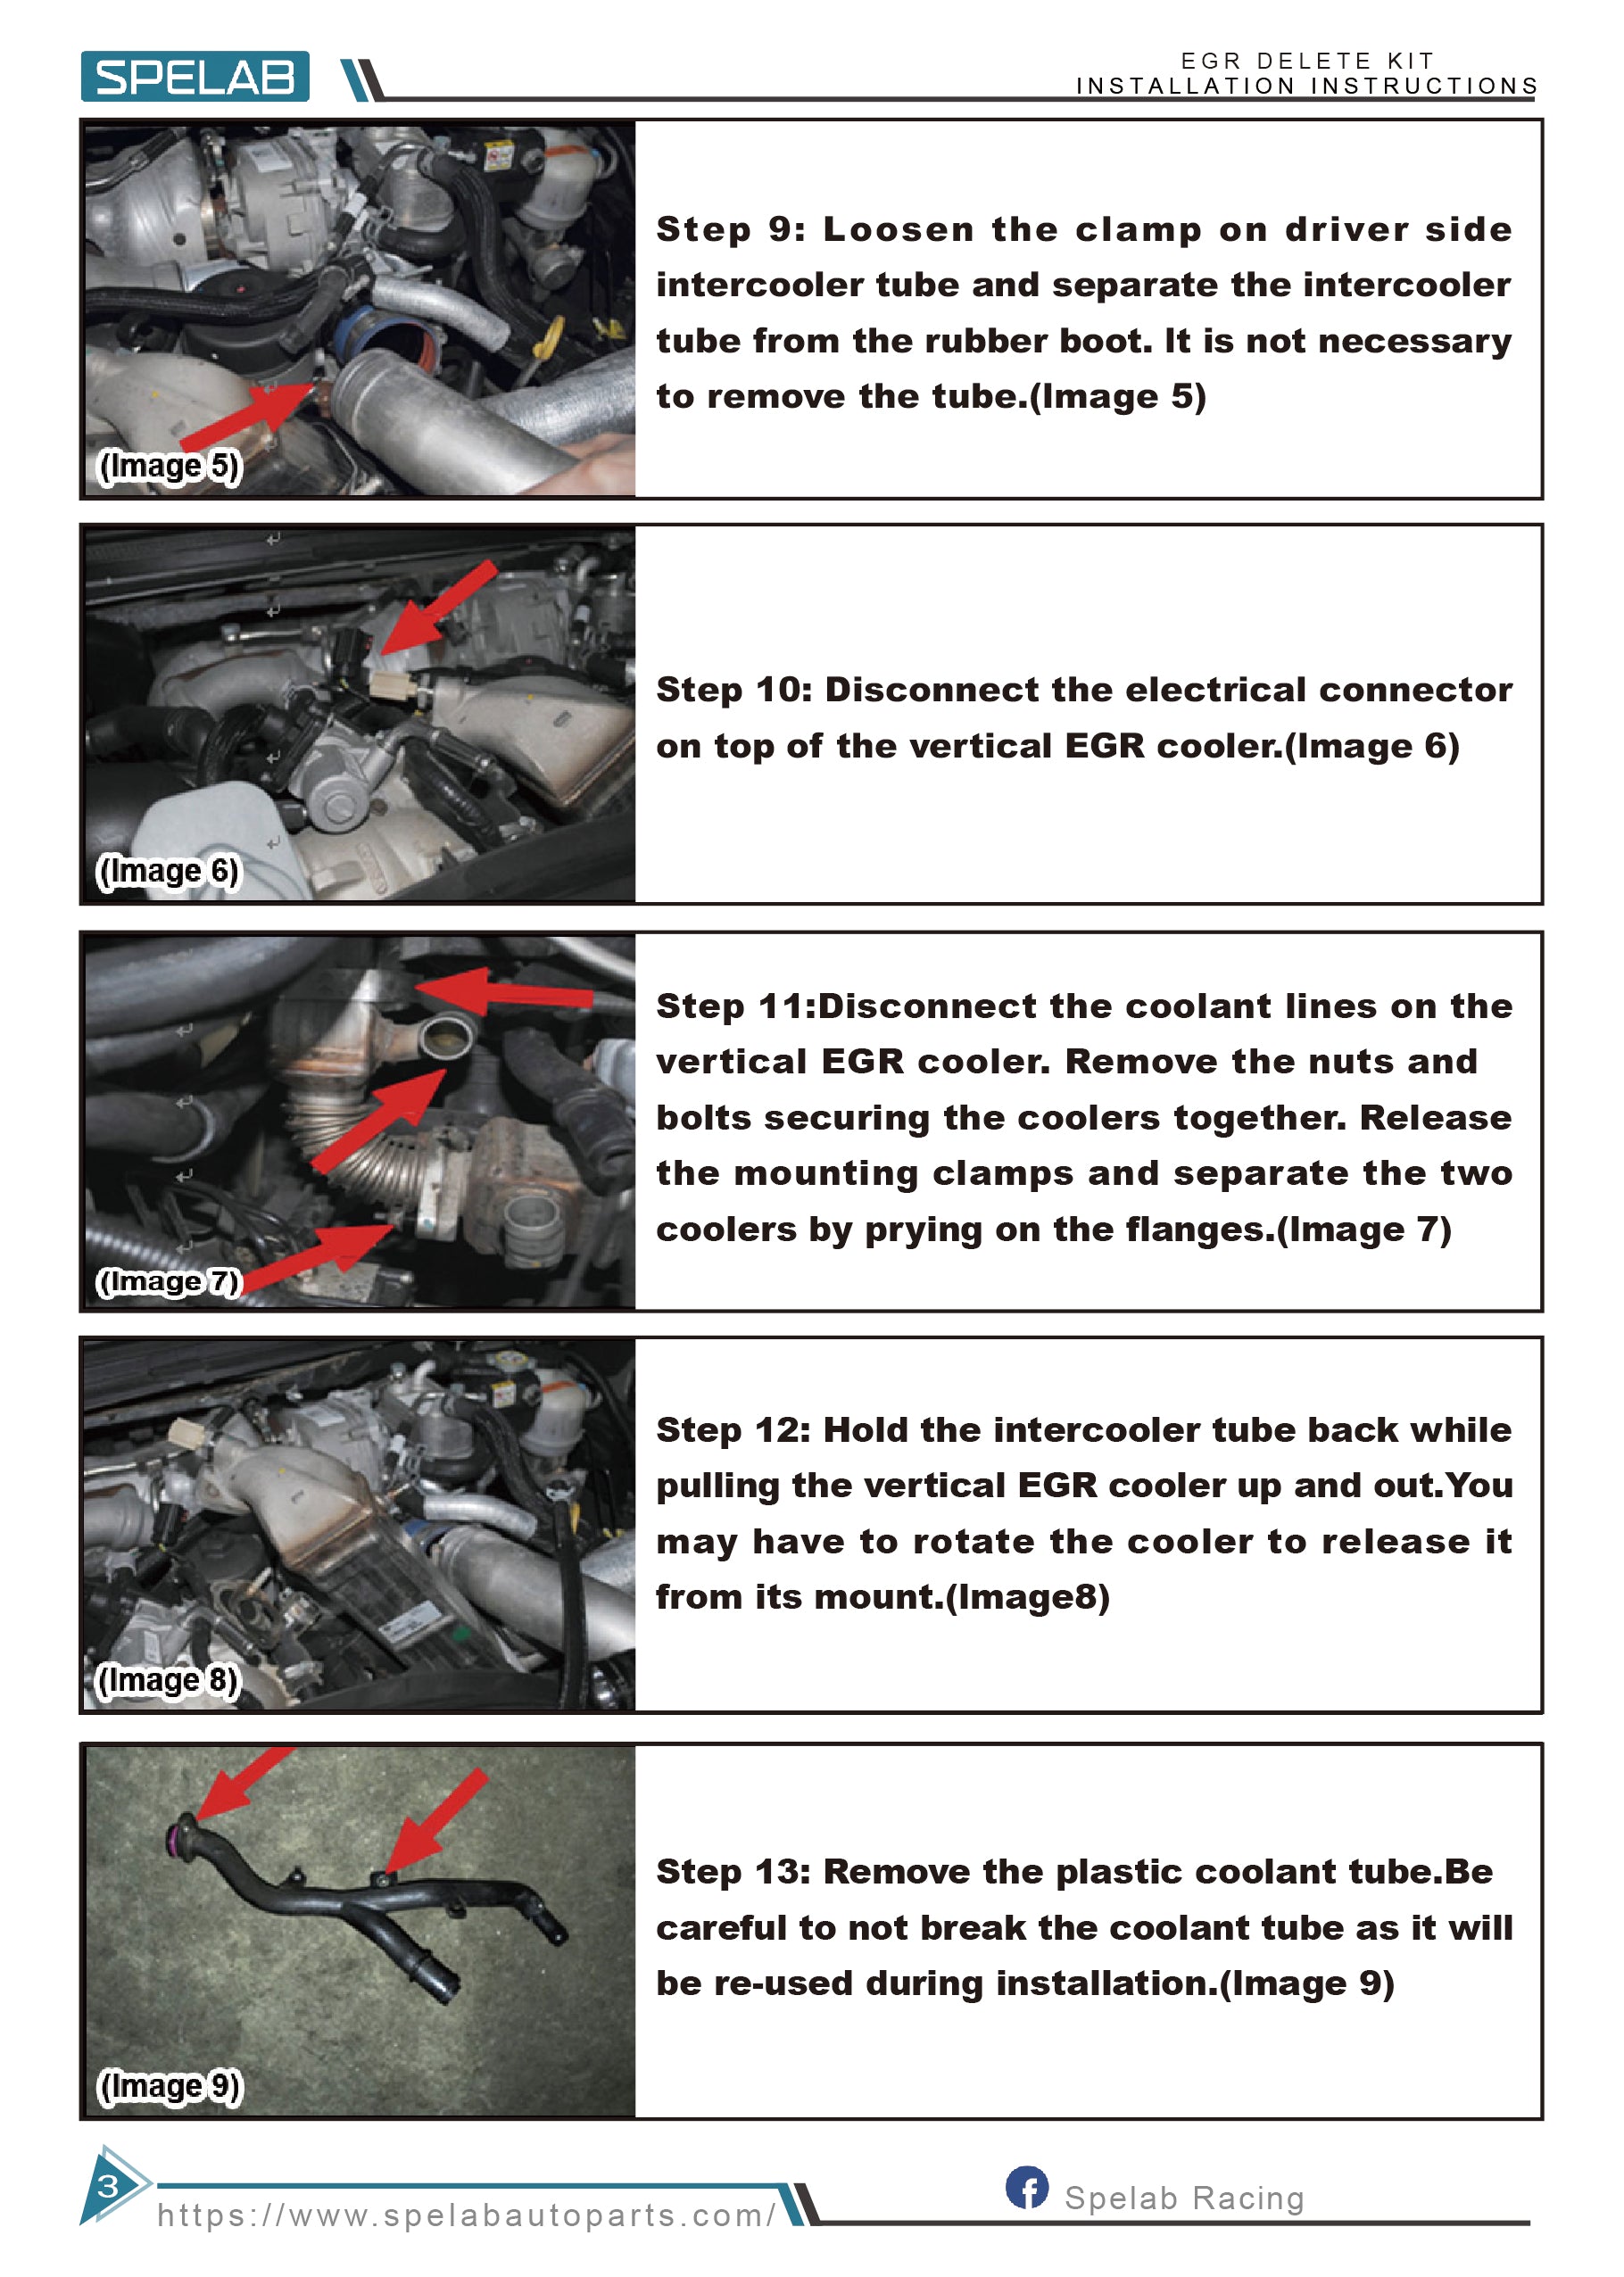
- Loosen the clamp on the driver side intercooler tube and separate the intercooler tube from the rubber boot. It is not necessary to remove the tube.
- Disconnect the electrical connector on top of the vertical EGR cooler.
Remove the EGR Coolers and Related Hardware
- Disconnect the coolant lines on the vertical EGR cooler. Remove the nuts and bolts securing the coolers together. Release the mounting clamps and separate the two coolers by prying on the flanges.
- Hold the intercooler tube back while pulling the vertical EGR cooler up and out. You may have to rotate the cooler to release it from its mount.
- Remove the plastic coolant tube. Be careful not to break the coolant tube, as it will be reused during installation.
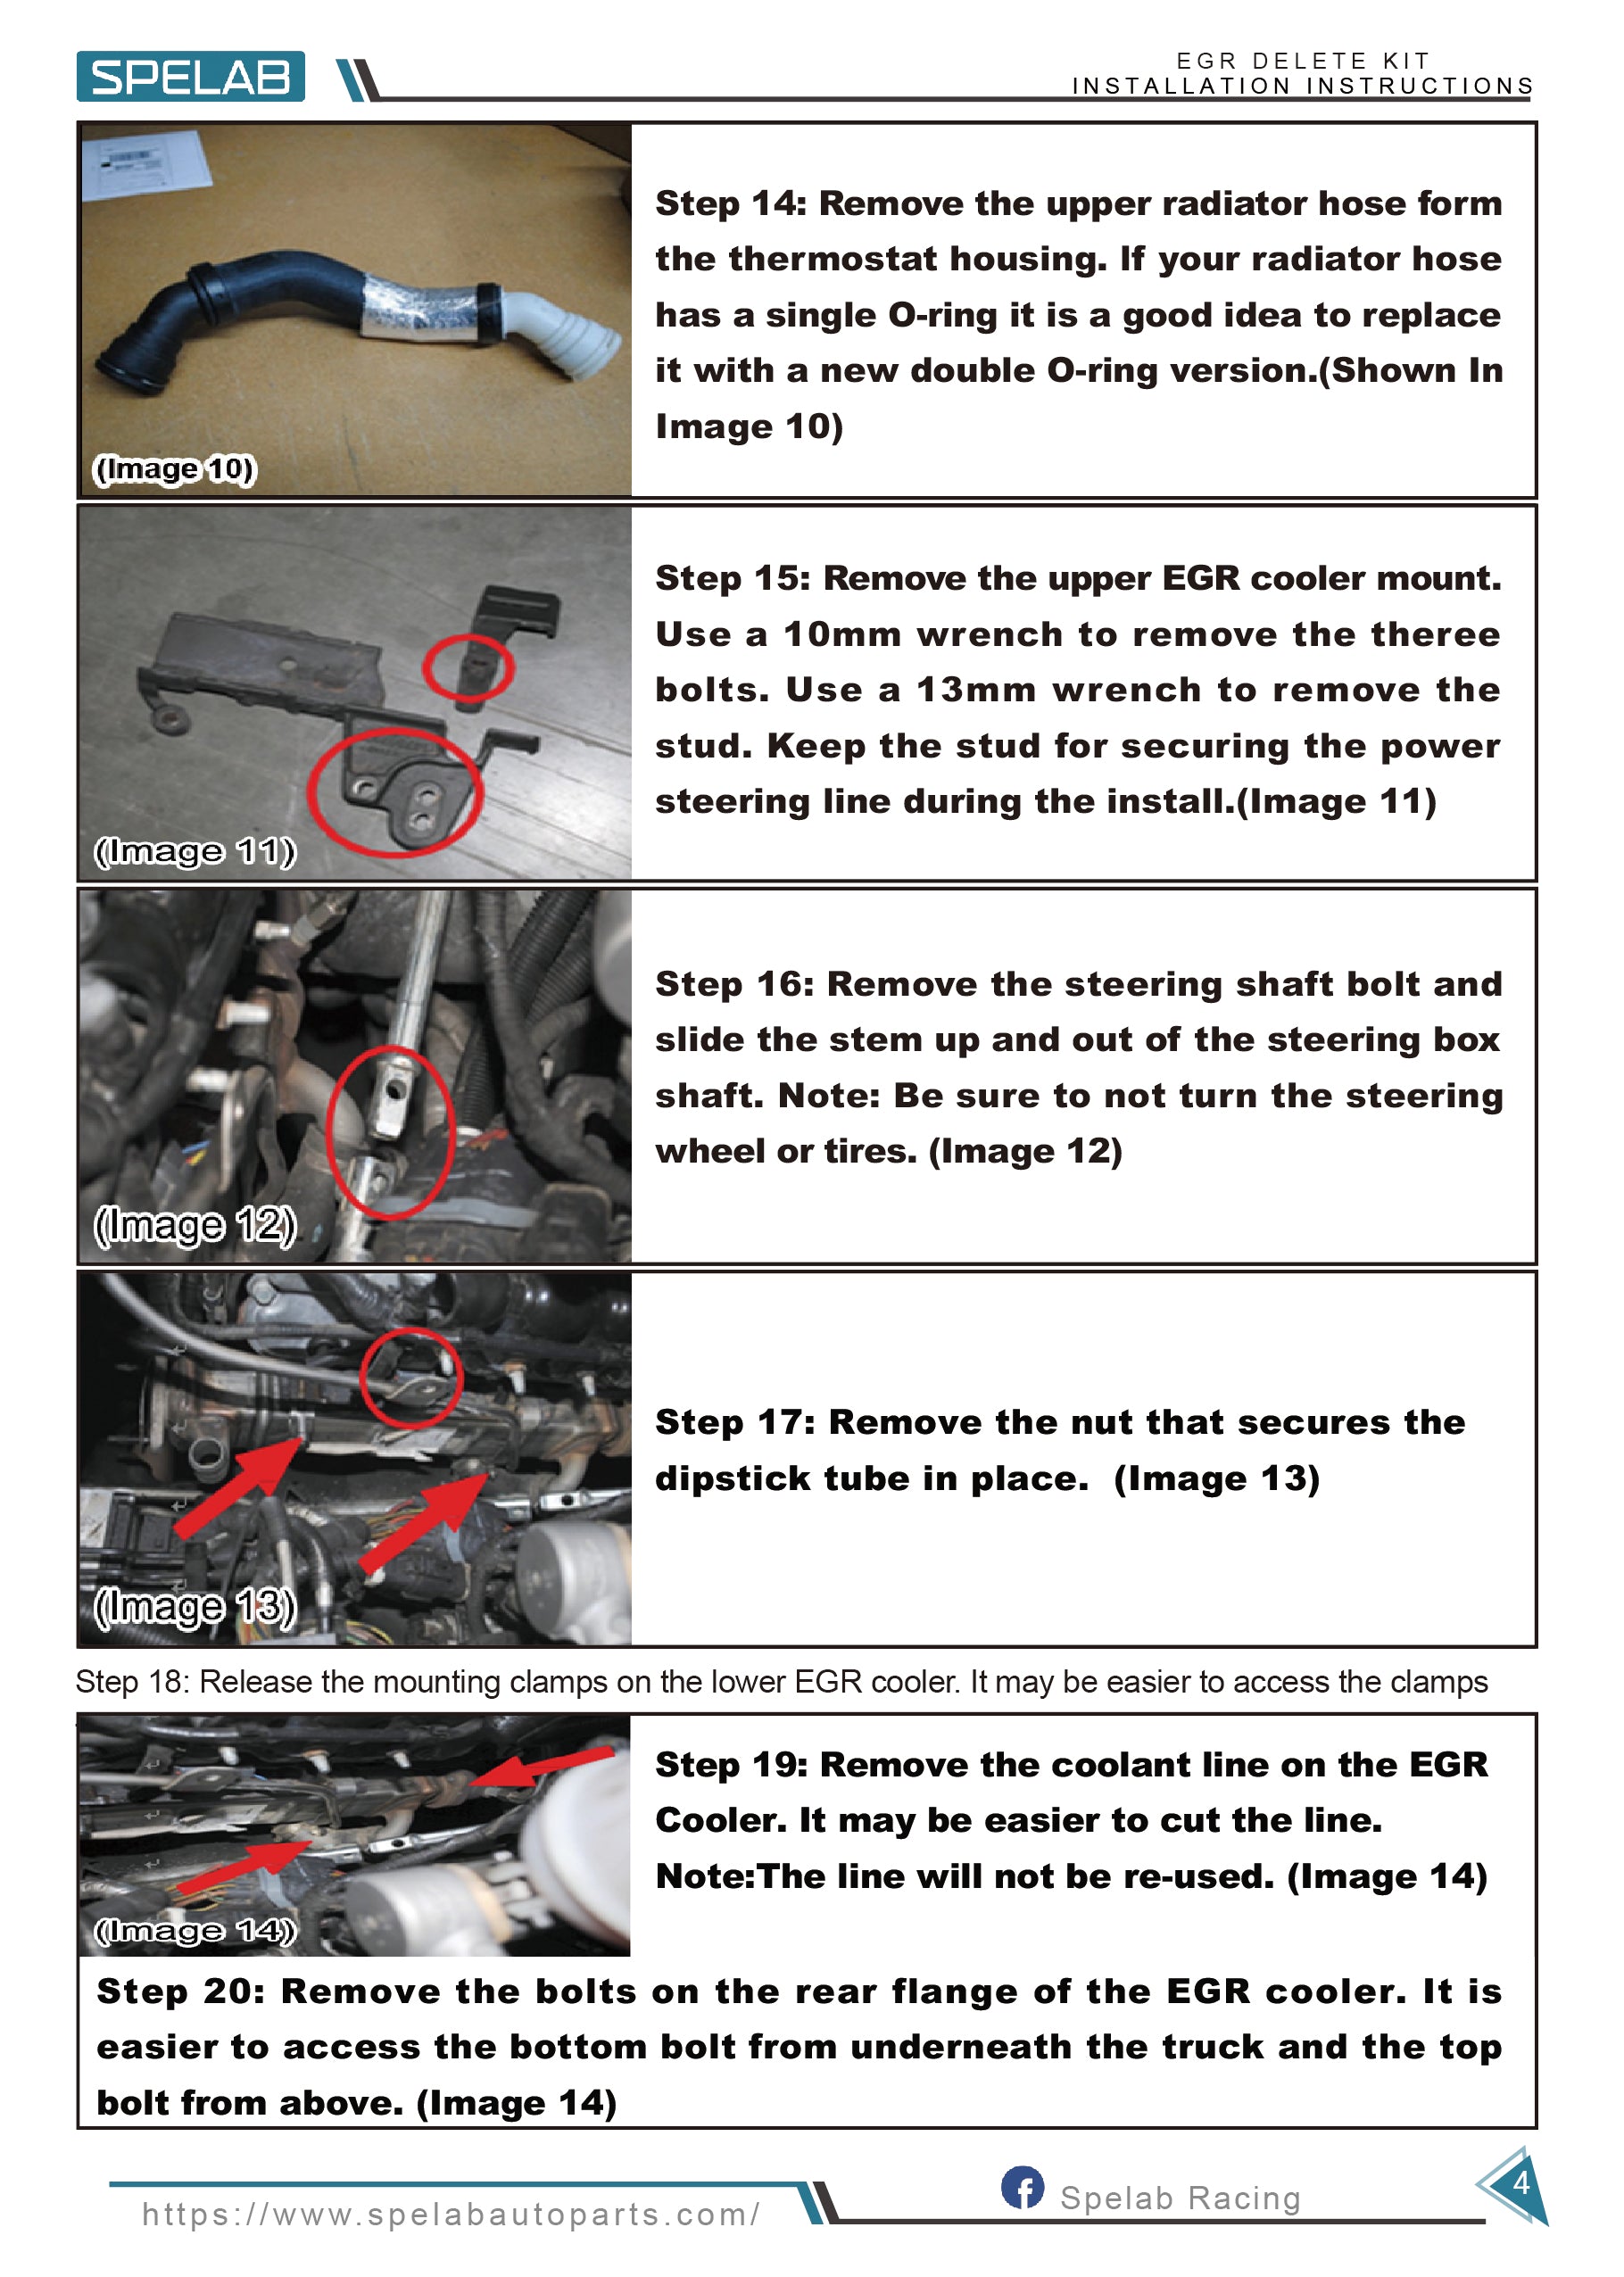
- Remove the upper radiator hose from the thermostat housing. If your radiator hose has a single O-ring, it is a good idea to replace it with a new double O-ring version.
- Remove the upper EGR cooler mount. Use a 10mm wrench to remove the three bolts. Use a 13mm wrench to remove the stud. Keep the stud for securing the power steering line during the install.
- Remove the steering shaft bolt and slide the stem up and out of the steering box shaft. Note: Be sure not to turn the steering wheel or tires.
- Remove the nut that secures the dipstick tube in place.
- Release the mounting clamps on the lower EGR cooler. It may be easier to access the clamps from underneath the truck.
- Remove the coolant line on the EGR cooler. It may be easier to cut the line. Note: The line will not be reused.
- Remove the bolts on the rear flange of the EGR cooler. It is easier to access the bottom bolt from underneath the truck and the top bolt from above.
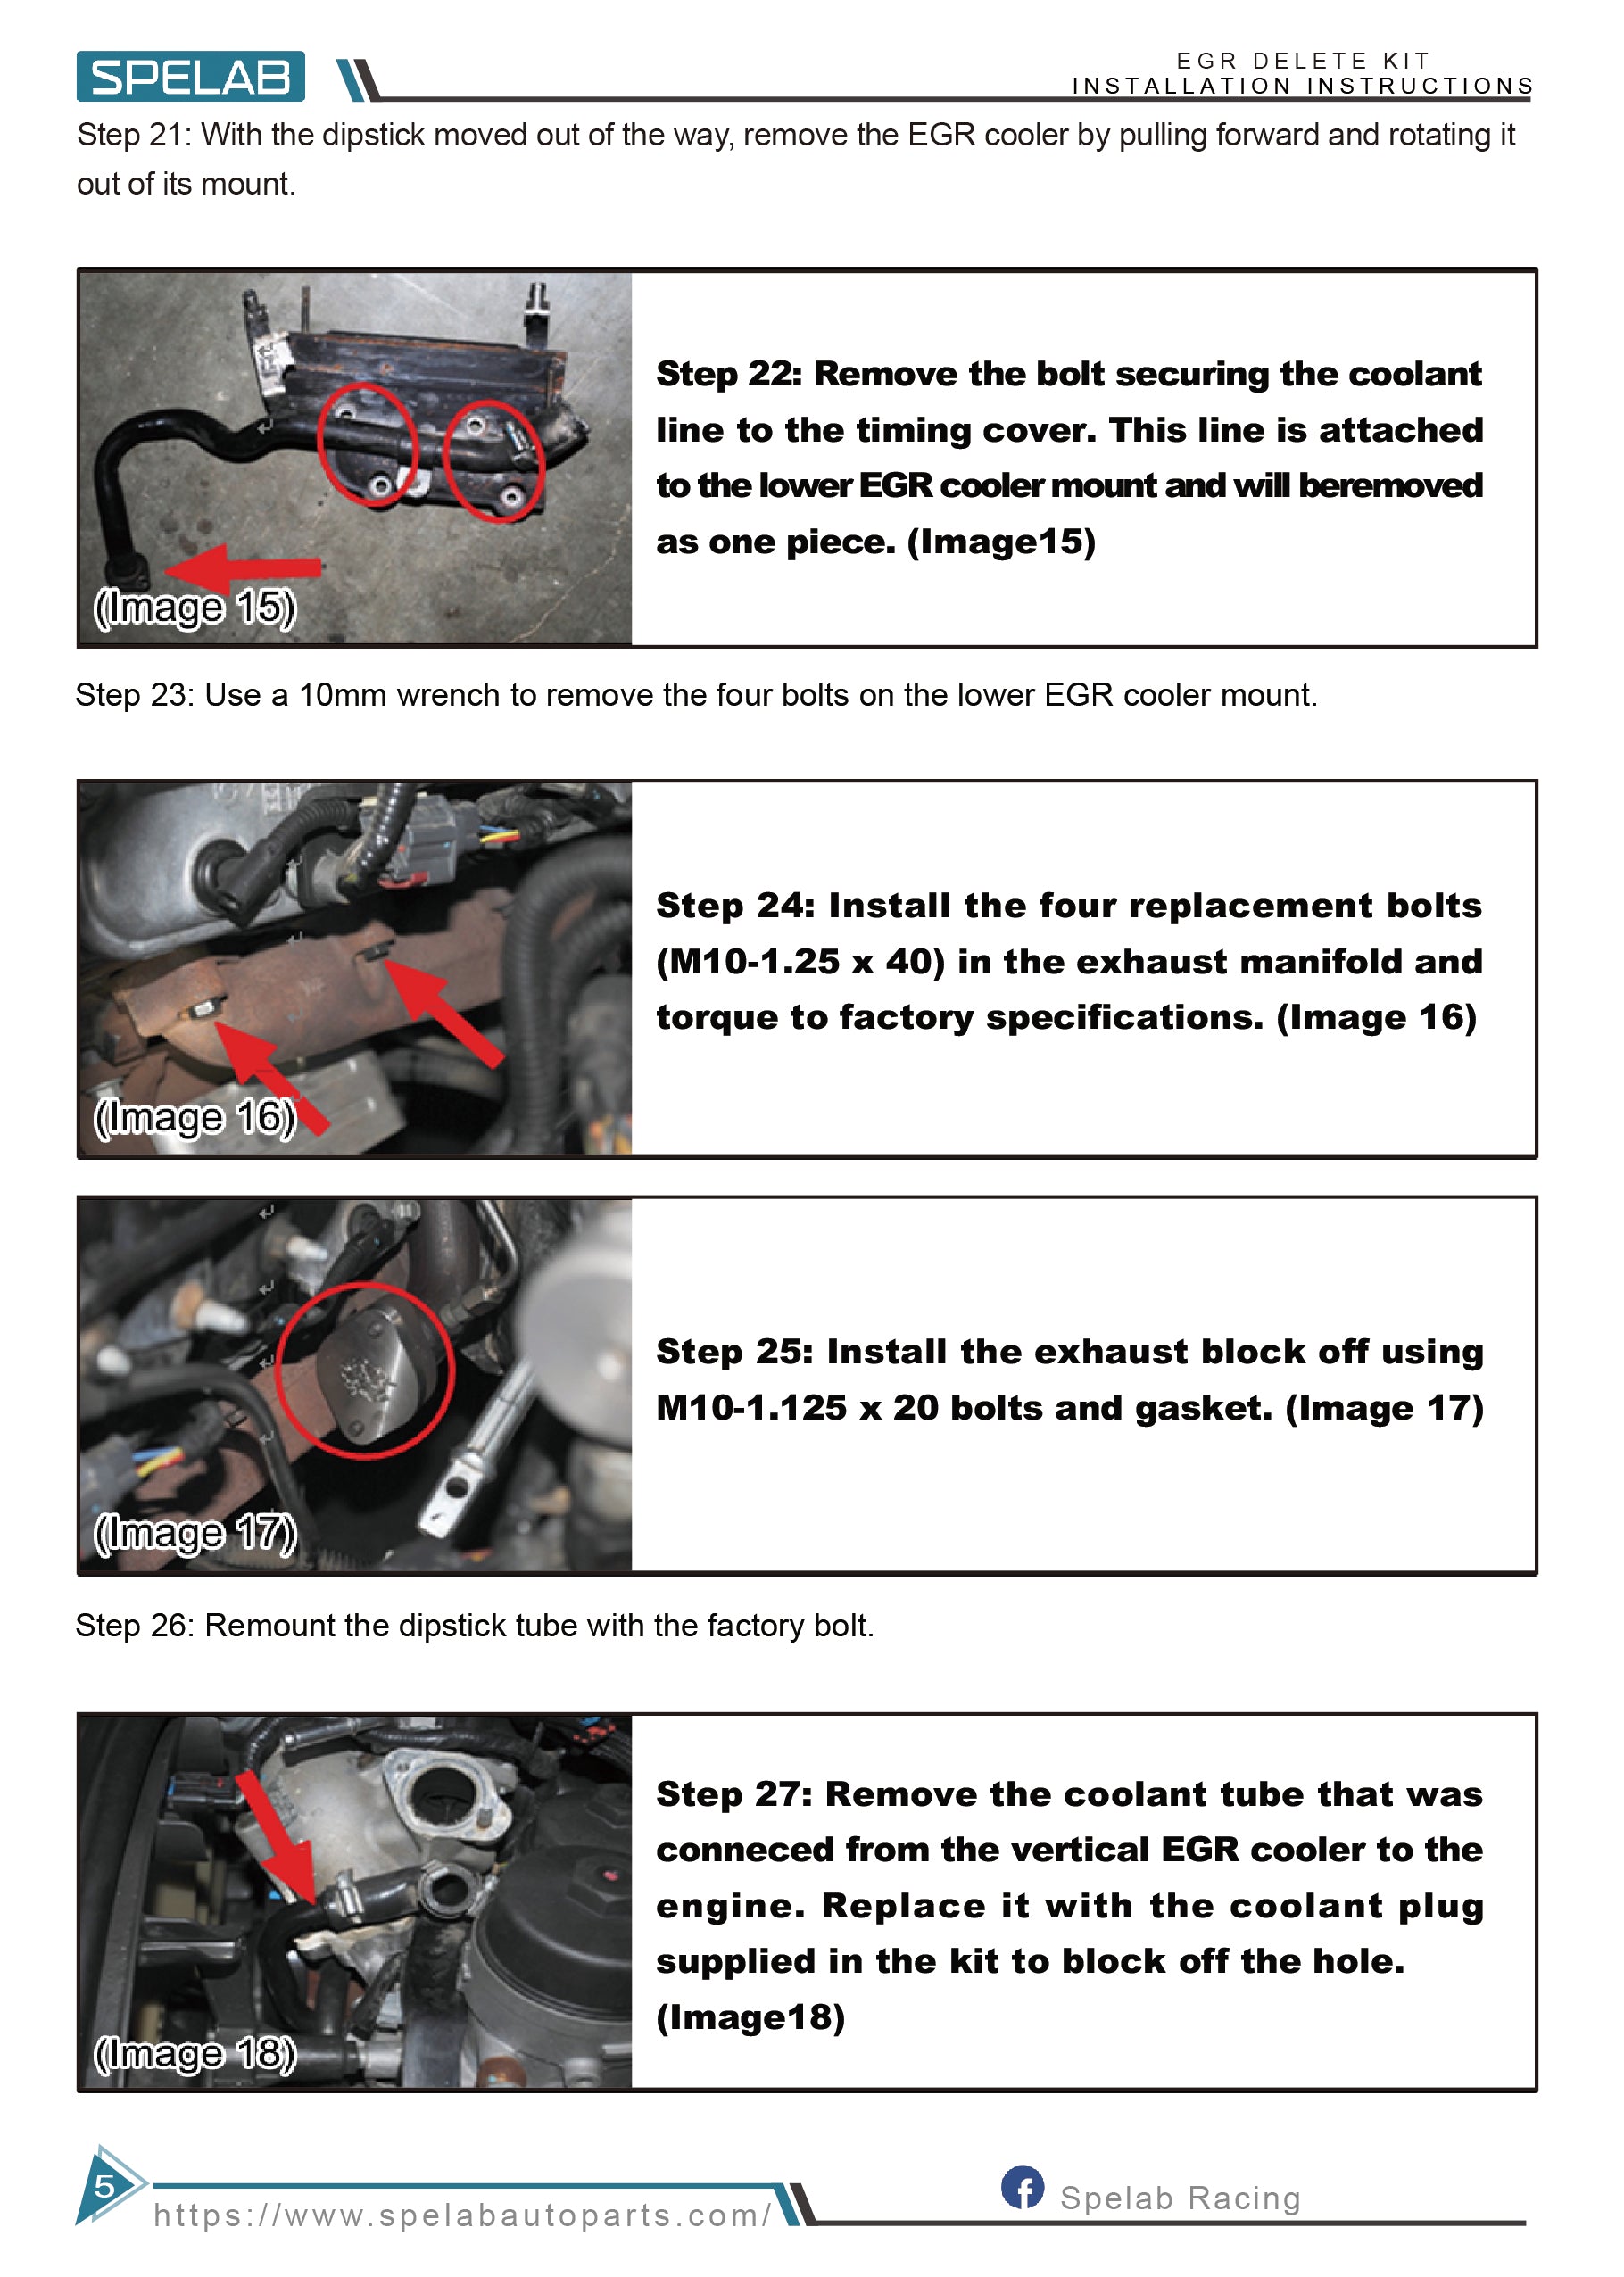
- With the dipstick moved out of the way, remove the EGR cooler by pulling forward and rotating it out of its mount.
- Remove the bolt securing the coolant line to the timing cover. This line is attached to the lower EGR cooler mount and will be removed as one piece.
- Use a 10mm wrench to remove the four bolts on the lower EGR cooler mount.
Install the EGR Delete Kit Components
- Install the four replacement bolts, M10-1.25 x 40, in the exhaust manifold and torque to factory specifications.
- Install the exhaust block-off using M10-1.125 x 20 bolts and gasket.
- Remount the dipstick tube with the factory bolt.
- Remove the coolant tube that was connected from the vertical EGR cooler to the engine. Replace it with the coolant plug supplied in the kit to block off the hole.
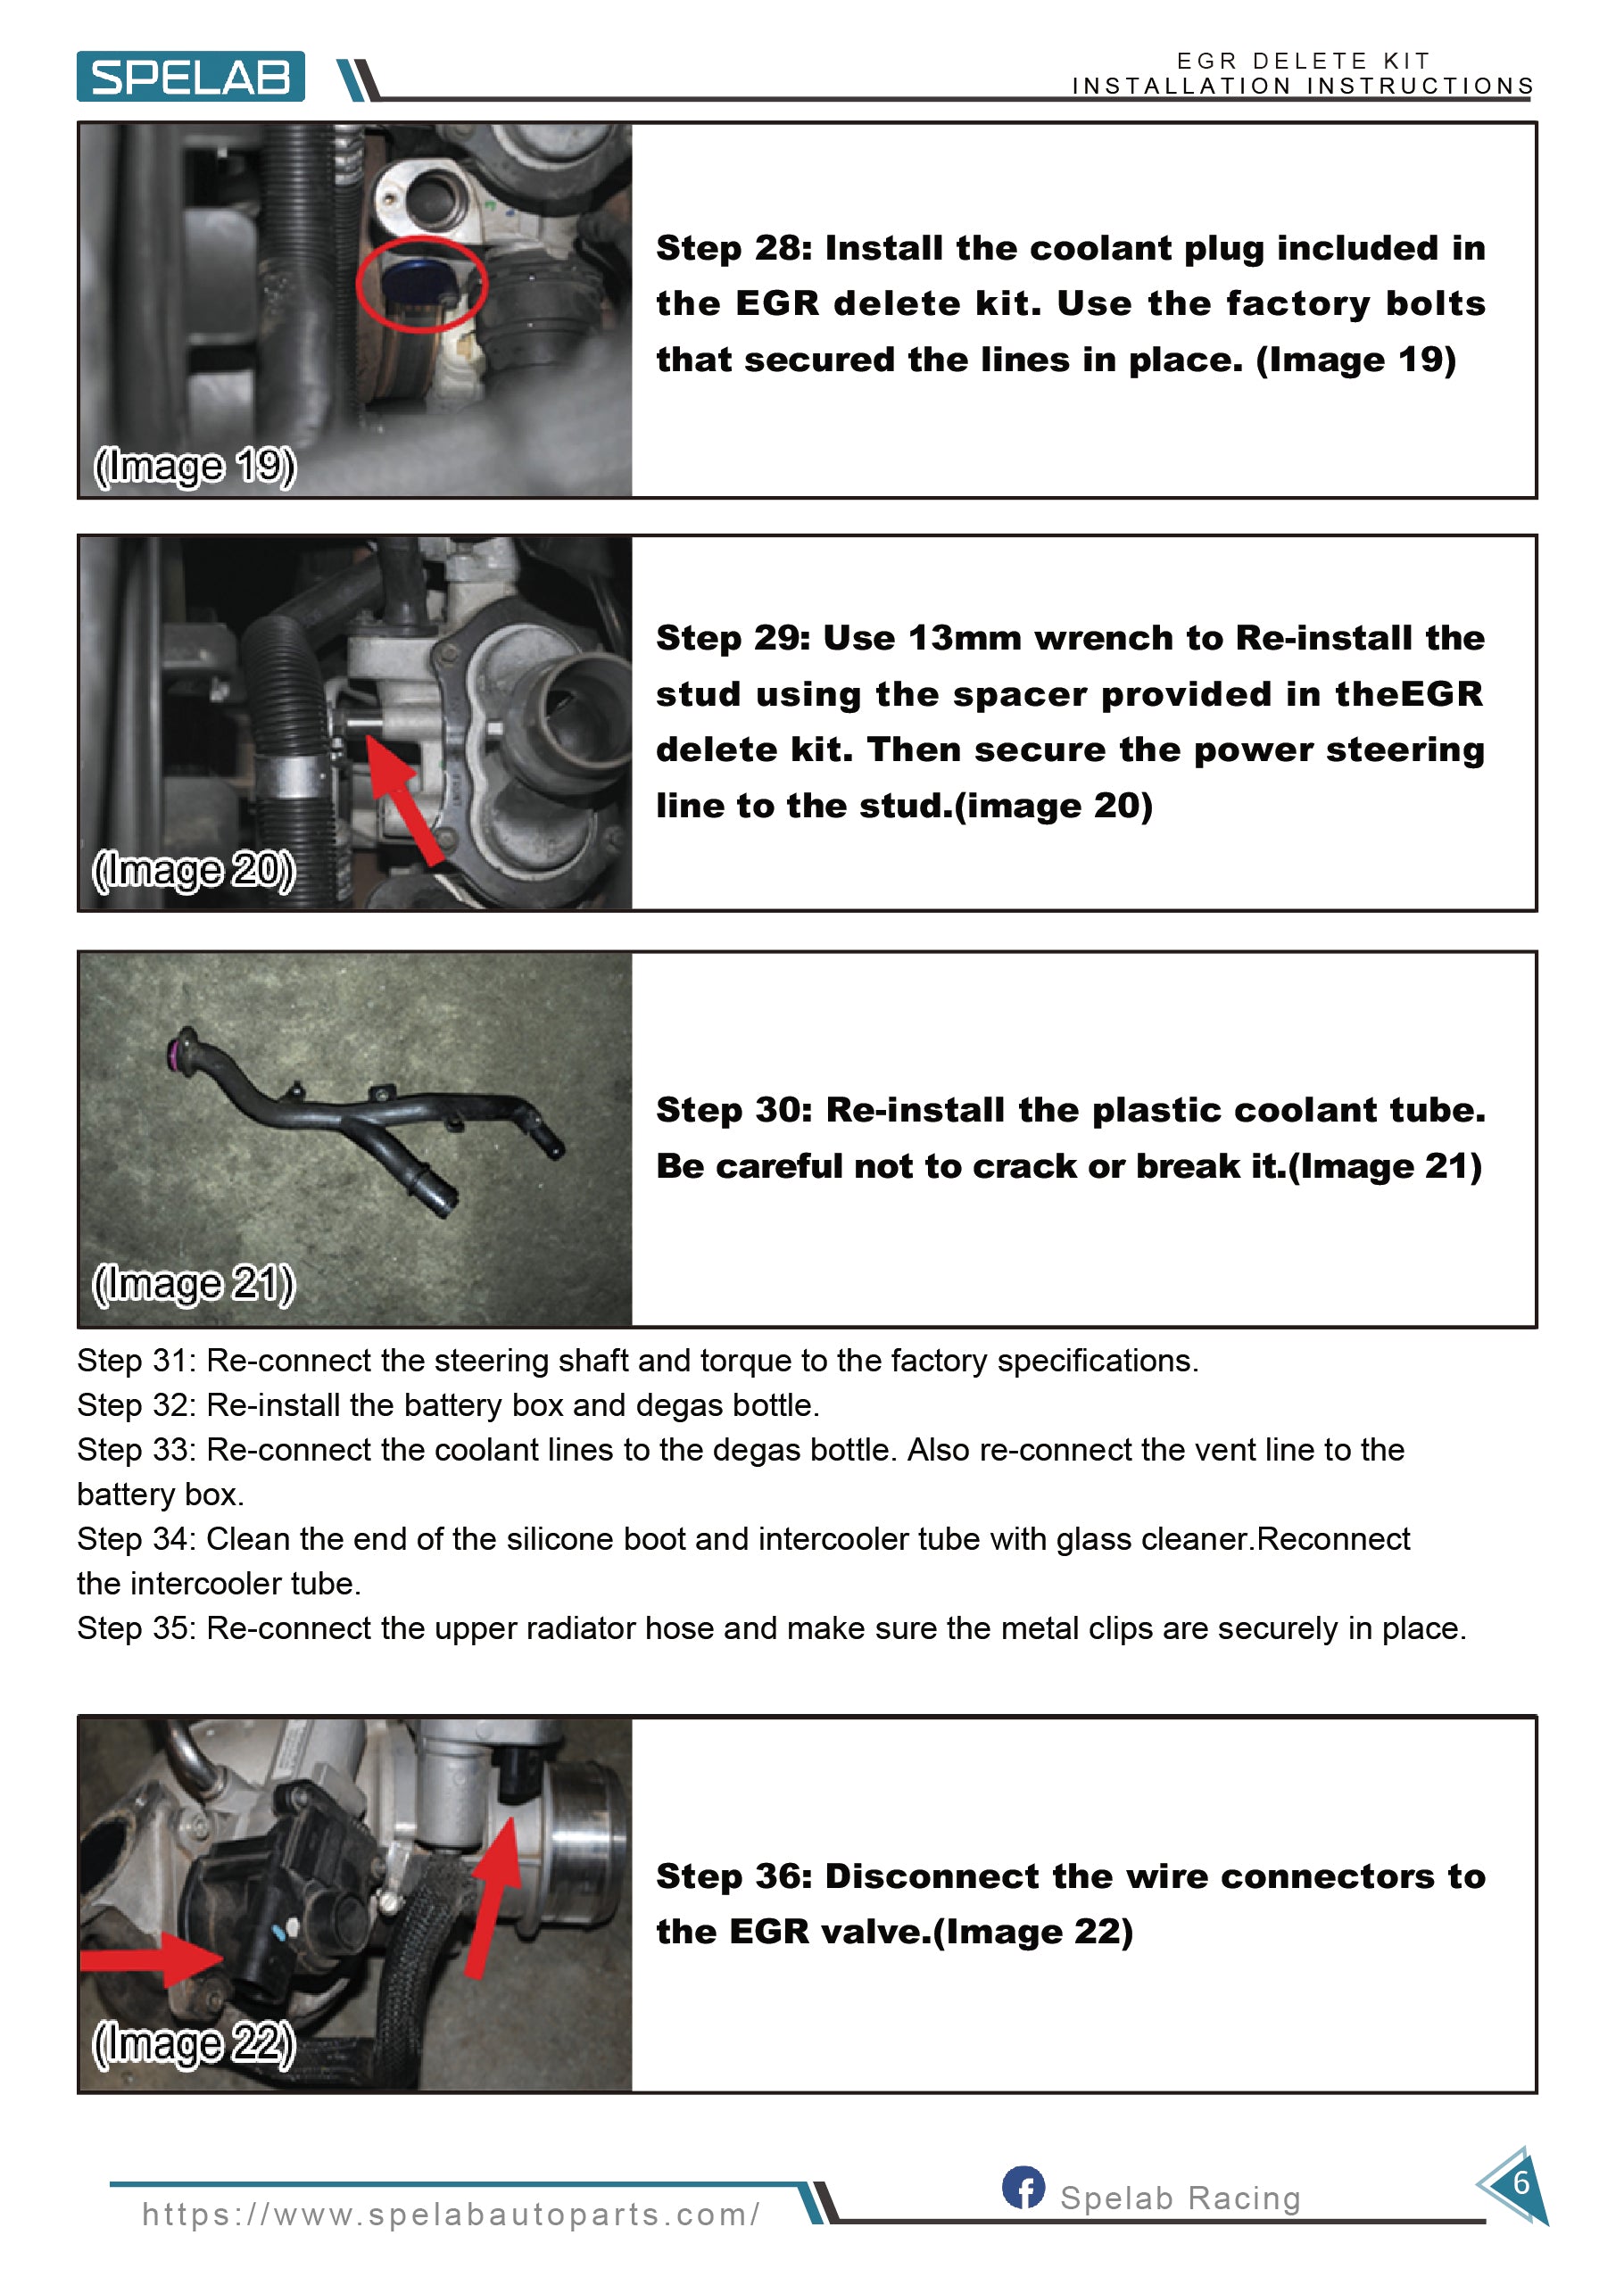
- Install the coolant plug included in the EGR delete kit. Use the factory bolts that secured the lines in place.
- Use a 13mm wrench to reinstall the stud using the spacer provided in the EGR delete kit. Then secure the power steering line to the stud.
- Reinstall the plastic coolant tube. Be careful not to crack or break it.
Reinstall Components and Finish the Job
- Reconnect the steering shaft and torque to the factory specifications.
- Reinstall the battery box and degas bottle.
- Reconnect the coolant lines to the degas bottle. Also reconnect the vent line to the battery box.
- Clean the end of the silicone boot and intercooler tube with glass cleaner. Reconnect the intercooler tube.
- Reconnect the upper radiator hose and make sure the metal clips are securely in place.
- Disconnect the wire connectors to the EGR valve.
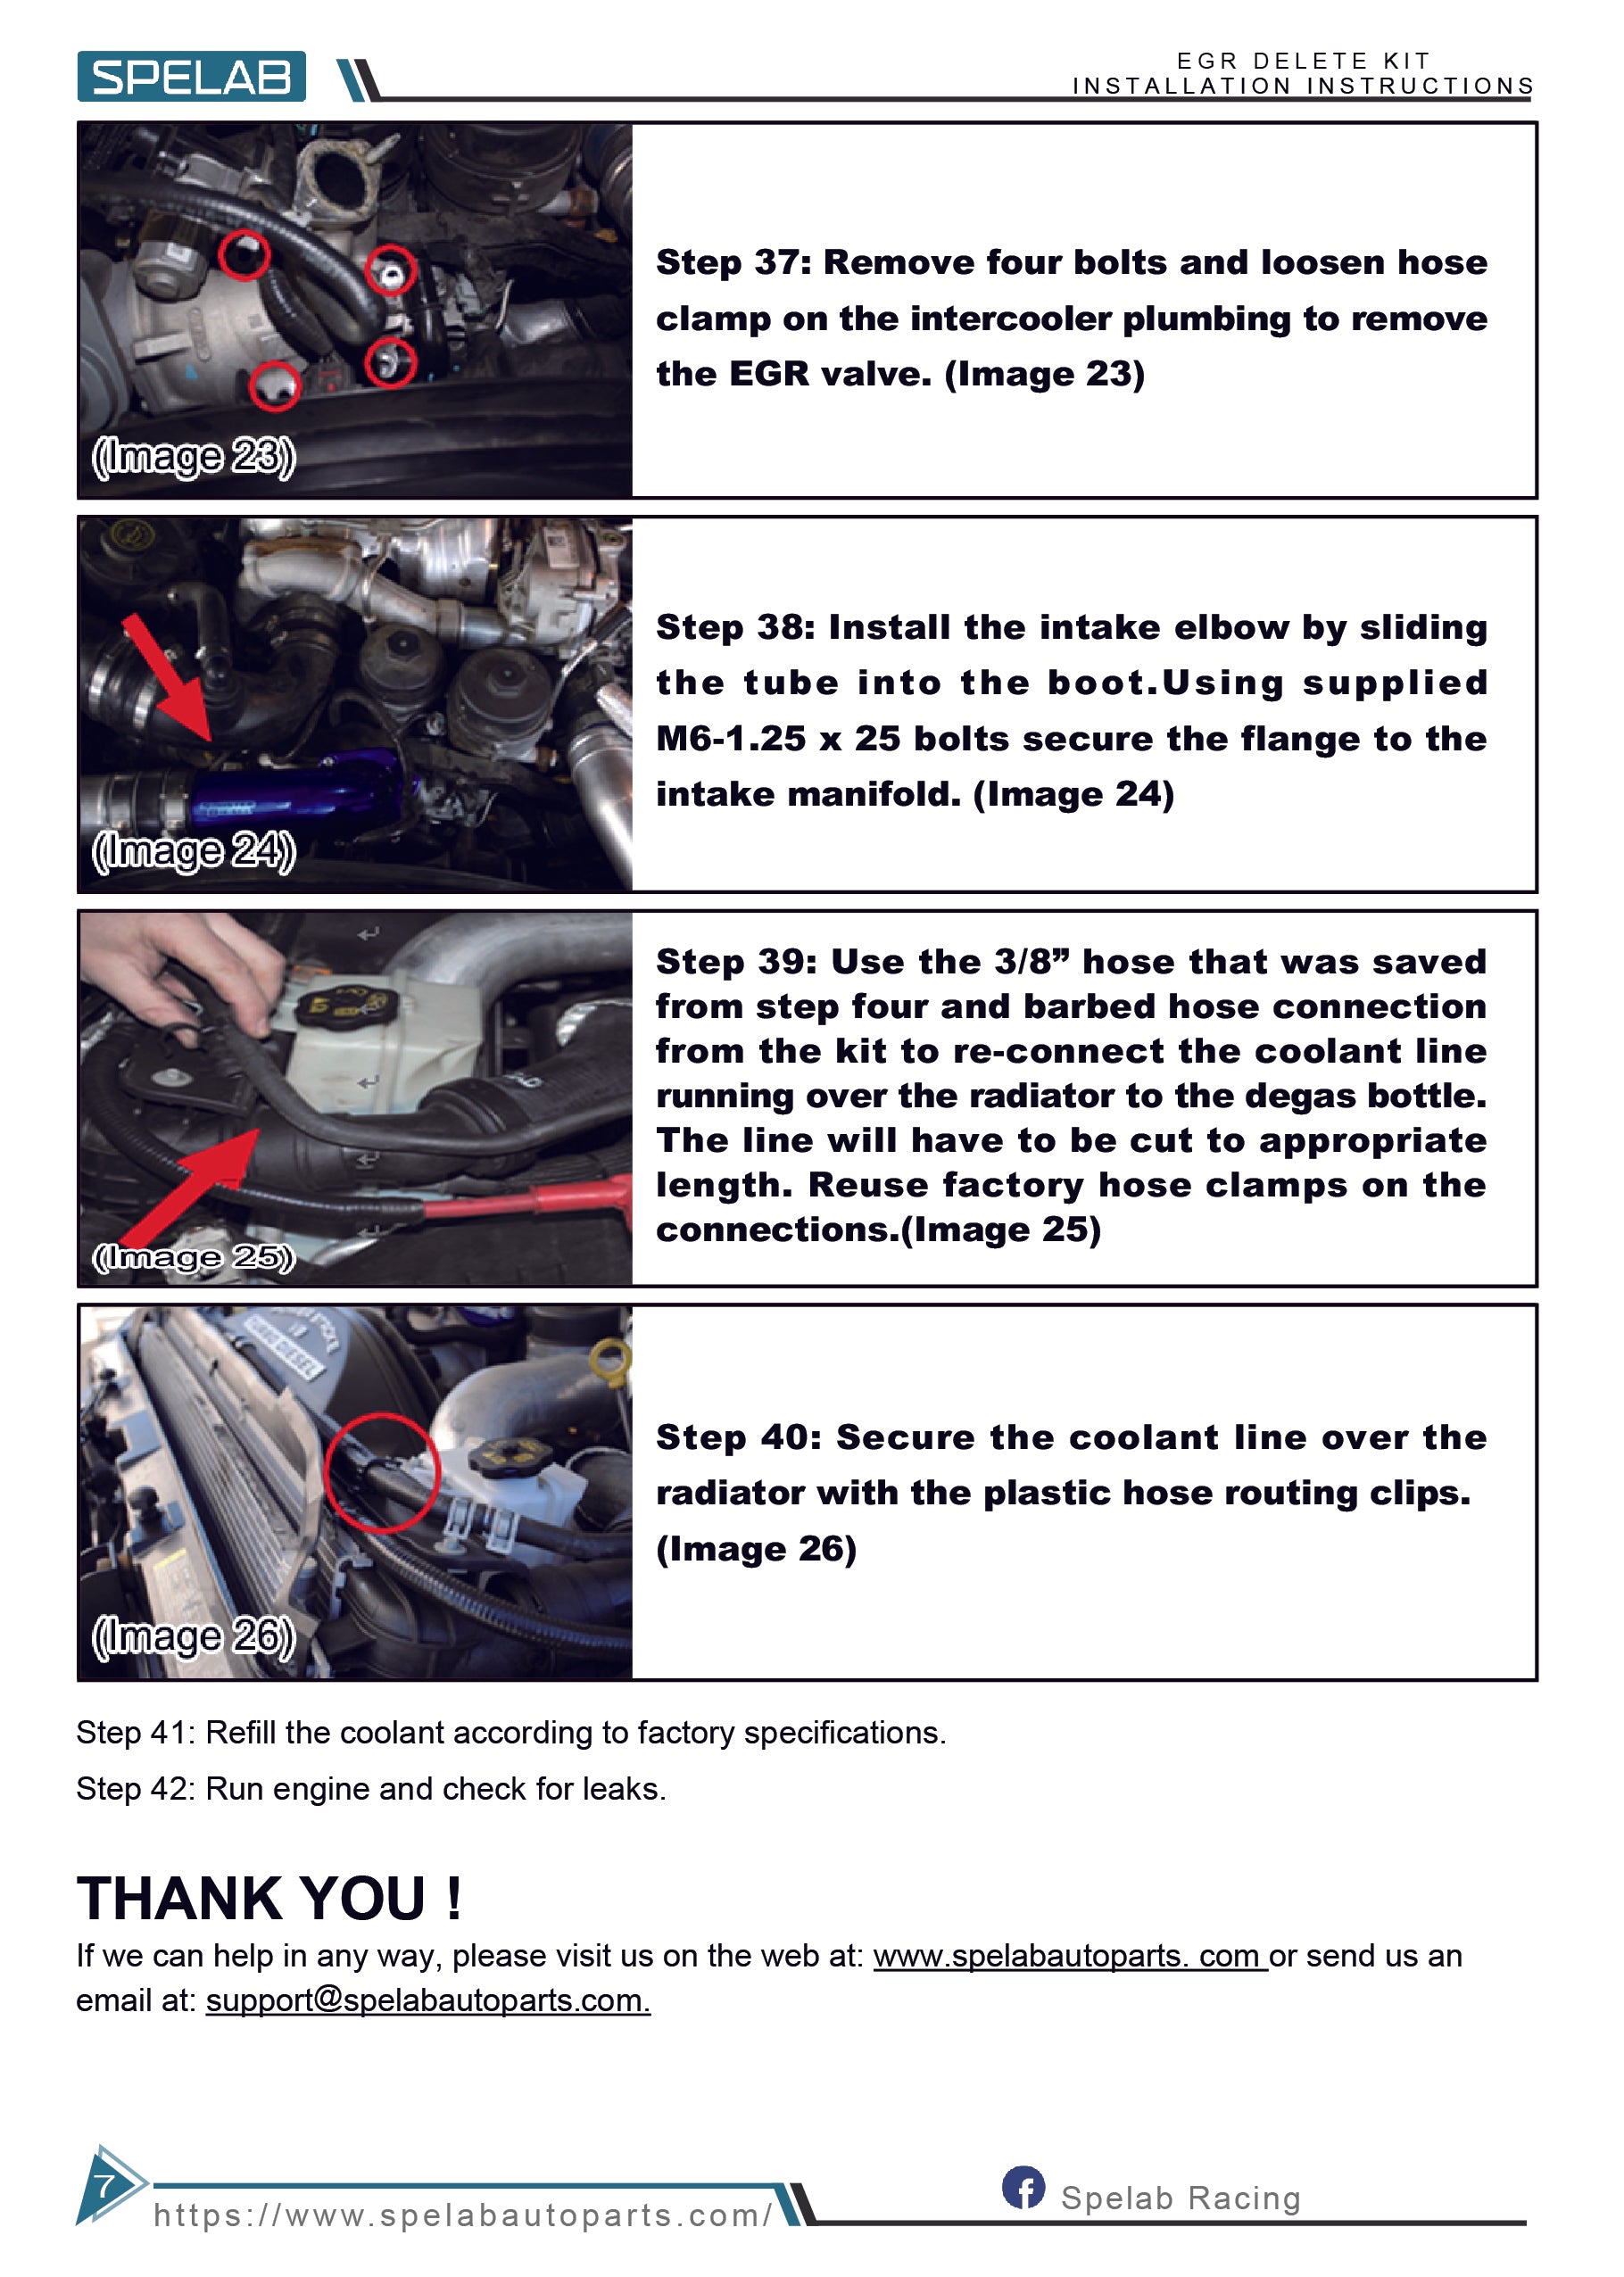
- Remove four bolts and loosen the hose clamp on the intercooler plumbing to remove the EGR valve.
- Install the intake elbow by sliding the tube into the boot. Using supplied M6-1.25 x 25 bolts, secure the flange to the intake manifold.
- Use the 3/8 inch hose that was saved from step four and the barbed hose connection from the kit to reconnect the coolant line running over the radiator to the degas bottle. The line will have to be cut to the appropriate length. Reuse factory hose clamps on the connections.
- Secure the coolant line over the radiator with the plastic hose routing clips.
- Refill the coolant according to factory specifications.
- Run engine and check for leaks.
Final Checks
- Confirm all coolant plugs, block-off plates, hose clamps, and fittings are tight.
- Verify the upper radiator hose clips are fully seated.
- Check the coolant level after the engine reaches operating temperature.
- Inspect for coolant leaks around the degas bottle, radiator hose, coolant plugs, and rerouted coolant line.
- Confirm the steering shaft and power steering line are secured before driving.
See More Installation Instructions
FAQs
Q1: Is the 6.4 EGR delete kit worth it?
A1: The 6.4 EGR delete kit can be worth it for those looking to improve engine performance, reduce potential engine issues related to the EGR system, and achieve a cleaner running engine. However, it is essential to consider the legal implications and environmental impact, as it is not street-legal in many areas and can increase emissions.
Q2: Can you just do an EGR delete?
A2: Yes, you can perform an EGR delete, but it often requires additional modifications like tuning to avoid check engine lights and ensure the vehicle runs properly. It's crucial to follow comprehensive instructions and have the right tools and parts for a successful installation.
Q3: How much difference does a EGR delete make?
A3: An EGR delete can significantly improve engine performance by reducing the intake of exhaust gases, which can lower engine temperatures, prevent soot buildup, and enhance overall efficiency. Many users report noticeable gains in power and fuel economy.
Q4: What are the downsides of EGR delete?
A4: Downsides include potential legal issues, as EGR deletes are not compliant with emissions regulations in many areas. It can also lead to higher NOx emissions, contributing to environmental pollution. Additionally, improper installation can cause engine damage or void warranties.
Q5: Do you get more HP with EGR delete?
A5: Yes, many users experience increased horsepower after an EGR delete because the engine no longer recirculates exhaust gases, allowing for a more efficient combustion process. The exact gain depends on other factors like tuning and additional modifications.
Q6: What is involved in an EGR delete?
A6: An EGR delete involves removing or blocking off the EGR valve and cooler, rerouting or capping coolant lines, and often installing tuning software to prevent error codes. The process requires mechanical knowledge and proper tools.
Q7: Is an EGR delete legal?
A7: In many regions, EGR deletes are not legal for street use because they bypass emissions controls, leading to increased pollution. They are typically only legal for off-road or racing vehicles, so it's essential to check local regulations before proceeding.
Q8: Can EGR delete improve fuel economy?
A8: Yes, an EGR delete can improve fuel economy by allowing the engine to run more efficiently and reducing the buildup of carbon deposits in the intake manifold and cylinders. This results in smoother engine operation and better fuel efficiency.
Q9: How long does it take to install an EGR delete kit?
A9: The installation time for an EGR delete kit can vary depending on experience and familiarity with the vehicle. On average, it takes about 4-6 hours, but it can take longer if complications arise or if it's the first time performing the modification.
Q10: Will an EGR delete void my warranty?
A10: Yes, performing an EGR delete can void the vehicle's warranty because it alters the factory emission control systems. It's important to consider this before proceeding and understand the potential implications on warranty coverage.